Table of Contents
Advertisement
Quick Links
Advertisement
Table of Contents

Related Manuals for Zoom MRS-1044


Summary of Contents for Zoom MRS-1044
- Page 1 Operation Manual...
-
Page 2: Usage And Safety Precautions
• Cleaning Use a soft, dry cloth to clean the MRS-1044. If necessary, slightly moisten the cloth. Do not use abrasive cleanser, wax, or solvents (such as paint thinner or cleaning alcohol), since these may dull the finish or damage the surface. -
Page 3: Table Of Contents
• • • • • • • • • • • • • • • • • • • • • • • • • • • • • • • • • • • • • • • Parts of the MRS-1044 and what they do Front panel •... - Page 4 Using the tuner • • • • • • • • • • • • • • Preventing digital copying of your master tape Appendices Specifications of the MRS-1044 Troubleshooting Problems during playback Problems during recording Problems with effects Problems with the rhythm section Problems with MIDI •...
-
Page 5: Introduction
All the functionality you need for music production – hard disk recorder, drum/bass machine, mixer, effects, and more – is provided by the MRS-1044. From creating the rhythm tracks to the processes of multitrack recording and mixdown, the MRS-1044 lets you do it all. -
Page 6: Introducing The Mrs-1044
Effect section This processes input signals or signals of the mixer section. The MRS-1044 lets you use two effects: an insert effect and a send/return effect. The following diagram shows the relationship and signal flow between each section. -
Page 7: Rhythm Section
Rhythm section The rhythm section of the MRS-1044 has 255 accompaniment patterns (several measures long) that use the internal drum/bass sound generator. (These are called "rhythm patterns.") Rhythm patterns can be played independently, or in synchronization with the recorder. Recorder section... -
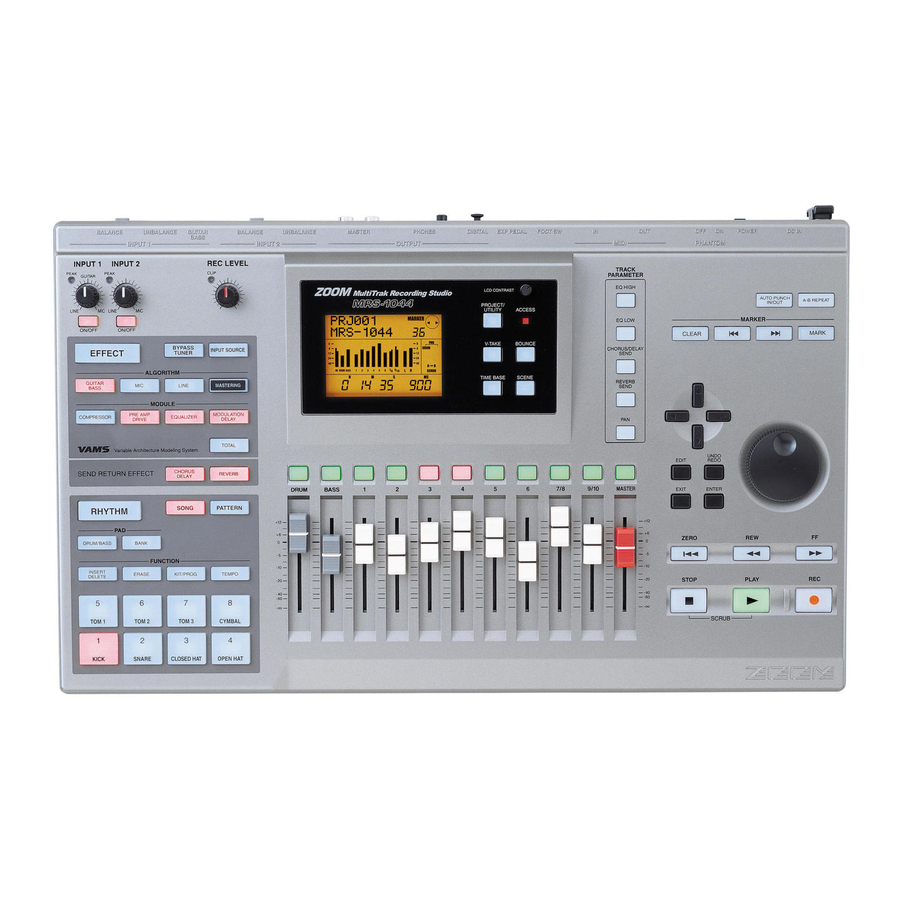
Page 8: Parts Of The Mrs-1044 And What They Do
Parts of the MRS-1044 and what they do Front panel Effect section ( ➔ p.9) Input section ( ➔ p.8) Rhythm section ( ➔ p.9) Input section (1) [PEAK] indicators These show whether the input signal (input source) from the [INPUT 1] and [INPUT 2] jacks is distorting. The indicators will light -6 dB below the level at which the sound begins to distort. -
Page 9: Effect Section
With the exception of the [TOTAL] key, the key of a module that is in use will light. ZOOM MRS-1044 • [COMPRESSOR] key • [PRE AMP/DRIVE] key • [EQUALIZER] key •... -
Page 10: Display Section
The DRUM/BASS faders adjust the volume of the drum/bass channels, and faders 1 – 6, 7/8, 9/10 adjust the volume of channels 1 – 6, 7/8, 9/10. The MASTER fader adjusts the overall volume that is sent from the [OUTPUT] jacks. ZOOM MRS-1044... -
Page 11: Track Parameter Section
• [EQ HIGH] key • [EQ LOW] key • [CHORUS/DELAY SEND] key • [REVERB SEND] key • [PAN] key ZOOM MRS-1044 Control section (10) (11) (1) [AUTO PUNCH IN/OUT] key This key is used to make settings for the "Auto Punch- in/out function"... -
Page 12: Transport Section
Use this key to record on the recorder, to record a rhythm pattern, or to begin creating a rhythm song. • BALANCE: This is an XLR balanced jack to which a mic or line-level device can be connected. • UNBALANCE: This is an unbalanced phone jack to ZOOM MRS-1044... -
Page 13: Side Panel
(9) [POWER] switch This switch turns the power of the MRS-1044 on/off. When turning off the power of the MRS-1044, you must use the [POWER] switch. If you turn the power off by simply disconnecting the AC adaptor plug, the previously recorded content or changes will be lost. -
Page 14: Connections
When connecting stereo output devices such as a synthesizer or CD player, connect the L output of the external device to the [INPUT 1] jack, and the R output to the [INPUT 2] jack. Guitar Dynamic or condenser mics CD player, etc. ZOOM MRS-1044... -
Page 15: Listening To The Demo Songs
Listening to the demo songs When shipped from the factory, the internal hard disk of the MRS-1044 contains several demo songs. After you have finished making connections, turn on the power and listen to the demo songs. Turn on the power Here's how to turn on the power of the MRS-1044 and your other equipment. -
Page 16: Turn Off The Power
/ FF [Y] key to rewind/fast-forward in steps of one second. Turn off the power When turning off the power of the MRS-1044 and your peripheral equipment, do so in the opposite order from which you turned the power on. -
Page 17: Introductory Tour
[OUTPUT] (PHONES) jack. 1-1: Load a project On the MRS-1044, all data needed to reproduce a song you created (e.g., the recorded contents of the tracks and the settings of the mixer section) is managed in terms of a "project."... -
Page 18: 1-2: Play The Rhythm Section Accom-Paniment
Step 1: Preparations before recording When the power of the MRS-1044 is turned on, the project that you used last will be loaded automatically. The following screen will appear in the display. Project number Project name Counter Hours Minutes Seconds Milliseconds The screen that appears first when the power is turned on is called the "main screen."... -
Page 19: 1-3: Save The Project
[POWER] switch to turn off the power. If the AC adaptor is pulled out of the outlet and power to the MRS-1044 is lost, all changes that occurred since the last save will be lost. This is also true of any other miscellaneous power failure. -
Page 20: Step 2: Record The First Track
[CLIP] indicator light. The current signal level is shown by the level meter (IN) located in the center of the display. If a recording track has not been specified, the input signal will be sent directly to the MASTER fader. ZOOM MRS-1044... -
Page 21: 2-2: Set The Insert Effect
2-2: Set the insert effect The MRS-1044 contains two types of effects: an "insert effect" that can be inserted into a specific signal route, and two "send/return effects" that can be applied to the entire song by using the send/return of the mixer. - Page 22 After moving in this way, you can press the PLAY [R] key to begin playback from that location. • You can also use the REW [T] / FF [Y] keys to move the current location, and then re-record from that location. If ZOOM MRS-1044...
-
Page 23: Step 3: Overdubbing
As in step 2-2, press the [GUITAR/BASS] key to select the GUITAR/BASS algorithm. Turn the dial to select the desired patch. For this example, select the patch named "Phaser" (number ZOOM MRS-1044 Step 3: Overdubbing Press the [EXIT] key. You will return to the main screen. -
Page 24: Step 4: Mixdown
3-2. Alternatively, you can load the project "Sample 3" (number 994) from the hard disk. When the MRS-1044 is shipped from the factory, this project contains pre-recorded performances on all tracks. (For details on loading a project, refer to p.17.) The track structure of "Sample 3"... - Page 25 If necessary, you can also make the level meters show the pre-fader signal levels (→ p.54). ZOOM MRS-1044 Adjust the pan In the main screen, press the [PAN] key of the TRACK PARAMETER section.
-
Page 26: 4-2: Using The Send/Return Effects
[CHORUS/DELAY] key to select a chorus/delay patch. The display will indicate the patch that is currently selected for the effect you selected. The screen shown in the next page is an example of when the [REVERB] key is pressed. ZOOM MRS-1044 Send CHORUS/ DELAY REVERB... -
Page 27: 4-3: Apply An Insert Effect To The Entire Song
Adjust the send level of other channels in the same way as in steps 6 – 7. ZOOM MRS-1044 When you have finished making settings, press the [EXIT] key. You will return to the main screen. -
Page 28: 4-4: Perform The Mixdown
[OUTPUT] jack(s), and then press the PLAY [ R ] key of the MRS-1044. When you have finished recording, stop the external recorder. Press the MRS-1044's STOP [ P ] key to stop the song. This completes the mixdown. Don't forget to save the current project on the hard disk. -
Page 29: Reference [Recorder]
Reference [Recorder] This section explains the functions and operations of the MRS-1044's recorder section. Moving to a desired location in the song (Locate function) You can specify a location within the song in time (minutes / seconds / 10 ms) units or in measure (measure / beat / tick) units, and move to that location. -
Page 30: Locating To A Mark Location
The selected mark will be deleted, and subsequent marks will be renumbered. • A deleted mark cannot be recovered. • It is not possible to delete mark number "00" located at the beginning of the song. ] key. ] key once. ZOOM MRS-1044... -
Page 31: Finding A Desired Location (Scrub/Preview Function)
Finding a desired location (Scrub/Preview function) The MRS-1044 provides a "Scrub" function that lets you search for a desired location while repeatedly playing a short region before or after the current location. This is convenient when you want to accurately find the point at which a specific sound starts or stops. -
Page 32: Playing Back Repeatedly (A-B Repeat Function)
To turn off repeat playback, press the [A-B ] key. REPEAT] key. The [A-B REPEAT] key will go dark, and repeat playback will be turned off. When the [A-B REPEAT] key goes dark, the programmed point A/B locations will be erased. ] key. ZOOM MRS-1044... -
Page 33: Re-Recording Only A Specified Region (Punch-In/Out Function)
"punch-in," and the action of switching back from recording to playback is called "punch-out." The MRS-1044 provides two ways to do this. You can use the panel keys or a foot switch (sold separately) to punch- in/out manually ("manual punch-in/out"), or cause punch- in/out to occur automatically at previously specified points ("auto punch-in/out"). - Page 34 Repeat function (→ p.32), you can automatically return to the punch-in point after punching-out, and listen to the recorded content. To do this, set the In/Out points, and then set point A and point B outside this region, and enable A-B Repeat. ] key. ZOOM MRS-1044...
-
Page 35: Using V-Takes
The level meter display area will show dots as lit/blinking/dark to indicate the V-take currently selected for each track, and the V-takes that have already been recorded. ZOOM MRS-1044 V-takes Lit: Already-recorded V-take Blinking: Currently selected V-take Dark: Unrecorded V-take... -
Page 36: Editing The Name Of A V-Take
When you have finished editing, press the [EXIT] key. You will return to the main screen. If all recorded data is erased from a V-take, the name will revert to "NO DATA." + , - . / : ; < = ZOOM MRS-1044... -
Page 37: Combining Multiple Tracks (Bounce Function)
[INPUT 1] and [INPUT 2] jacks into the bounce recording. • If you select only one mono track as the bounce- ZOOM MRS-1044 Combining multiple tracks (Bounce function) destination, the signal mixed to mono will be recorded. -
Page 38: Track Editing
The track edit menu will appear, from which you can select the desired type of editing function. Make sure that the display indicates "TR EDIT COPY," and press the [ENTER] key. A screen will appear in which you can specify the copy- source track and V-take. ZOOM MRS-1044... - Page 39 Measure display, you can specify the location in measure/beat/clock units. • By holding down STOP[ ] and pressing the PLAY[ ZOOM MRS-1044 key, you can scrub-play the track and V-take you specified in step 4. For details on using scrub-playback, refer to p.31.
-
Page 40: Copying The Data Of An Entire Track
Moving a specified region of data to another location A specified region of recorded data can be moved to the desired location of a desired track. The previous data at the ZOOM MRS-1044... - Page 41 Press the [ENTER] key. A screen will appear in which you can specify the starting location of the move-source. ZOOM MRS-1044 Use the cursor [ in the display, and turn the dial to specify the location. The location can be specified in one of the following two ways.
-
Page 42: Erasing A Specified Region
• Assigning a previously-specified mark location Move the blinking area to the MARKER area in the upper right of the display, and turn the dial to specify the mark number. ZOOM MRS-1044 ] keys to specify... -
Page 43: Erasing The Data Of An Entire Track
Erase In the main screen, press the [V-TAKE] key. The [V-TAKE] key will light, and a screen will appear in ZOOM MRS-1044 which you can switch the V-take of each track. Press the [PROJECT/UTILITY] key. A menu will appear in which you can edit recorded data in units of entire tracks. -
Page 44: Capturing The Recorded Contents Of A Track
Capturing the recorded contents of a track The MRS-1044 lets you capture the recorded data of a desired track, and temporarily store it on the hard disk. The captured data can be swapped (exchanged) with a current track when needed. -
Page 45: Swapping With The Captured Data
When a captured track is selected, the display will indicate "SWAP." If you select a track that has not been captured, the display will indicate "CAPTURE." ZOOM MRS-1044 Capturing the recorded contents of a track Press the [ENTER] key. The display will ask "SWAP SURE?"... -
Page 46: Reference [Mixer]
Reference [Mixer] This section explains the functions and operation of the two mixers built into the MRS-1044. About the mixer The mixer of the MRS-1044 is divided into two sections: an "input mixer" that processes the input signals from the [INPUT 1/2] jacks, and a "track mixer"... -
Page 47: Basic Operation Of The Input Mixer
• The level of the signal sent to the recording track will change according to the settings of the insert effect parameters. If you switch insert effect patches or edit the ZOOM MRS-1044 Basic operation of the input mixer parameters, you should once again check whether the recording level is appropriate. -
Page 48: Adjusting The Depth Of The Send/Return Effects
Here's how to adjust the pan (stereo position) of the signal sent from the input mixer to the [OUTPUT] jacks or recording tracks, or the balance (the volume balance between two channels). Press the [PAN] key. A screen will appear in which you can adjust the PAN parameter. ZOOM MRS-1044... -
Page 49: Basic Operation Of The Track Mixer
1 and 2 are enabled) or the balance (if both INPUT 1 and 2 are enabled). • When one mono track is selected as the recording track The PAN parameter will have no effect. ZOOM MRS-1044 Basic operation of the track mixer Basic operation of the track mixer Adjusting the volume/pan/EQ... -
Page 50: Adjusting The Effect Depth
(1/2, 3/4, 5/6) can be linked. (This is referred to as "stereo link.") The parameters of two stereo-linked channels will operate in tandem in the same way as channels 7/8 or 9/10. Press the TRACK PARAMETER section [PAN] key. ZOOM MRS-1044... -
Page 51: Saving/Recalling Mixer Settings (Scene Function)
(The even-numbered fader will have no effect.) • The parameters as well as the status keys of 2 stereo- linked channels will operate in tandem. ZOOM MRS-1044 Saving/recalling mixer settings (Scene function) Saving/recalling mixer settings (Scene function) The current mixer and effect settings can be saved as a "scene"... -
Page 52: Recalling A Saved Scene
When you press the [MARK] key at a location where a mark has been assigned, a screen will appear in which you ] keys can assign a scene to the corresponding mark. ] key to locate to the beginning of the ZOOM MRS-1044... - Page 53 7. Press the [EXIT] key. You will return to the main screen. ZOOM MRS-1044 Saving/recalling mixer settings (Scene function) Using the procedure from steps 6 – 10, assign a mark to each point at which you want the mix to change, and assign a scene to each of these marks.
-
Page 54: Switching The Level Meter Display Type
Switching the level meter display type Switching the level meter display type With the MRS-1044's default settings, the level meters displayed in the center of the screen will indicate the level of the signals that have passed through the [REC LEVEL] controls/faders (post-fader). -
Page 55: Reference [Rhythm]
A bass program is a single bass sound, such as an electric bass or acoustic bass. You can choose one of the 16 different bass sounds built into the MRS-1044, and use the front panel pads 1 – 8 to play a scale, or use it as a sound generator for accompaniment. -
Page 56: Playing Rhythm Patterns
Rhythm Pattern mode I Synchronizing the recorder section and rhythm section With the default settings of the MRS-1044, the rhythm section will operate in synchronization with the recorder section. When you operate the transport to make the recorder section begin running, the rhythm pattern or rhythm song will also begin playing. -
Page 57: Changing The Tempo Of The Rhythm Pattern
In Rhythm Pattern mode, press the [TEMPO] key. The current tempo value will be displayed. Tempo value ZOOM MRS-1044 ] key. Turn the dial to adjust the tempo. The tempo can be adjusted in steps of 0.1 over a range of 40 –... -
Page 58: Creating A Rhythm Song
When you create a new project on the MRS-1044, the rhythm song will always be empty. Before you perform the following procedure, make sure that the DRUM, BASS, and MASTER faders of the panel are raised, and that the DRUM and BASS status keys are lit. - Page 59 This operation will not affect the original rhythm pattern. ZOOM MRS-1044 To finalize the selected rhythm pattern, press the [ENTER] key. The rhythm pattern data will be input at the current location.
-
Page 60: Inputting Chord Data
For details on rhythm pattern chords, refer to p.69. Turn the dial to specify the note name (C – B) that will be the root of the chord. The following screen shows an example of when the chord ] key. ] keys to make the display ZOOM MRS-1044... - Page 61 (1) Moving in steps of a measure Use the cursor [ ] keys to move to the beginning of the preceding or following measure. ZOOM MRS-1044 (2) Specify the location in 4th note units Use the REW [ of the preceding or following quarter note.
-
Page 62: Inputting Tempo Data
In this screen, symbols displayed following "EV → " such as "Pt" or "TS" let you see what type of events are input at the current location. The following table shows the types of events that can be input, and the corresponding symbols. ZOOM MRS-1044... -
Page 63: Playing A Rhythm Song
Turn the dial to input the value. Input the remaining events in the same way. The events you input can be edited in the following ways. ZOOM MRS-1044 To edit the value of an event Range Display the event that you want to edit, and turn the dial to input the new value. -
Page 64: Editing A Rhythm Song
The following screen will appear in the display. Turn the dial to select the starting measure of the copy-source region, and press the [ENTER] key. Turn the dial to select the last measure of the copy- source region, and press the [ENTER] key. ZOOM MRS-1044... -
Page 65: Transposing The Entire Rhythm Song
To return to the main screen, press the [EXIT] key several times. By adjusting the reference pitch of the MRS-1044's built-in tuner, you can make fine adjustments to the pitch of the bass program. (For details on the tuner, refer to p.92.) -
Page 66: Creating An Original Rhythm Pattern
The bass track will be selected. Now you can tap pads 1 – 8 to play the scale of the bass program selected for the bass track. An example of the scale of the bass program assigned to the pads ZOOM MRS-1044... - Page 67 Make sure that the [PATTERN] key is lit, and press the [RHYTHM] key. The [RHYTHM] key will light, and the rhythm pattern ZOOM MRS-1044 screen will appear. A rhythm pattern can be recorded or edited only when the [RHYTHM] key is lit.
- Page 68 Recording will resume when you press the REC [ once again. • You can also input a pattern using a MIDI controller connected to the MRS-1044's [MIDI IN] connector, instead of tapping the pads. If you want to erase the performance of a specific pad from the track, hold down the [ERASE] key and press the corresponding pad.
-
Page 69: Specifying The Chord Of A Rhythm Pattern
Kick Bass track When you have finished recording, press the STOP ] key. ZOOM MRS-1044 Creating an original rhythm pattern Pattern recording will stop, and you will return to the rhythm pattern screen. Press the PLAY [ pattern that you recorded. -
Page 70: Editing A Rhythm Pattern
Turn the dial to adjust the setting, and press the [EXIT] key. The change will be finalized, and you will return to the rhythm pattern edit menu. To return to the main screen, press the [EXIT] key several times. ZOOM MRS-1044... -
Page 71: Copying A Rhythm Pattern
] keys to make the display read "EDIT NAME," and press the [ENTER] key. The rhythm pattern name will appear, and the first character will be blinking. ZOOM MRS-1044 Editing a rhythm pattern Use the cursor [ ] keys to move the blinking area, and turn the dial to change the character. -
Page 72: Importing Rhythm Patterns And The Rhythm Song From Another Project
The screen display and operation will be different for each item. For details refer to the sections that follow. For details on MIDI operations, refer to page 90. For details on the Import procedure, refer to the preceding section. ZOOM MRS-1044... -
Page 73: Changing The Length Of The Pre-Count (Count)
• SOFT: The volume will be soft, regardless of how strongly you tap. • MEDIUM: The volume will be medium, regardless of ZOOM MRS-1044 Editing various settings of the rhythm section how strongly you tap. • LOUD: The volume will be loud, regardless of how strongly you tap. -
Page 74: Reference [Effects]
Reference [Effects] This section explains how to use the effects built into the MRS-1044. About the effects The MRS-1044 has two types of effects, an "insert effect" and two "send/return effects." The two types can be used simultaneously. The two types of effect are described below in detail. -
Page 75: Using The Insert Effect
DRIVE VOL PDL A newly created project contains 220 patches designed by ZOOM, and these patches are organized according to the four algorithms. You can instantly switch insert effect settings simply by selecting the appropriate algorithm, and then selecting a patch. The following table shows how the patches are organized for each algorithm. -
Page 76: Changing The Insert Location Of The Insert Effect
• WET: The input signal that has passed through the insert effect will be recorded on the track (default setting). • DRY: Only the unprocessed input signal will be recorded on the track. Even in this case, however, the insert effect will be applied to the monitor signal. ZOOM MRS-1044... -
Page 77: Selecting The Patch For The Insert Effect
When you press the ALGORITHM key, the display will show the insert effect patches of that algorithm. ZOOM MRS-1044 Using the insert effect Turn the dial to select the desired patch. As you turn the dial, new patches will be recalled immediately. -
Page 78: Editing The Insert Effect Patch
EFFECT ( M → S ) Channel Track mixer Channel EFFECT ( S → S ) Channel Track mixer EFFECT Channel ( M → S ) Track mixer EFFECT Channel ( S → S ) MASTER fade OUTPUT ZOOM MRS-1044... - Page 79 LINE 3BAND COMP/ MASTERING NORMALIZE LO-FI ZOOM MRS-1044 From the MODULE keys, press the key for the effect module that you want to edit. When editing a patch, use the MODULE keys to select the PHASER module for editing. The table below shows how the POSITION MODULE keys correspond to the various effect modules.
-
Page 80: Storing An Insert Effect Patch
Turn the dial to select the store-destination patch number, and press the [ENTER] key. The display will ask "SURE?" Press the [ENTER] key. The patch will be stored, and you will return to the patch select screen. ZOOM MRS-1044... -
Page 81: Editing The Name Of An Insert Effect Patch
"STORE," and press the [ENTER] key three times. The patch will be stored with the edited name, and you will return to the patch select screen. ZOOM MRS-1044 Using the send/return effects This section explains how to select and edit patches for the... -
Page 82: Editing A Send/Return Effect Patch
You will return to the patch select screen. Be aware that if you return to the patch select screen and select another patch, your edits will be lost. If you want to keep the edited patch, refer to the following section. ZOOM MRS-1044... -
Page 83: Storing A Send/Return Effect Patch
When either key is pressed, the currently selected patch will be displayed. If necessary, turn the dial to select the patch ZOOM MRS-1044 Using the send/return effects whose name you want to edit. -
Page 84: Importing Patches From Another Project
[EXIT] key to cancel. When the data has been imported, you will return to the "UTILITY IMPORT" screen. At this time, all effect patches of the project you selected in step 3 will be overwritten onto the current project. ZOOM MRS-1044... -
Page 85: Reference [Project]
Reference [Project] This section explains operations that affect an entire project. About projects On the MRS-1044, the data needed to reproduce a song you create is managed in units called "projects." A project contains the following data. • The data recorded on V-takes 1 – 10 of tracks 1 – 10 •... -
Page 86: Loading A Project (Project Select)
• When you press the [ENTER] key, the project that you had been working on will be saved automatically before the selected project is loaded. • When the power of the MRS-1044 is turned on, the project that you were last working on will be loaded automatically. -
Page 87: Duplicating A Project (Project Copy)
Project name Project number ZOOM MRS-1044 To execute the erasure, press the [ENTER] key. To cancel, press the [EXIT] key. When the erase operation has been completed, you will return to the main screen. -
Page 88: Storing A Project (Project Store)
If the AC adaptor is pulled out of the outlet and power to the MRS-1044 is lost, all changes that occurred since the project was last stored will be lost. This is also true of any other miscellaneous power failure. As a precaution against such occurrences, we recommend that you store the project periodically. -
Page 89: Reference [Midi]
Performance data can be sent from a MIDI keyboard or computer to the MRS-1044, to play a drum kit or bass program. When creating a rhythm pattern, you can also record a performance from an external MIDI device instead of using the pads. -
Page 90: Making Midi-Related Settings
Note messages from an external MIDI device on that MIDI channel to play the sounds of the MRS-1044's drum or bass track (i.e., to play the drum kit or bass program). Also, when you play back a rhythm... -
Page 91: Specifying Transmission Of Song Position Pointer Messages (Spp)
Timing Clock will be transmitted even if the drum and/or bass tracks are muted (DRUM/BASS status keys dark). • When using MIDI Timing Clock messages transmitted from the MRS-1044 to synchronize the operation of an exter nal MIDI device, you should also tur n on transmission... -
Page 92: Reference [Other]
Reference [Other] This section explains how to use functions such as the MRS-1044's built-in tuner, and how to change the function of the foot switch. Changing the function of the foot switch With the default settings of the MRS-1044, a separately sold foot switch (ZOOM FS01) connected to the [FOOT SW] jack can be used to play/stop the MRS-1044. -
Page 93: Preventing Digital Copying Of Your Master Tape
To disable bypass for the insert effect, press the [BYPASS/TUNER] key. ZOOM MRS-1044 Preventing digital copying of your master tape Preventing digital copying of your master tape When mixing down to a DAT recorder etc. - Page 94 When you have finished making settings, press the [EXIT] key several times. You will return to the main screen. This setting must be made before you mixdown. If you turn the setting ON after mixing down, it will have no effect. ZOOM MRS-1044...
-
Page 95: Appendices
Appendices Specifications of the MRS-1044 Recorder Physical tracks Virtual tracks 100 (10 virtual tracks for each track) Drum track 1 (stereo) Bass track 1 (mono) Simultaneously recordable tracks 2 tracks Recorded data format 16 bit linear (uncompressed) Maximum recording time More than 44 hours (calculated for... -
Page 96: Troubleshooting
Troubleshooting Troubleshooting If the MRS-1044 does not function as you expect, check the following points first. Problems during playback No sound, or sound is very weak • Check the connections to your audio system, and the volume of your audio system. -
Page 97: Problems With The Rhythm Section
Can't synchronize with an external MIDI device • Make sure that a MIDI cable is correctly connected from the [MIDI OUT] connector of the MRS-1044 to the MIDI IN connector of the external device. • On the MRS-1044, make sure that transmission is enabled for the Timing Clock, Song Position Pointer, and Start/Stop/Continue messages ( →... -
Page 98: Effect Type/Parameter List
Combination of vintage distortion and cabinet simulator. GAIN MZ+CAB Combination of metal-style distortion and cabinet simulator. GAIN 9002+CB Combination of the Zoom 9002 distortion and cabinet simulator. Aco.Sim Transforms the sound of an electric guitar into an acoustic-guitar-like tone. COLOR E-AcPRE Pre-amp for electric-acoustic. - Page 99 -12 – 12 -12 – 12 LEVEL 1 – 8 ZNR MODULE TYPE PARAMETER 1 Zoom's proprietary noise reduction that minimizes noise when you are not playing. Explanation of ZNR MODULE parameters Parameter name Range OFF,1 – 30 THRSHOLD VOL PDL MODULE...
- Page 100 Specifies the output level of the module. PARAMETER 3 PARAMETER 4 TONE LEVEL DE-ESSER TONE 1 LEVEL 1 COLOR 2 PARAMETER 5 PARAMETER 6 ATTACK_2 LEVEL_2 RELEASE2 LEVEL_2 Explanation of parameter PARAMETER 5 PARAMETER 6 TONE 2 LEVEL 2 ZOOM MRS-1044...
- Page 101 TYPE PARAMETER 1 THRSHOLD ZNR (*1) Zoom's proprietary noise reduction that minimizes noise when you are not playing. THRSH 1 ZNR (*2) Zoom's proprietary noise reduction that minimizes noise when you are not playing. *1: When a SINGLE type effect is selected for the COMP/LIM module...
- Page 102 Specifies the frequency at which the Mid/Hi bands will be divided. Specifies the mix amount of the high range. Specifies the mix amount of the mid range. Specifies the mix amount of the low range. PARAMETER 5 PARAMETER 6 TONE 2 MIX 2 PARAMETER 5 MIX_LOW ZOOM MRS-1044...
- Page 103 *For an explanation of the parameters, refer to the GUITAR/BASS algorithm. ZNR MODULE TYPE PARAMETER 1 Zoom's proprietary noise reduction that minimizes noise when you are not playing. *For an explanation of the parameters, refer to the GUITAR/BASS algorithm. VOL PDL MODULE TYPE...
- Page 104 *For an explanation of the parameters, refer to the GUITAR/BASS algorithm. ZNR MODULE TYPE PARAMETER 1 Zoom's proprietary noise reduction that minimizes noise when you are not playing. *For an explanation of the parameters, refer to the GUITAR/BASS algorithm. VOL PDL MODULE TYPE...
-
Page 105: Send Return Effect
REV TIME 1 – 30 EQ_HIGH -12 – 6 EQ_LOW -12 – 6 E/R MIX 0 – 30 EFX LVL 0 – 30 ZOOM MRS-1044 PARAMETER 3 PARAMETER 4 DEPTH RATE PRE DLY DAMP EFX LVL TONE EFX LVL Explanation of parameter Selects the LFO phrase;... -
Page 106: Effect Patch List
Wet new hard rock sound HDR-Drv Clean sound suitable for arpeggios, with octave pitch 12-Clean Cry-Lead "Cry effect" -style sound ZakWah Lead sound with auto-wah TheRing Ring modulator also usable as a sound effect for recording Comment Application Guitar ZOOM MRS-1044... - Page 107 AG/Vo 3 Patch that applies effects to aggressively modify the vocal character AG-Mix 1 Enhanced sound effective for mixdown (strumming) AG-Mix 2 Enhanced sound effective for mixdown (arpeggios) EMPTY ZOOM MRS-1044 Comment Comment Effect patch list Application Bass Electro-acoustic Acoustic guitar...
- Page 108 Simulates the reverberation of a rehearsal studio (garage) TrStudio Room reverb with a mild tonal quality DarkRoom Reverb tuned to enhance the vocal VcxRev Simulates the reverberation of a tunnel Tunnel EMPTY Comment Comment Comment Comment Application Keyboard Piano Rhythm Audio Application Mastering ZOOM MRS-1044...
-
Page 109: Pattern List
* Select the drum kit / bass program and tempo as desired. (With the factory settings, project number 999 is protected. If you want to change the drum kit or bass program, you must first defeat the Protect setting. See p.87.) * If you want to use these patterns in another project, execute the Rhythm Import operation (see p.72). ZOOM MRS-1044 Pattern Pattern... - Page 110 04JAZZ02 04JAZZ03 04JAZZ04 BOSSA CNTRY 68BLUS DANCE INTRO01 INTRO02 INTRO03 INTRO04 INTRO05 INTRO06 INTRO07 INTRO08 INTRO09 INTRO10 INTRO11 INTRO12 INTRO13 INTRO14 INTRO15 INTRO16 INTRO17 INTRO18 COUNT ENDING01 ENDING02 ENDING03 ENDING04 ENDING05 ENDING06 ENDING07 METRO4/4 METRO3/4 All Mute EMPTY ZOOM MRS-1044...
- Page 111 * Select the drum kit / bass program and tempo as desired. (With the factory settings, project number 997 is protected. If you want to change the drum kit or bass program, you must first defeat the Protect setting. See p.87.) * If you want to use these patterns in another project, execute the Rhythm Import operation (see p.72). ZOOM MRS-1044 Pattern Pattern...
- Page 112 LATNs2FA INTRO09 LATNs2VB INTRO10 LATNs2FB INTRO11 MidE01 INTRO12 MidE02 INTRO13 INTRO14 MidE03 MidE04T INTRO15 MidEs1VA INTRO16 MidEs1FA INTRO17 Pattern Pattern Chord Chord number name INTRO18 COUNT ENDING01 ENDING02 ENDING03 ENDING04 ENDING05 ENDING06 ENDING07 METRO4/4 METRO3/4 All Mute EMPTY ZOOM MRS-1044...
-
Page 113: Drum Kit / Bass Program List
25DIST Distortion 26GNPERC General Percussion PERCUSSION 27DRSKIN Drum Skins 28CLKSTK Click and Sticks ENSEMBLE PARTS 29LOPERC Lo Percussion 30HIPERC Hi Percussion ZOOM MRS-1044 I Bass Program List Kit name Display 00LIVEBS 01STUDIO 02EPICBS 03FUNKBS 04BALLAD 05ACOUBS 06ROCKBS 07SYNTH 08TECHNO 09NOFRET... - Page 114 Doumbek 1 Wood Block Low Doumbek 2 Jingle Bell Doumbek 3 Castanet Latin Sell 1 Mute Surdo Cabasa Open Surdo Whistle 1 Muted Triangle Whistle 2 Open Triangle BANK3 NOTE# BANK3 NOTE# BANK3 NOTE# BANK3 NOTE# BANK3 NOTE# ZOOM MRS-1044...
- Page 115 PAD7 TOM 3 Shaker 3 PAD8 CYMBAL Vibraslap * On the MRS-1044, each drum kit is independent. This means that instruments with identical names may sound different. I Bass pad note# correspondence table For E min min-1 min-2 PAD No.
-
Page 116: Midi Implementation
All Sounds Off All Notes Off Description Note Off kk: note number Note On kk: note number vv: velocity Channel Volume vv: volume value All Notes Off Song Position Pointer shsl: song position Timing Clock Start Continue Stop ZOOM MRS-1044... -
Page 117: Midi Implementation Chart
MIDI implementation chart [HardDisk Recorder Model MRS-1044 MIDI Implementation Chart Function ... Basic Default Channel Changed Default Mode Messages Altered Note Number True voice Velocity Note ON Note OFF After Key's Touch Ch's Pitch Bend Control Change Prog Change True #... -
Page 118: Index
Start/Stop/Continue transmission Timing Clock transmission [MIDI IN] / [MIDI OUT] connectors 13, 89 Mixdown Mixer Mixer section [MODULATION/DELAY] key 9, 79 MODULE keys 9, 79 Note messages [ON/OFF] keys 8, 20, 47 [OUTPUT] jacks DIGITAL MASTER PHONES Overdubbing ZOOM MRS-1044... - Page 119 9, 81 REW[ ] key [RHYTHM] key Rhythm pattern Changing the tempo of a rhythm pattern ZOOM MRS-1044 Selecting and playing a rhythm pattern Rhythm pattern Edit menu Rhythm Pattern mode Rhythm pattern screen Rhythm pattern, creating a Recording on a rhythm pattern 67...
- Page 120 ZOOM CORPORATION NOAH Bldg., 2-10-2, Miyanishi-cho, Fuchu-shi, Tokyo 183-0022, Japan PHONE: +81-42-369-7116 FAX: +81-42-369-7115 Web Site: http://www.zoom.co.jp Printed in Japan MRS-1044 - 5000-2...