Table of Contents
Advertisement
INSTALLER: Leave this manual with party responsible for use and operation.
OWNER: Retain this manual for future reference.
NOTICE: DO NOT discard this manual!
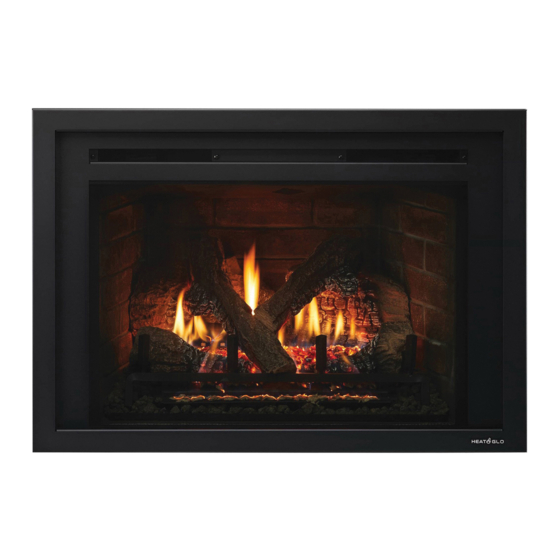
Models:
This appliance may be installed as an OEM
installation in manufactured home (USA
only) or mobile home and must be installed
in accordance with the manufacturer's
instructions and the Manufactured Home
Construction and Safety Standard, Title 24
CFR, Part 3280 in the United States, or the
Standard for Installation in Mobile Homes,
CAN/CSA Z240 MH Series, in Canada.
This appliance is only for use with the type(s)
of gas indicated on the rating plate. This
appliance is not convertible for use with other
gases, unless a certified kit is used.
In the Commonwealth of Massachusetts installation must be
performed by a licensed plumber or gas fitter.
See Table of Contents for location of additional Commonwealth
of Massachusetts requirements.
Heat & Glo • ESCAPE-35-IFT, ESCAPE-30-IFT Installation Manual • 2550-980 Rev. B • 6/18
Installation Manual
Installation and Appliance Setup
WARNING:
FIRE OR EXPLOSION HAZARD
Failure to follow safety warnings exactly
could result in serious injury, death, or
property damage.
• DO NOT store or use gasoline or other flam-
mable vapors and liquids in the vicinity of this
or any other appliance.
• What to do if you smell gas
- DO NOT try to light any appliance.
- DO NOT touch any electrical switch. DO
NOT use any phone in your building.
- Leave the building immediately.
- Immediately call your gas supplier from
a neighbor's phone. Follow the gas sup-
plier's instructions.
- If you cannot reach your gas supplier, call
the fire department.
• Installation and service must be performed
by a qualified installer, service agency, or the
gas supplier.
DANGER
DO NOT TOUCH GLASS
NEVER ALLOW CHILDREN
A barrier designed to reduce the risk of
burns from the hot viewing glass is provided
with this appliance and shall be installed for
the protection of children and other at-risk
individuals.
HOT GLASS WILL
CAUSE BURNS.
UNTIL COOLED.
TO TOUCH GLASS.
1
Advertisement
Table of Contents

Related Manuals for Heat & Glo ESCAPE-30LP-IFT


Summary of Contents for Heat & Glo ESCAPE-30LP-IFT
- Page 1 Installation Manual Installation and Appliance Setup INSTALLER: Leave this manual with party responsible for use and operation. OWNER: Retain this manual for future reference. NOTICE: DO NOT discard this manual! WARNING: FIRE OR EXPLOSION HAZARD Failure to follow safety warnings exactly could result in serious injury, death, or Models: property damage.
-
Page 2: Table Of Contents
Safety Alert Key: • DANGER! Indicates a hazardous situation which, if not avoided will result in death or serious injury. • WARNING! Indicates a hazardous situation which, if not avoided could result in death or serious injury. • CAUTION! Indicates a hazardous situation which, if not avoided, could result in minor or moderate injury. •... -
Page 3: Installation Standard Work Checklist
Customer: Date Installed: Lot/Address: Location of Fireplace: Installer: Model (circle one): ESCAPE-30-IFT ESCAPE-30LP-IFT Dealer/Distributor Phone # ESCAPE-35-IFT ESCAPE-35LP-IFT Serial #: WARNING! Risk of Fire or Explosion! Failure to install appliance according to these instructions can lead to a fire or explosion. -
Page 4: Product Specific And Important Safety Information
Product Specific and Important Safety Information A. Appliance Certification D. High Altitude Installations NOTICE: If the heating value of the gas has been reduced, MODELS: ESCAPE-30-IFT ESCAPE-30LP-IFT, these rules do not apply. Check with your local gas utility ESCAPE-35-IFT, ESCAPE-35LP-IFT or authorities having jurisdiction. -
Page 5: Getting Started
Getting Started A. Design and Installation Considerations C. Inspect Appliance and Components Heat & Glo gas inserts are designed for installations into • Carefully remove the appliance and components from solid fuel masonry or UL127 listed factory built fireplaces. the packaging. No additional outside air source is required. -
Page 6: Framing And Clearances
Dimensions are actual appliance dimensions. Use for reference only. For framing dimensions and clearances refer to Section 4. ACCESS MODEL DIMENSIONS MODEL DIMENSIONS ESCAPE-35-IFT ESCAPE-30-IFT ESCAPE-35-IFT ESCAPE-30-IFT ESCAPE-35LP-IFT ESCAPE-30LP-IFT ESCAPE-35LP-IFT ESCAPE-30LP-IFT Location Location Inches Millimeters Inches Millimeters Inches Millimeters Inches... - Page 7 FIRESCREEN DECORATIVE FRONTS 17-3/4 2-9/16 36-1/2 25-3/4 FS-FB30-XX 19-7/8 2-9/16 38-1/2 27-3/4 FS-FB35-XX IRON AGE DECORATIVE FRONTS 17-3/4 2-9/16 36-1/2 25-3/4 IA-FB30-XX 19-7/8 2-9/16 38-1/2 27-3/4 IA-FB35-XX Figure 3.2 Decorative Front Dimensions - Firescreen and Iron Age Heat & Glo • ESCAPE-35-IFT, ESCAPE-30-IFT Installation Manual • 2550-980 Rev. B • 6/18...
- Page 8 CHATEAU FORGE DECORATIVE FRONTS 28-11/16 17-15/16 3-1/4 36-1/2 25-3/4 CHAF-FB30 30-13/16 19-13/16 3-3/8 38-1/2 27-3/4 CHAF-FB35 HALSTON DECORATIVE FRONTS 16-7/16 4-1/2 36-1/2 25-3/4 HAL-FB30-XX 18-7/16 4-1/2 38-1/2 27-3/4 HAL-FB35-XX Figure 3.3 Decorative Front Dimensions - Chateau Forge and Halston Heat & Glo • ESCAPE-35-IFT, ESCAPE-30-IFT Installation Manual • 2550-980 Rev. B • 6/18...
- Page 9 GALLERIA DECORATIVE FRONTS 31-13/16 17-7/8 3-5/16 37-1/8 25-3/4 25-3/16 GAL-FB30-XX 33-15/16 3-3/8 38-15/16 28-13/16 28-1/16 GAL-FB35-XX Figure 3.4 Decorative Front Dimensions - GALLERIA Heat & Glo • ESCAPE-35-IFT, ESCAPE-30-IFT Installation Manual • 2550-980 Rev. B • 6/18...
-
Page 10: Fireplace Size Requirements
Fireplace Size Requirements • The metal floor of the factory-built fireplace may be A. Minimum Fireplace Opening removed to facilitate the installation of the insert. Minimum fireplace opening requirements are shown in • Cutting of any sheet metal parts of the fireplace in which Figure 4.2. - Page 11 MINIMUM FIREBOX OPENING SIZE ESCAPE-35-IFT ESCAPE-30-IFT ESCAPE-35LP-IFT ESCAPE-30LP-IFT Location Inches Millimeters Inches Millimeters Rear Width 25-1/2 21-1/2 Front Width 35-1/8 30-1/2 Height-Front 24-5/8 22-5/8 Height-Rear 22-1/4 20-1/2 Unit Depth 18-1/8 16-5/8 Venting Depth 13-3/8 11-7/8 * Note: If exhaust collar on insert and fireplace damper do not line up, add 4 Inches (102 mm) to minimum fireplace height for bends in vent pipe.
-
Page 12: Termination Location And Vent Information
Termination Location and Vent Information A. Vent Termination Minimum Clearances WARNING Fire Risk. Maintain vent clearance to combustibles as specified. • DO NOT pack air space with insulation or other materials. Failure to keep insulation or other materials away from vent pipe could cause overheating and fire. HORIZONTAL OVERHANG 2 FT. -
Page 13: Installation Preparation
Installation Preparation D. Fireplace Conversion Notice Prepare the existing solid fuel masonry or factory built non-combustible firebox for installation. Permanently attach the label with the following warning to the inside lower back of the fireplace firebox into which the A. Cleaning insert is being installed. -
Page 14: Installing Vent Pipe And Appliance
Installing Vent Pipe and Appliance A. Vent Limits CAUTION! ALL vent specifications MUST be followed. This product is tested and listed to these specifications. The abbreviations listed in this vent table key are used in Appliance performance will suffer if specifications are not the vent diagrams. -
Page 15: Connecting Vent Pipe
C. Connecting Vent Pipe Reference instructions in the termination kit. • Install the 3 in. flexible vent pipe(s) down through the chimney. • Secure the exhaust flexible vent pipe to the 3 ft. section stainless steel flexible vent pipe using the factory- installed 3 in. -
Page 16: Placing, Securing And Leveling The Appliance
D. Placing, Securing and Leveling the Appliance REAR LEVELING LEGS SHIPPED IN THIS WARNING! Risk of Explosion/Combustion Fumes! POSITION Connect vent sections per installation instructions. • The 3 foot section of stainless steel flexible pipe MUST be attached directly to the exhaust collar on the collar THE FRONT LEVELING LEGS ARE SHIPPED slide plate. -
Page 17: Installing Adaptor And Termination Cap
E. Installing Adaptor and Termination Cap CAUTION! Risk of Cuts/Abrasions/Flying Debris. Wear protective gloves and safety glasses during instal- lation. Sheet metal edges are sharp. For installation of termination cap see minimum vent heights for various pitched roofs (see Figure 7.4) . To install adaptor see Figure 7.5. - Page 18 To prevent odors and cold air drafts, it may be necessary to place non-combustible insulation or field fabricated metal plates around the vent pipe flues as they go through the damper. Note: The LINK-DV4-30B and LINKSQ-DV4-30 systems REQUIRE this insulation. Masonry Factory Built LINK-DV30B...
-
Page 19: Electrical Information
Electrical Information A. General Information Electrical Service and Repair WARNING! Risk of Shock or Explosion! DO NOT wire WARNING! Risk of Shock! Label all wires prior to dis- 110-120 VAC to the valve or to the appliance wall switch. connection when servicing controls. Wiring errors can Incorrect wiring will damage controls. -
Page 20: Wiring
B. Wiring Requirements - IntelliFire™ Touch NOTICE: Batteries should only be used as a power source in the event of an emergency power outage. Batteries Ignition System Wiring should not be used as a primary long-term power source. Battery polarity must be correct when installing batteries. •... - Page 21 Note: if any of the original wire as supplied with the appliance must be replaced, it must be replaced with type 105 °C rated wire. PLUG INTO 120V EXISTING OUTLET BLOWERS FUSE WIRE ASSEMBLY FUSE WIRE ASSEMBLY NOTE: SEE FIGURE 8.2 FOR ADDITIONAL INFORMATION Figure 8.3 Fan Wiring Diagram Heat &...
-
Page 22: Gas Information
Gas Information A. Fuel Conversion C. Gas Connection • Make sure the appliance is compatible with available gas • Refer to Reference Section 3 for location of gas line types. access in appliance. • Conversions must be made by a qualified service •... -
Page 23: Air Shutter Setting
E. Air Shutter Setting Air shutter settings should be adjusted by a qualified ser- vice technician at the time of installation. The air shutter is set at the factory for minimum vertical vent run. Adjust air shutter for longer vertical runs. See Figure 9.1. NOTICE: If sooting occurs, provide more air by opening the air shutter. -
Page 24: Finishing
Finishing A. Mantel and Wall Projections WARNING! Risk of Fire! Comply with all minimum clear- SIZE DEPTH (D) WIDTH (W) ances to combustibles as specified. Framing or finishing 30 in. material closer than the minimums listed must be construct- ed entirely of noncombustible materials (i.e., steel studs, 35 in. -
Page 25: Appliance Setup
Appliance Setup • To remove glass assembly, release one top glass latch at A. Fixed Glass Assembly a time. Use one hand to support the glass while pulling WARNING! Risk of Asphyxiation! Handle fixed glass the top spring-loaded latch forward with the other hand. assembly with care. -
Page 26: Remove The Shipping Materials
B. Remove the Shipping Materials Remove shipping materials from inside or underneath the firebox. Remove metal panels covering electrical compo- nents on sides of appliance. Note: Remove the zip ties on the exterior sides of the ap- pliance that hold the electrical cord and gas line in place for shipping. -
Page 27: Place The Lava Rock
F. Place the Lava Rock G. Ember Placement WARNING! Risk of Explosion! Follow lava rock place- WARNING! Risk of Explosion! Follow ember placement ment instructions in manual. DO NOT place lava rock on instructions in manual. DO NOT place embers directly over burner. -
Page 28: Install The Log Assembly And Glass Rock
H. Install the Log Assembly and Glass Rock Log Set Assembly: LOGS-I30FB Models: ESCAPE-I30-C, ESCAPE-I30FB, ESCAPE-I30-F, ESCAPE-30-IFT CAUTION: Logs are fragile, handle with care. SRV2201-702 SRV2201-701 SRV2201-705 SRV2201-704 SRV2201-703 SRV2201-706 PILOT BRACKET BURNER LEDGE BURNER LEDGE LIGHT TRAYS LOG PINS GRATE BAR GRATE TINES Figure 2. - Page 29 FLAT SPOT FOR LOG #6 LOG HANGS OVER ONTO BURNER TOP Figure 4. Log #2 Log #2 (SRV2201-701): See Figure 2 for additional references. Position Log #2 as shown in Figure 4. Mate Log #2 with the right corner of the burner as shown. Pull the log forward and to the left until it locks into position. LOG CONTACTS RIGHT GRATE TINE LOG CONTACTS LEFT...
- Page 30 PLACE LOG ON FLAT SPOT FLAT SPOT FOR LOG #6 LOG TOUCHES GRATE TINE GLASS ROCK GROOVE MATES WITH GRATE BAR Figure 7. Glass Rock in Place Figure 8. Place Log #5 GLASS ROCK (2201-853): Once Log #3 and Log #4 are installed, fill each light tray with the glass rock. See Figure 7. WARNING! Risk of Explosion! DO NOT place glass rock on the burner surface.
- Page 31 H. Install the Log Assembly and Glass Rock Log Set Assembly: LOGS-I35FB Models: ESCAPE-I35FB, ESCAPE-I35-C, ESCAPE-I35-F, ESCAPE-35-IFT CAUTION: Logs are fragile, handle with care. SRV2202-702 SRV2202-701 SRV2202-704 SRV2202-703 SRV2202-706 SRV2202-705 PILOT BRACKET BURNER LEDGE BURNER LEDGE LIGHT TRAYS LOG PINS GRATE GRATE TINES Figure 2.
- Page 32 FLAT SPOT FOR LOG#6 LOG MATES WITH CORNER OF BURNER LOG HANGS OVER ONTO BURNER TOP Figure 4. Log #2 Log #2 (SRV2202-701): See Figure 2 for additional references. Position Log #2 as shown in Figure 4. Mate Log #2 with the right corner of the burner as shown.
- Page 33 PLACE LOG ON FLAT SPOT FLAT SPOTS FOR LOG #6 CENTER BETWEEN GROOVE MATES LOG #3 AND WITH GRATE BAR LOG #4 Figure 8. Place Log #5 Log #5 (SRV2202-705): See Figures 2 and 3 for additional references. Place the thick end of Log #5 on the flat spot of Log #1.
-
Page 34: Intellifire™ Touch Control System Setup
I. IntelliFire™ Touch Control System Setup J. Install Decorative Front/Surround • Detailed instructions for electrical wiring and connec- A decorative front and surround is required to complete tions are provided in Section 8. this installation. Installation instructions are included with the decorative front and surround. -
Page 35: Reference Materials
Reference Materials A. Vent Components Direct Vent Flex Liner Kits (see Figure 12.1) LINK-DV30B: Masonry 3 in. flex liner kit. Expands to 30 feet. Includes: two liners, termination cap and flashing. LINK-DV4-30B: Masonry 3 in. flex liner kit. Expands to 30 feet and 4 feet respectively. -
Page 36: Accessories
B. Accessories Remote Controls, Wall Controls and Wall Switches An RC400 remote control system is included with this ap- pliance. After a qualified service technician has installed the remote control, wall control or wall switch, follow the instructions supplied with the control installed to operate your fireplace: For safety: •...