Sign In
Upload
Manuals
Brands
NETGEAR Manuals
Wireless Router
Nighthawk X4S
NETGEAR Nighthawk X4S Manuals
Manuals and User Guides for NETGEAR Nighthawk X4S. We have
7
NETGEAR Nighthawk X4S manuals available for free PDF download: User Manual, Quick Start Manual, Manual, Quick Start
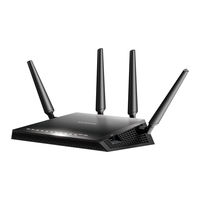
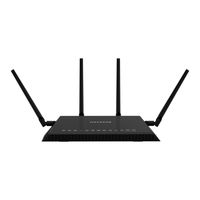
NETGEAR Nighthawk X4S R7800 - AC2600 Smart WiFi Router Manual
Brand:
NETGEAR
| Category:
Wireless Router
| Size: 1.44 MB
Table of Contents
Package Contents
Connect the Router
Hardware Features
Top and Side Panels
Rear Panel
Top Panel LEDs and Buttons
Install Your Router
WiFi Network Name and Password
Join the WiFi Network
View or Change the Router Settings
Log In to the Router
Change the admin Password
Recover a Forgotten admin Password
Find a Forgotten WiFi Security Password
Access a USB Device on the Network
Back Up With ReadySHARE Vault
Print Wirelessly With ReadySHARE Printer
More Premium Features
iTunes Server
VPN Service
Personal FTP Server
Download the NETGEAR genie App
Support
Trademarks
Compliance
Documents / Resources
References
Advertisement
NETGEAR Nighthawk X4S EX7500 - AC2200 WiFi Range Extender Quick Manual
Brand:
NETGEAR
| Category:
Extender
| Size: 1.67 MB
Table of Contents
Getting Started
Connect With WPS
Connect With the NETGEAR Installation Assistant
Log In to Access Extender Settings
Support
Documents / Resources
References
NETGEAR Nighthawk X4S User Manual (185 pages)
Brand:
NETGEAR
| Category:
Wireless Router
| Size: 8.79 MB
Table of Contents
User Manual
1
Table of Contents
3
Chapter 1 Hardware Setup
9
Unpack Your Router
9
Top View
9
Rear Panel
11
Turn the Leds on or off
12
Attach the Antennas
12
USB Ports on the Left Panel
13
Esata Port on the Right Panel
13
Connect an Esata Device
14
Position Your Router
14
Cable Your Router
15
Chapter 2 Connect to the Network and Access the Router
18
Connect to the Network
18
Wired Connection
18
Wifi Connection Using WPS
18
Wifi Connection
18
Label
19
Types of Logins
19
Use a Web Browser to Access the Router
19
Log in to the Router
19
Automatic Internet Setup
20
Automatic Internet Setup with Two Routers
21
Access the Router with NETGEAR Genie Apps
23
Chapter 3 Specify Your Internet Settings
25
Use the Internet Setup Wizard
25
Manually Set up the Internet Connection
25
Specify an Internet Connection Without a Login
26
Specify an Internet Connection that Uses a Login
27
Specify Ipv6 Internet Connections
29
Requirements for Entering Ipv6 Addresses
30
Use Auto Config for an Ipv6 Internet Connection
30
Use Auto Detect for an Ipv6 Internet Connection
32
Set up an Ipv6 6Rd Internet Connection
33
Set up an Ipv6 6To4 Tunnel Internet Connection
35
Set up an Ipv6 Pass through Internet Connection
36
Set up an Ipv6 Fixed Internet Connection
37
Set up an Ipv6 DHCP Internet Connection
38
Set up an Ipv6 Pppoe Internet Connection
40
Change the MTU Size
41
Enable British Telcom IGMP Proxy Support
44
Chapter 4 Control Access to the Internet
46
Set up Parental Controls
46
Allow or Block Access to Your Network
47
Use Keywords to Block Internet Sites
48
Block Services from the Internet
49
Delete Keywords from the Blocked List
51
Avoid Blocking on a Trusted Computer
52
Manage Network Access Control Lists
52
Schedule When to Block Internet Sites and Services
53
Set up Security Event Email Notifications
55
Set up IP-MAC Binding
56
Chapter 5 Network Settings
58
View or Change WAN Settings
58
Set up a Default DMZ Server
59
Change the Router's Device Name
60
Change the LAN TCP/IP Settings
60
Specify the IP Addresses that the Router Assigns
62
Disable the DHCP Server Feature in the Router
64
Manage Reserved LAN IP Addresses
64
Reserve an IP Address
64
Edit a Reserved IP Address
65
Delete a Reserved IP Address Entry
66
Use the WPS Wizard for Wifi Connections
66
Specify Basic Wifi Settings
67
Change the Wifi Mbps Settings
70
Change the Wifi Password or Security Level
71
Enable or Disable Wifi 160 Mhz
72
Enable a Wifi Video Network
72
Enable Wifi Video Network
72
Set up a Guest Wifi Network
73
Enable a Video Guest Wifi Network
75
Control the Wifi Radios
76
Use the Wifi On/Off Button
76
Enable or Disable the Wifi Radios
76
Set up a Wifi Schedule
77
Specify WPS Settings
78
Use the Router as a Wifi Access Point
79
Use the Router in Bridge Mode
80
Set up a Bridge for a Port Group or VLAN Tag Group
82
Set up a Bridge for a Port Group
83
Set up a Bridge for a VLAN Tag Group
84
Set up an IPTV Port to Lease an Intranet Port
86
Chapter 6 Optimize Performance
89
Use Dynamic Qos to Optimize Internet Traffic Management
89
Enable Dynamic Qos
89
Enable or Disable the Automatic Qos Database Update
90
Manually Update the Dynamic Qos Database
91
Participate in Dynamic Qos Analytics
91
Improve Network Connections with Universal Plug and Play
92
Wi-Fi Multimedia Quality of Service
93
Chapter 7 Manage Your Network
96
Update the Router Firmware
96
Change the Admin Password
96
Set up Password Recovery
97
Recover the Admin Password
98
View Router Status
99
Display Internet Port Statistics
100
Check the Internet Connection Status
101
View and Manage Logs of Router Activity
102
View Devices Currently on the Network
103
Monitor Internet Traffictraffic Metering
104
Manage the Router Configuration File
106
Back up Settings
106
Erase the Current Configuration Settings
107
Restore Configuration Settings
107
Remote Access
108
Set up Remote Management
108
Use Remote Access
109
Remotely Access Your Router Using the Genie App
109
Chapter 8 Share USB Storage Devices Attached to the Router
111
USB Device Requirements
111
Connect a Storage Device to the Router
111
Share USB Storage Devices Attached to the Router
111
Access a Storage Device Connected to the Router from a Windows Computer
112
Access a Storage Device that Is Connected to the Router from a Mac
113
Map a USB Device to a Windows Network Drive
112
Back up Windows Computers with Readyshare Vault
114
Back up Mac Computers with Time Machine
114
Set up a USB Hard Drive on a Mac
114
Prepare to Back up a Large Amount of Data
115
Use Time Machine to Back up Onto a USB Hard Disk
116
Use FTP Within the Network
117
View or Change Network Folders on a Storage Device
117
Add a Network Folder on a Storage Device
119
Edit a Network Folder on a Storage Device
120
Safely Remove a USB Device
121
Chapter 9 Use Dynamic DNS to Access USB Storage Devices through the Internet
123
Set up and Manage Dynamic DNS
123
Set up FTP Access through the Internet
123
Your Personal FTP Server
124
Set up Your Personal FTP Server
124
Set up a New Dynamic DNS Account
125
Specify a DNS Account that You Already Created
126
Change the Dynamic DNS Settings
127
Access USB Storage Devices through the Internet
129
Remotely Access a USB Device Using Readycloud
129
Create a Readycloud Account
129
Register Your Router with Readycloud
130
Download Files Onto a USB Storage Device
132
Download Files
132
Change the Download Settings
133
Send Downloader Email Notifications
134
Manage Downloader Tasks
135
View Photos on Your USB Device with Kwilt
135
Chapter 10 Use the Router as a Media Server
137
Specify Readydlna Media Server Settings
138
Play Music from a Storage Device with Itunes Server
138
Set up the Router's Itunes Server with Itunes
139
Set up the Router's Itunes Server with the Remote App
140
Play Media from a USB Device on Tivo
142
Set up the Router to Work with Tivo
142
Play Videos on Tivo
143
Play Music or View Photos on Tivo
143
Share a USB Printer
144
Chapter 11 Share a USB Printer
145
Install the Printer Driver and Cable the Printer
145
Download the Readyshare Printer Utility
145
Install the Readyshare Printer Utility
145
Print Using the NETGEAR USB Control Center
147
View or Change the Status of a Printer
147
Use the Scan Feature of a Multifunction USB Printer
148
Change NETGEAR USB Control Center Settings
148
Turn off Automatic Startup for NETGEAR USB Control Center
148
Change the Language for the NETGEAR USB Control Center
149
Specify the USB Control Center Time-Out
149
Chapter 12 Customize Internet Traffic Rules for Ports
151
Port Forwarding to a Local Server
152
Set up Port Forwarding to a Local Server
152
Add a Custom Port Forwarding Service
153
Edit a Port Forwarding Service
154
Delete a Port Forwarding Entry
155
Application Example: Make a Local Web Server Public
155
How the Router Implements the Port Forwarding Rule
156
Port Triggering
156
Add a Port Triggering Service
156
Enable Port Triggering
158
Chapter 13 Use VPN to Access Your Network
161
Set up a VPN Connection
161
Specify VPN Service in the Router
161
Use VPN to Access Your Network
161
Install Openvpn Software
162
Install Openvpn Software on Your Windows Computer
162
Install Openvpn Software on Your Mac Computer
165
Install Openvpn Software on an Ios Device
165
Install Openvpn Software on an Android Device
166
Use a VPN Tunnel on Your Windows Computer
167
Use VPN to Access the Router's USB Device and Media
169
Use VPN to Access Your Internet Service at Home
169
Set up VPN Client Internet Access in the Router
169
Block VPN Client Internet Access in the Router
170
Use a VPN Tunnel to Access Your Internet Service at Home
171
Change VPN Pass-Through Settings
171
Troubleshooting
173
Chapter 14 Troubleshooting
174
Quick Tips
174
Sequence to Restart Your Network
174
Check Ethernet Cable Connections
174
Wifi Settings
174
Network Settings
174
Troubleshoot with the Leds
174
Standard LED Behavior When the Router Is Powered on
174
Power LED Is off or Blinking
175
Power LED Stays Amber
175
Leds Never Turn off
175
Internet or Ethernet Port Leds Are off
176
Wifi LED Is off
176
You Cannot Log in to the Router
176
You Cannot Access the Internet
177
Troubleshoot Internet Browsing
178
Changes Are Not Saved
178
Troubleshoot Wifi Connectivity
179
Troubleshoot Your Network Using the Ping Utility
179
Test the LAN Path to Your Router
179
Test the Path from Your Computer to a Remote Device
180
Chapter 15 Supplemental Information
182
Factory Settings
183
Technical Specifications
184
Advertisement
NETGEAR Nighthawk X4S User Manual (50 pages)
AC2200 Tri-Band
Brand:
NETGEAR
| Category:
Extender
| Size: 0.48 MB
Table of Contents
Table of Contents
3
Chapter 1 Overview
5
Meet Your Extender
6
Leds
6
Buttons
8
System Requirements
9
When to Use Your Extender
9
How the Extender Works
9
Chapter 2 Get Started
10
Install the Wifi Extender
11
Place the Extender and Apply Power
11
Connect to an Existing Wifi Network
11
Connect with WPS
11
Connect with the NETGEAR Installation Assistant
13
Connect a Device to the Extender Network
13
Connect a Device to the Extender Network Using Wifi
14
Connect a Device to the Extender Network Using WPS
14
Log in to the Extender after Installation
14
Run Smart Setup Installation
15
Chapter 3 Extender Network Settings
16
Enable or Disable One Wifi Name
17
Enable or Disable Smart Connect
17
View Connected Devices
18
View Wifi Settings
19
Change the Wifi Network Name
20
Turn off the SSID Broadcast to Create a Hidden Network
21
Disable or Enable the Wifi Radios
21
Change the Wifi Speed
22
Use WPS to Add a Computer to the Extender's Wifi Network
23
Use WPS with the Push Button Method
23
Use WPS with the PIN Method
24
Deny Access to a Computer or Wifi Device
25
Set up an Access Schedule
26
Change the Extender's Device Name
27
Set up the Extender to Use a Static IP Address
28
Use the Extender with MAC Filtering or Access Control
29
Chapter 4 Maintain and Monitor the Extender
30
Change the Extender Admin User Name and Password
31
Turn Password Protection off and on
31
Recover a Forgotten User Name or Password
32
Automatically Adjust for Daylight Saving Time
33
Manually Set the Extender Clock
34
Back up and Manage the Extender Configuration
35
Back up the Configuration Settings
35
Restore the Configuration Settings
36
Return the Extender to Its Factory Default Settings
37
Use the Reset Button
37
Log in and Reset the Extender to Factory Settings
37
Update the Extender Firmware
38
Check for New Firmware and Update the Extender
38
Manually Upload Firmware to the Extender
39
Restart the Extender Remotely
40
Turn the Extender Leds on or off
41
Chapter 5 Faqs and Troubleshooting
43
Faqs
44
Cannot Connect to the Extender
45
Cannot Join a Wifi Network and Receive an Error Message
45
Cannot Access Mywifiext.net
45
Find the Extender's IP Address
46
Appendix A Supplemental Information
48
Factory Default Settings
49
Technical and Environmental Specifications
50
NETGEAR Nighthawk X4S Quick Start Manual (23 pages)
AC2600 Smart
Brand:
NETGEAR
| Category:
Wireless Router
| Size: 1.93 MB
Table of Contents
Package Contents
1
Quick Start
1
Hardware Features
3
Top and Side Panels
3
Rear Panel
3
Led Description
4
Install Your Router
6
Wifi Network Name and Password
10
Join the Wifi Network
11
View or Change the Router Settings
12
Log in to the Router
12
Change the Admin Password
12
Recover a Forgotten Admin Password
13
Access a USB Device on the Network
15
Print Wirelessly with Readyshare Printer
18
More Premium Features
19
Itunes Server
19
VPN Service
20
Download the NETGEAR Genie App
21
NETGEAR Nighthawk X4S Manual (17 pages)
Brand:
NETGEAR
| Category:
Extender
| Size: 0.25 MB
Table of Contents
Connect to the Extender Network
2
Wifi Connection
2
WPS Connection
3
Log in to Access Extender Settings
4
Change the Extender Wifi Settings
6
Frequently Asked Questions
8
To Add a Translated MAC Address to Your Router
12
NETGEAR Nighthawk X4S Quick Start (2 pages)
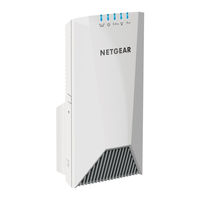
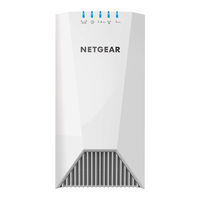
Nighthawk X4S WiFi Range Extender
Brand:
NETGEAR
| Category:
Extender
| Size: 1.1 MB
Advertisement
Related Products
Netgear Nighthawk X4 R7500
Netgear R7500 Nighthawk X4 AC2350
NETGEAR Nighthawk X4S R7800
NETGEAR Nighthawk X4 AC2350 R7500
NETGEAR Nighthawk X8 AC5300 Tri-Band
NETGEAR Nighthawk X6
NETGEAR Nighthawk X6R7900
NETGEAR Nighthawk X10 R9000
NETGEAR XRM570
NETGEAR Nighthawk X8 5
NETGEAR Categories
Wireless Router
Switch
Network Router
Adapter
Wireless Access Point
More NETGEAR Manuals
Login
Sign In
OR
Sign in with Facebook
Sign in with Google
Upload manual
Upload from disk
Upload from URL