Sign In
Upload
Manuals
Brands
EMC2 Manuals
I/O Systems
Data Domain DD9500
EMC2 Data Domain DD9500 Manuals
Manuals and User Guides for EMC2 Data Domain DD9500. We have
3
EMC2 Data Domain DD9500 manuals available for free PDF download: Installation And Upgrade Manual, Field Replacement Unit Manual, Replacement Manual
EMC2 Data Domain DD9500 Installation And Upgrade Manual (80 pages)
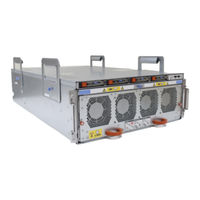
High Availability (HA) System
Brand:
EMC2
| Category:
Storage
| Size: 9 MB
Table of Contents
Table of Contents
3
Revision History
11
Planning and Site Preparation
13
Tools and Supplies Needed
14
Safety Information
14
Information
14
Warning about Lifting the System
15
Description of the System
16
Site Requirements
16
System Specifications
16
DD9500 System Specifications
16
System
16
Capacity with ES30 SAS Shelves
17
Capacity with DS60 Shelves
17
DD9500 Front Panel
18
Front Panel Components
18
Service Leds
19
Power Button
20
Front Leds
20
DD9500 Rear Panel
21
Rear Panel Overview
21
Front Panel LED Status Indicators
21
Rear Panel Leds
22
Location of NVRAM and I/O Modules
22
I/O Module Slot Assignments
23
Define the Data Domain System Information for Your Site
24
Setup Worksheet
24
Site
24
New Installation or Upgrade
25
Install the System in the Rack
27
Warning about Lifting the System
28
Unpack the System
28
Install the Rack Brackets
28
Shelf Brackets and Cable Management Assembly
28
Rail Bracket Inside
29
Rail Bracket Outside
29
Install Rail Brackets on the Data Domain and EMC Racks (for Square or Round Hole Racks)
30
Cable Management Assembly (CMA)
30
Rail Bracket Inside
31
Rail Bracket Outside
31
Insert Screw in the Back
32
Insert Screw in the Front
33
Attach Bracket to Front of Rack
33
Install Rail Brackets Using the Adapter Hardware (for Threaded Hole Racks)
34
Attaching the Front Rail with the Screw
35
Attaching the Front Rail Adapter with a Wrench
35
Rear Bracket Attached to Rail
36
Install the DD9500 System into a Rack
37
Attach Front Rail Adapter
37
Warning about Lifting the System
37
Pre-Defined Location for DD9500
39
Four Handles Attached to the Chassis
40
System on a Rack
40
Mount the Cable Management Assembly on both Nodes
41
Location of Serial Number Tag
41
Install the EMC Cable Management Assembly (CMA)
42
EMC CMA Front
42
EMC CMA Back
42
Blue Knob Positions
43
EMC Cable Management Assembly Back Inside
43
Rear of the Rack Mount Rail
44
Installing the CMA on the Rack
44
Installing the Expansion Shelves into the Racks
45
Next Steps
45
Adjusting the CMA Plates
45
Connect Cables and Power on
47
Connecting the Expansion Shelves and the Controllers
48
Notes and Information
48
Minimum and Maximum Configurations
48
ES30 Cable Information
49
Node 0 SAS I/O Module to ES30 Host Port Connector
49
Node 1 SAS I/O Module to ES30 Expansion Port Connector
50
Cables for Node 0 to ES30 Shelf Loop
50
Cables for Node 1 to ES30 Shelf Loop
50
Connecting Multiple ES30 Shelves to the DD9500 System
51
Cabling for a DD9500 System
51
Primary Node Cabling Instructions
51
Standby Node Cabling Instructions
52
Recommended Cabling for DD9500 System with One Rack
54
DS60 Cable Information
55
Recommended Cabling for DD9500 System with Two Racks
55
SAS I/O Module to DS60 Connector
56
Cables for Node 0 and Node 1 to DS60 Shelf Loop
56
Connecting Multiple DS60 Shelves to the DD9500 System
57
Cabling for a DD9500 System
57
Primary Node Cabling Instructions 3 TB Drives
58
Primary Node Cabling Instructions 4 TB Drives
58
Standby Node Cabling Instructions 3 TB Drives
58
Standby Node Cabling Instructions 4 TB Drives
59
Recommended Cabling for DD9500 System (3TB Drives)
60
Next Steps
61
Recommended Cabling for DD9500 System (4TB Drives)
61
Shelf Brackets and Cable Management Assembly
62
Rail Bracket Inside
62
Rail Bracket Outside
62
Connecting the HA Interconnect
63
Next Steps
63
Cable Management Assembly (CMA)
63
Install the Bezel
65
Attaching the Factory Bezel
65
Attaching the Field Bezel
65
Connect Data Cables on both Nodes
66
Next Steps
66
Power on All Systems; Active Node First, then the Standby Node
66
Configure System for Use
69
Enable Administrative Communication
70
Communications Settings
70
Power LED and Power Button
71
Accepting the End User License Agreement (EULA)
72
Run the Configuration Wizard
72
Configuring the Network
72
Configure HA for New Installations
74
Configuring Additional System Parameters
75
Upgrading an Existing Data Domain System to HA
77
HA Upgrade Overview
78
HA Upgrade Tasks
78
Installing the HA Interconnect I/O Module
79
Configure HA for Upgrades
79
Advertisement
EMC2 Data Domain DD9500 Replacement Manual (14 pages)
Brand:
EMC2
| Category:
I/O Systems
| Size: 1 MB
Table of Contents
Table of Contents
1
Revision History
2
Related Documentation
2
Tools and Supplies Needed
2
Overview: DD9500 and DD9800 I/O Modules
2
Ethernet I/O Modules
5
Fibre Channel (FC) I/O Modules
5
SAS I/O Modules
5
Identify the Failed I/O Module
5
Remove and Install an I/O Module
6
Reconnect the System
8
Complete the I/O Module Replacement
9
Complete the Procedure
13
EMC2 Data Domain DD9500 Field Replacement Unit Manual (18 pages)
DIMM and Memory Riser Card Replacement and Memory Upgrade
Brand:
EMC2
| Category:
Storage
| Size: 2 MB
Table of Contents
Revision History
2
Related Documentation
2
Tools and Supplies Needed
2
Remove the Bezel
8
Advertisement
Advertisement
Related Products
EMC2 Data Domain DD9800
EMC2 DS-F20P-10GigE
EMC2 DAE5S
EMC2 Data Domain DD2500
EMC2 Categories
Storage
Enclosure
Power Supply
Server
Switch
More EMC2 Manuals
Login
Sign In
OR
Sign in with Facebook
Sign in with Google
Upload manual
Upload from disk
Upload from URL