Sign In
Upload
Manuals
Brands
ebm-papst Manuals
Monitor
CN1116
ebm-papst CN1116 Manuals
Manuals and User Guides for ebm-papst CN1116. We have
1
ebm-papst CN1116 manual available for free PDF download: Operating And Maintenance Instructions Manual
ebm-papst CN1116 Operating And Maintenance Instructions Manual (47 pages)
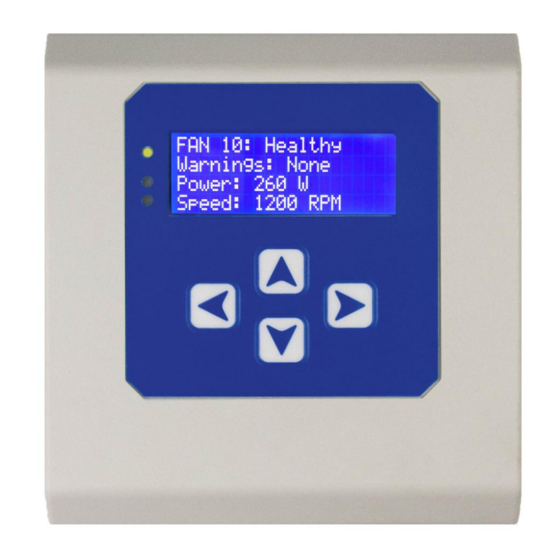
Modbus Display & Control (MDC)
Brand:
ebm-papst
| Category:
Monitor
| Size: 3 MB
Table of Contents
Table of Contents
2
1 Safety Notice
5
2 Introduction
6
Table 1 - Information Shown on the MDC
6
3 Overview
7
Specification
7
Installation
7
Hot Plugging
7
RS485 Wiring Installation
7
Figure 1 - Schematic of RS485 Installation
7
Table 2 - Specification
7
4 Configuration and First Use
8
Electrical Connections
8
General and Initial Power on
8
Figure 2 - Typical Wiring for Monitor Operating Mode
8
Figure 3 - Fan Status Screen Showing that the Controller Had a Previously Stored Fan Array
8
First Time Controller Configuration
9
Configuring the Controller with Fans that Are in Their Factory Default Settings
9
Figure 4 - Keypad Buttons
9
Figure 5 - Main Menu Display Screen on First Application of Power
9
Configuring the Controller with Fans that Have Been Pre-Configured by Another MDC
10
Table 3 - Supported Fan Modbus Port Configuration
10
Fan Status Screen
11
Power Meter and Summary Screen
11
Figure 6 - Fan Status Screen
11
Figure 7 - Power Meter and Summary Screen
11
Swapping Fan Numbers and Addresses
12
5 Operating Modes
12
General
12
Main Menu Access and Operating Mode Configuration
13
Monitor Mode (Default Operation)
13
Figure 8 - Wiring Diagram for Monitor Operating Mode - with Optional Pressure Sensor
13
Monitor & Control Mode
14
Controlling the Fan Array Speed Using the Controller's 0-10V Input (0-10V Control Mode)
14
Controlling the Fan Array Speed Using the Controller's RS485 Slave Port (Modbus Control Mode)
15
Figure 9 - Wiring Diagram for Monitor & Control Operating Mode and 0-10V Control Mode - Potentiometer Control
15
Signal and 10V Supply from Fans
15
Figure 10 - Wiring Diagram for Monitor & Control Operating Mode and 0-10V Control Mode - Potentiometer Control Signal and External Power Supply
15
Figure 11 - Wiring Diagram for Monitor & Control Operating Mode and 0-10V Control Mode - External Control Signal
15
Controlling the Fan Array Speed Using the Controller's Keypad (Keypad Control Mode)
16
Figure 12 - Wiring Diagram for Monitor & Control Operating Mode - Modbus RS485 Control Signal
16
Figure 13 - Wiring Diagram for Monitor & Control Operating Mode - Keypad Control
16
Measuring Fan Performance Using One or Multiple Pressure Sensors
16
Constant Volume or Constant Pressure Operating Mode
17
Figure 14 - Wiring Diagram for Monitor & Control Operating Mode - Single Sensor Monitoring
17
Modbus Relay Operating Mode
18
6 Pressure Sensor Connections
18
Figure 15 - Typical Wiring Diagram for Constant Volume / Constant Pressure Operating Mode and Controller Sensor Input
18
7 Advanced Settings
19
Figure 16 - Sensor Airline Connections for Pressure and Volume
19
Figure 17 - Airline Length for a Single Sensor Constant Volume System or Volume Monitoring System
19
8 Multi-Sensor Operation
22
Sensor Wiring and Airline Connections
22
Figure 18 - Sensor-Fan Wiring Diagram with Power Supply
22
Figure 19 - Simplified Sensor-Fan Wiring Using Ebm-Papst Differential Pressure Sensors
22
Controller Configuration and Automatic Sensor Mapping
23
Figure 20 - Example of Sensor Airline Connections in a 4-Fan 2-Sensors Constant Volume System
23
Figure 21 - Example of Airline Connections in a 4-Fan 2-Sensor Constant Pressure System
23
Reading the Volume from Individual Sensors (Direct and Shared Sensors)
25
9 Fault Indication
25
Loss of Communication and Fan Alarms Indications
25
Figure 22 - Fan Status Screen Showing Individual Sensor Readings in M3/H
25
Warning Indications
26
Sensor Failures
26
Figure 23 - Communication Lost Figure 24 - Fan Alarm
26
Figure 25 - Example of a First Warning on a Fan Figure 26 - Example of a Second Warning on a Fan
26
10 Replacing the Controller
27
11 Replacing a Fan
27
Figure 27 - Sensor Fail Alarm Indication
27
14 Take Back Policy
28
15 Transport & Storage
28
16 Maintenance and Servicing
28
17 UKCA / CE Certificates
28
Figure 28 - Exploded View of Product
28
12 WEEE (Waste Electrical and Electronic Equipment)
28
13 End of Life
28
Appendix A - Physical Details
29
Appendix B - Electrical Connections
30
Table 4 - PCB Bottom Side Connector Identities and Pin Functions
30
Table 5 - PCB Top Side Connector and Pin Function
30
Appendix C - Remote Monitoring & Control
31
Remote Monitoring
31
Remote Fan Array Control
31
Remote Speed Control - Individual Fans
32
Appendix D - Modbus Input Registers
32
Table 6 - Modbus Input Registers
32
Appendix E - Modbus Holding Registers for Configuration & Control
33
Table 7 - Controller's Dedicated Modbus Holding Registers Part 1
33
Appendix F - Modbus Holding Registers for Individual Fan Monitoring
37
Table 8 - Controller's Dedicated Modbus Holding Registers Part 2
37
Table 9 - Fan Alarm and Fan Warning Register Breakdown
38
Appendix G - Example of Modbus Relay Operation
39
Table 10 - Full Modbus Relay Register Map (Retrieved from Fan Registers)
40
Appendix H - Menu Structure Flow Chart
41
H1 - Fan Addressing - New Fan Array -Initial Setup
41
H2 - Fan Addressing - Existing Fan Array - Initial Setup
41
H3 - Initial Factory Reset
41
H4 - Fan Replacement
41
H5 - Main Menu
41
H6 - Fan Status
42
H7 - Operation Mode - Monitor
42
H8 - Operation Mode - Monitor & Control
42
H9 - Operation Mode - Monitor & Control - Keypad Control
43
H10 - Operation Mode - Constant Volume / Constant Pressure
43
H11 - Operation Mode - Modbus Relay
43
H12 - Advanced Settings Sub Menu
44
H13 - Adv. Settings - Sensor Reading H14 - Adv. Settings - Measurement Unit
44
H15 - Advanced Settings - PID Settings
44
H16 - Advanced Settings - RPM Limit
44
H17 - Adv. Settings - 0-10V Control Cap H18 - Adv. Settings - 0-10V Input Cap
45
H19 - Advanced Settings - Alarm Output
45
H20 - Advanced Settings - BMS Settings
45
H21 - Advanced Settings - BMS Compatibility
46
H22 - Advanced Settings - Main Menu Lock
46
H23 - Diagnostics Menu
46
H24 - Fan Comms
46
H25 - Adv. Settings - LCD Brightness H26 - Adv. Settings - Erase Sensor Map
47
H27 - Advanced Settings - Factory Reset
47
Advertisement
Advertisement
Related Products
ebm-papst CN1090
ebm-papst CN1083
ebm-papst CN1127
ebm-papst COOL500EC-230
ebm-papst COOL500EC-115
ebm-papst Categories
Fan
Blower
Computer Hardware
Industrial Equipment
Engine
More ebm-papst Manuals
Login
Sign In
OR
Sign in with Facebook
Sign in with Google
Upload manual
Upload from disk
Upload from URL