Table of Contents
Advertisement
Quick Links
Download this manual
See also:
User Manual
Advertisement
Table of Contents

Related Manuals for AT&T Synapse SB67035


Summary of Contents for AT&T Synapse SB67035
-
Page 1: Quick Start Guide
Quick Start Guide AT&T SB67035 Deskset... -
Page 3: Voicemail Indicator
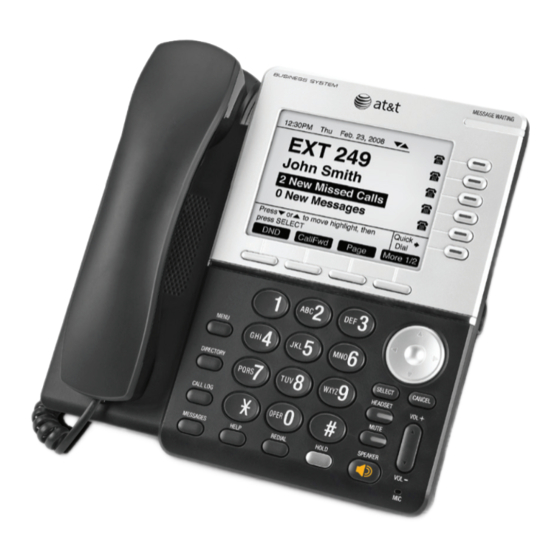
Deskset Overview This page identifies and describes the main display and key groups for the Synapse® SB67035 deskset. See the User’s Guide at www.telephones.att.com/synapseguides for additional information. Voicemail Indicator Lights when there are 12:30PM Thu Feb 23 2008 new voicemail messages. Liquid Crystal Display (LCD) EXT 249 Displays information for using... -
Page 4: Hard Keys
Hard Keys Navigation Moves the cursor up/down/ Dial Pad Select left/right on the display. Selects a highlighted Menu Cancel option in most cases. Displays the settings menus Cancels the most recent and deskset information. operation and returns to previous screen. Directory Headset Displays the Directory. -
Page 5: New Messages
Idle Screen The Idle screen appears when the deskset has power and no activity. Scroll Indicators Appear when pressing Navigation key has an effect. Time and Date Status Display 12:30PM Thu Feb 23 2008 DND, FWD ON – Feature enabled EXT 249 <... - Page 6 Call/Line Appearance Keys & Indicators Call Appearance/Line Appearance keys, their LEDs, and the icons on the display next to them reflect call status. For active, ringing and held calls, the screen shows a name and number next to a key. As you use the r and s Navigation key to highlight different calls, the appropriate soft keys appear.
-
Page 7: Status Description
Call Status Icons The deskset displays icons that show call status, and complement the LED status indications. Icon Status Description Icon Status Description Available Indicates an available Ringing Indicates an incoming call. Call Appearance or line. Off Hook Indicates you are dialing Silenced Ring Appears during an incoming or are on a call. -
Page 8: Soft Keys
Soft Keys Four context-sensitive keys provide functions indicated by labels on the screen. Soft keys such as indicate that there are more than four soft key 12:30PM Thu Feb 23 2008 functions available. Numeric designation indicates current page. For example, EXT 249 indicates that you are on page one of two. -
Page 9: Making A Call
Making a Call You can make a call from the deskset using predialing, live dialing or from 12:30PM Thu Feb 23 2008 a list. To predial, use the dial pad to enter a phone number and then go off hook. To live dial, go off hook and then dial a number. To make a call when viewing a list of numbers such as the Directory, Call Log, Redial or Messages lists, highlight the number and then press To predial a number:... -
Page 10: Answering A Call
Answering a Call You can answer a call by lifting the corded handset, pressing the soft key, pressing SPEAKER, pressing HEADSET, pressing the associated Call Appearance or Line Appearance key, or you can set the deskset to automatically answer after a delay. See the User’s Guide at www.telephones.att.com/synapseguides for additional information on this feature. -
Page 11: Managing A Call
Managing a Call The deskset call management functions begin 12:30PM Thu Feb 23 2008 with the active call screen. Graham Bell 9-1-232-555-0176 0:03 Mary Williams 9-1-888-722-7702 0:02 If your system has been configured for Line Appearance mode, a different set of soft keys will be available. For more information, see the User’s Guide at Quick To retrieve held call, press key next to... -
Page 12: Transferring A Call
Transferring a Call To transfer a call: 1. From the active call screen, press , if necessary, until you see 2. Press . The active call is put on hold. 3. Dial a number or access an entry from the Directory, Call Log, Extension list, or Messages list and press You can also transfer to a parked or held call by accessing it and pressing SELECT. -
Page 13: Creating A Conference Call
Creating a Conference Call The deskset can conference two calls to create a three-party conference call. Only one conference can exist at a time at a deskset. To create a conference call: 1. Establish the first call, Call A. You may establish Call A through direct dialing, from the Extension list, Call Log, Redial list, Park list, Directory, Quick Dial or by taking a held call off hold. - Page 14 Paging You can page all extensions, or, if the system administrator has created Paging Zones, you can page groups of other extensions. To page extensions: 1. Press . The Paging Zones screen appears. The screen shows the page options available at your deskset: an All Extensions option, and any Paging Zones that the system administrator has created.
-
Page 15: Accessing Voicemail
Accessing Voicemail # New Messages To display the New Message list, highlight on the Idle Messages screen and then press SELECT. To view the entire message list, press Graham Bell 10:17a MESSAGES. You will be prompted to enter your password if you have created 305-555-0134 Feb 23 Private... -
Page 16: Accessing The Call Log
Accessing the Call Log To display only New Calls, highlight # New Missed Calls on the Idle screen and press SELECT. To view the entire Call Log, press CALL LOG. If the caller left a voicemail message, indicated by tape icon, you may play the message from the Call Log list or from Call Log details. - Page 17 Directory The Directory consists of other deskset extension numbers, your own Personal entries, and System entries that only the system administrator can add and edit. You can add up to 50 Personal entries to your deskset Directory. Within the Directory, you can press a dial-pad key to see the first name that starts with the first letter on that key.
-
Page 18: Using The Directory
Using the Directory To create a new Directory entry: 1. To display the Directory list, press DIRECTORY. . The Personal Entry screen appears. 2. Press 3. Fill in the First Name, Last Name and Phone # using the dial-pad keys. Add a 9, or whatever your system administrator said is necessary, for outside calls. -
Page 19: Deskset Menu
Deskset Menu You can use the deskset menus to set up many deskset features. Access the main menu by pressing MENU, and then select options by scrolling down to an option and pressing SELECT, or by pressing the dial-pad key with that option number. - Page 20 Dial Pad Entry Dial pad data entry allows you to use the dial pad to enter alphabetical characters into a text field. Press a dial-pad key repeatedly to display first the upper case letters for that key, then the digit, and then the lower case letters for that key in sequence. Pressing the key further will repeat the sequence.
- Page 21 Remote Voicemail Access Card fold here fold here Synapse® Deskset Synapse® Deskset Personal Voicemail Personal Voicemail Access Card Access Card © 2014 Advanced American Telephones. All rights reserved. AT&T © 2014 Advanced American Telephones. All rights reserved. AT&T and the AT&T logo are trademarks of AT&T Intellectual Property and the AT&T logo are trademarks of AT&T Intellectual Property licensed to Advanced American Telephones, San Antonio, TX 78219.
- Page 22 Remote Voicemail Access Card...
- Page 24 NOTE: For customer service or product information, contact your installer. If your www.telephones.att.com/smb installer is unavailable, visit our website at 1 (888) 916-2007 1 (888) 883-2474 or call . In Canada dial © 2014 Advanced American Telephones. All Rights Reserved. AT&T and the AT&T logo are trademarks of AT&T Intellectual Property licensed to Advanced American Telephones, San Antonio, TX 78219.
Need help?
Do you have a question about the Synapse SB67035 and is the answer not in the manual?
Questions and answers