Table of Contents
Advertisement
Advertisement
Table of Contents

Related Manuals for Yaesu FTA-230


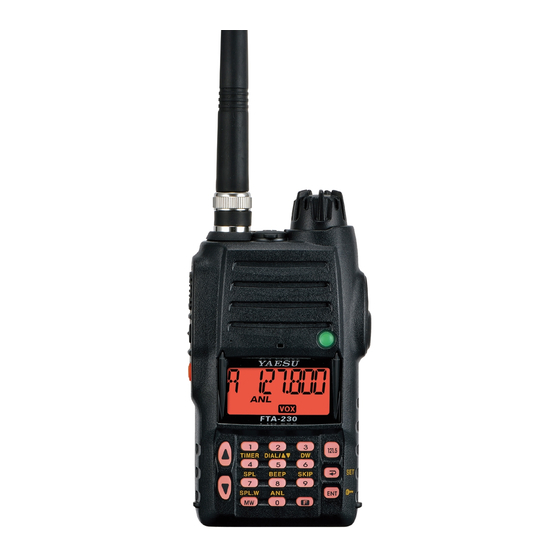
Summary of Contents for Yaesu FTA-230
- Page 1 AIR BAND TRANSCEIVER Operating Manual...
-
Page 2: Table Of Contents
ontents Important Notice! ............1 Advanced Operation ..........18 Introduction ..............2 Tuning Methods ............... 18 Accessories & Options ..........3 Reception of Weather Channel Broadcasts ...... 19 Monitor Key ..............20 Control & Connectors ..........5 Top Panel ................5 ANL (Automatic Noise Limiter) Feature ...... -
Page 3: Important Notice
FCC RF Exposure Compliance Requirements for Occupational Use Only: This FTA-230 has been tested and complies with the Federal Communications Commission (FCC) RF exposure lim- its for Occupational Use/Controlled Exposure Environment. In addition, it complies with the following Standards and Guidelines: ... -
Page 4: Introduction
NOAA weather band monitoring, 8-character Alpha/Numeric Display, 150 Memory Channels, and 100 “Book Memory” Channels. We recommend that you read this manual in its entirety, so as to understand the many features of the FTA-230 com- pletely. Keep this manual handy, so you may use it for reference. -
Page 5: Supplied Accessories
: “B” suffix is for use with 120 VAC or “C” suffix is others may be unavailable in some regions. Consult for use with 230-240 VAC. your YAESU Dealer for details regarding these and any newly available options. Connection of any non-YAESU-approved accessory, should it cause damage, may void the Limited Warranty on this apparatus. -
Page 6: Accessories & Options
& o ccessorIes ptIons Headset (not supplied) CT-96 Headset Cable PTT Switch (not supplied) An external PTT switch is required for use with an E-DC-5B DC Cable w/Noise Filter (Option) aviation headset. CD-59 12 V DC Charging Cradl FTA-230 O perATing AnuAl... -
Page 7: Control & Connectors
Because these jack connections are unique, using a Speaker/Microphone that is not specified by Yaesu may damage the FTA-230. 2) Do not allow the FTA-230 to become sub- merged in water while the rubber cap over the MIC/EAR jack is removed. -
Page 8: Front Panel
2 seconds. These functions are described in detail on page 8. BUSY/TX Indicator Lamp This lamp glows green when a signal is being re- ceived, and red when transmitting. FTA-230 O perATing AnuAl... -
Page 9: Side Panel
& c ontrols onnectors anel 2) Do not allow the FTA-230 to become sub- PTT (Push To Talk) Switch merged in water while the rubber cap over the Press this button to transmit when you are operating EXT DC jack is removed. -
Page 10: Keypad
: D e p e n d s o n s e t t i n g o f t h e ( Press and Hold key ) Command Secondary function of the key. See page 18 for details. FTA-230 O perATing AnuAl... -
Page 11: Lcd Display
Battery” indicator, which t h a t S e c o n d a r y K e y blinks when the battery Function is active. See voltage becomes too low page 8. for proper operation. FTA-230 O perATing AnuAl... -
Page 12: Before You Begin
Precautions Battery Installation and Removal The FTA-230 is apparatus is capable of two-way To install the battery, hold the transceiver with your communication on channels used for critical avia- left hand, so your palm is over the speaker and your tion safety communications. -
Page 13: Battery Charging
R E D i n d i c a t o r o n t h e CD-32 will glow. A fully-discharged pack will be charged PA-48 completely in 12 hours. CD-59 DC 11 V ~ 16 V CD-32 FTA-230 O perATing AnuAl... -
Page 14: Low Battery Indication
Ni-MH battery pack. Yaesu recom- the particular charger or battery pack you intend to mends that you carry an extra, fully-charged pack use. -
Page 15: Installing The Fba-25A Alkaline Battery Case
Installing the FBA-25A Alkaline Battery Case The supplied FBA-25A Battery Case allows operation of the FTA-230 using six “AA” size Alkaline batteries. When installing batteries, insert the (–) end first, then press in the (+) end so the battery snaps into place. Al- ways replace all six batteries at the same time, paying attention to the polarity indicated inside the case. -
Page 16: Basic Operation
Press [ 1 ] [ 3 ] [ 4 ] [ 3 ] [ 5 ] . To set 118.00 MHz: Press [ 1 ] [ 1 ] [ 8 ] [ ( SET )] . FTA-230 O perATing AnuAl... - Page 17 , and you may use this noise to set the desired audio level. Press the [ MONITOR ] button momentarily to silence the noise and resume normal (quiet) monitoring. FTA-230 O perATing AnuAl...
-
Page 18: Squelch Adjustment
Press the [ F ] key momentarily, then press the [ Emergency Frequency ( SET )] key to activate The FTA-230 can quickly access the 121.500 MHz the Menu (SET) mode. Emergency Frequency. This function can be activated Rotate the DIAL selec-... -
Page 19: Flip-Flop Feature (Frequency Recall)
Flip-Flop Feature (Frequency Recall) Erasing the memorized Frequencies The FTA-230 can memorize up to 10 operating frequen- Recall the memorized frequency that you wish to cies automatically, and recall them for later use. erase using the DIAL selector knob ... -
Page 20: Advanced Operation
MR (Memory Recall) The MR (Memory Recall) Throughout this manual, you will see references to sev- mode of the FTA-230 eral different frequency setting methods. Each will be provides the user with particularly useful in a particular operating situation,... -
Page 21: Reception Of Weather Channel Broadcasts
Press the [ MONITOR ] button (USA version only) to stop the scanner. The FTA-230 can receive VHF Weather Channel broad- You can also select Weather Channels manually by casts, which may assist your flight planning. The FTA- rotating the DIAL selector knob ... -
Page 22: Monitor Key
(press the [ F ] key followed by the [ 0 ( ANL )] key); will remain open and you should have a better chance the “ANL” icon will disappear from the display. of hearing weak signals. To return to normal operation, press the [ MONITOR ] key momentarily. FTA-230 O perATing AnuAl... -
Page 23: Lock Function
Simply press the [ 121.5 ] key momentarily (this key never locks). Pressing this key also unlocks the ra- dio. You may choose the lockout configuration according to your operating preferences. See page 45 for details. FTA-230 O perATing AnuAl... -
Page 24: Receive Battery Saver Setup
[ ENT ( )] key to save the new setting, and then An important feature of the FTA-230 is its Receive Bat- press the PTT key to exit to normal operation. tery Saver, which “puts the radio to sleep” for a time interval, periodically “waking it up”... -
Page 25: Beep On/Off
Beep On/Off The FTA-230 provides for adjustment of the Beep level via the Menu. To adjust the Beep level: The FTA-230’s key/button beeper provides convenient audible feedback whenever a button is pressed. Each Press the [ F ] key momentarily, then press the [... -
Page 26: Changing The Channel Steps
(pilot, tower, control, etc) will call out the frequency procedure to do so is very easy. according to what the display indicates. First set the FTA-230 to the operating band (NAV or COM) on which you wish to change the channel Operating... -
Page 27: Vox Operation
VOX Operation The FTA-230 provides for adjustment of the VOX Gain via the Menu, to prevent accidental transmitter activa- The VOX system provides automatic transmit/receive tion in a noisy environment. To set the VOX Gain: switching based on voice input to the microphone when using the after- market Headset. -
Page 28: Side Tone Feature
Side Tone Feature The FTA-230 also provides for adjustment of the monitoring your voice “Hang-Time” of the VOX system (transmit-receive de- When using the after-market Headset, you may monitor lay after the cessation of speech) via the Menu. The de- your transmitted voice from the headset for monitoring. -
Page 29: Timer Operation
To disable the Timer Mode, press the [ F ] key fol- Timer Operation lowed by the [ 4 ( TIMER )] key again. The FTA-230 is provided a “Stop Watch” timer and a “Count Down” timer. These can be used for a variety of time-keeping purposes. -
Page 30: Memory Operation
Memory System Operation blink on the LCD. The FTA-230’s Main Memory system allows the user W i t h i n f i v e s e c - to store, label, and recall channel frequencies which onds of pressing the you may want to use frequently. - Page 31 A B C D E G H M N O P Q R S T U V W X / Y < > µ | 0 1 2 3 4 5 6 7 8 9 FTA-230 O perATing AnuAl...
-
Page 32: Recalling The Memories
3. Alphanumeric Label (e.g. LAX FSS). “F ” requency ndIcatIon To change the Memory display title, press the ( SET )] key repeat- edly, if necessary, until you get the desired dis- “a ” lphanumerIc aBel play title structure. FTA-230 O perATing AnuAl... -
Page 33: Deleting Memories
)] key to clear the Memory channel (the Memory channel number will return to “001”). Important Notice: An “erased” channel cannot be restored, and “CH-001” cannot be erased, as it is used for “Priority Channel” operation. FTA-230 O perATing AnuAl... -
Page 34: Scanning Operation
The FTA-230 allows you to scan automatically in the When the scanner encounters a signal, the scanner 1 , Main Memory, “Book” Memory, or Weather will halt on that channel and will hold there for five Channel 2... -
Page 35: Channel-Skip Scanning
The FTA-230’s automatic scanner is not operational in Recall the Memory Channel to be skipped during the NAV band (108.000 - 117.975 MHz), because the scanning. Press the [ F ] key fol- NAV stations (ILS, etc.) transmit constantly (thereby lowed by the [ 9 ( SKIP )] causing the scanner to stop repeatedly). -
Page 36: Dual Watch Operation
Priority channel will each be polled Channel. To stop Dual Watch, press [ F ] key followed by the for a 500 ms interval, as the FTA-230 looks for activity [ 6 ( DW )] key. on each channel. -
Page 37: Priority Dual Watch Operation
“DW” icon will appear on the display. While receiving on the “current” (non-Priority) ch an n el , pr e s s in g t h e PTT switch once causes the radio to switch to the FTA-230 O perATing AnuAl... -
Page 38: Split Operation
P r e s s t h e [ F ] k e y f o l l o w e d b y t h e [ MW ( SPL-W )] key. The “SPL” icon will blink, and the transmit frequency will appear on the display. FTA-230 O perATing AnuAl... -
Page 39: Operating In The Split Mode
Note: A split frequency can be programmed into each memory channel independently. Set a transmit frequen- cy before programming the memory channel, if desired. The split function on/off setting can also be programmed into a memory channel. FTA-230 O perATing AnuAl... -
Page 40: Field Programming Mode
LCD. To attach an alpha/numeric name may want to use frequently while the FTA-230 is in the (label) to the memory, proceed to the next step; oth- Field Programming mode. -
Page 41: Cpu Resetting
To clear all memories and other settings to factory de- faults: Turn the radio off. Press and hold in the [ ENT ( )] key and the [ MONITOR ] button, while turning the radio on. FTA-230 O perATing AnuAl... -
Page 42: Menu ("Set") Mode
(“on” to “oFF,” default settings be changed, however, until you are thor- etc.). oughly familiar with the operation of the FTA-230. 1. Press the [ F ] key momen- 5. Press the [ ENT ( )] key tarily, then press the [ to save your new setting. -
Page 43: Menu Listing
K / KD / P / PD / PK / PKD / D STEP Selects the synthesizer steps. 25 kHz / 8 kHz 25 kHz 1 ~ 3 BPLV Sets the Beep level. STLV Sets the Side Tone level. 1 ~ 3 FTA-230 O perATing AnuAl... - Page 44 Important Notice: An “erased” channel cannot be re- automatically when scanning resumes. stored, and “CH-001” cannot be erased, as it is used for [ BEEP ] “Priority Channel” operation. Function: Keypad Beeper On/Off. Available Values: on/oFF Default Setting: on FTA-230 O perATing AnuAl...
- Page 45 DIAL knob is operated. Default Setting: DW “oFF” mode: Disables the illumination lamp. “DW” mode: The FTA-230 will activate the Dual “CNT” mode: Illuminates the Display/Keypad continu- Watch feature when you press the [ F ] key ously.
- Page 46 [ DIMM ] the external microphone is disconnected. Function: Setting of the display brightness level. Available Values: LV1 ~ LV4 Default Setting: LV3 FTA-230 O perATing AnuAl...
- Page 47 [ STLV ] [ VDLY ] Function: Sets the Side tone level. Function: Selects the VOX delay (“hang”) time. Available Values: 1 ~ 3 Available Values: 05/10/15/20 (x0.1 sec) Default Setting: 3 Default Setting: 10 (x0.1 sec) FTA-230 O perATing AnuAl...
- Page 48 AM: Better than 0.8 µV (for 6 dB S/N with 1 kHz, 30 % modulation) FM; Better than 0.4 µV (for 12 dB SINAD) Selectivity: More than 8 kHz/–6 dB Adjacent CH. Selectivity: Less than 25 kHz/–60 dB AF Output (Internal speaker): 0.7 W @ 16 Ohms, 10 % THD FTA-230 O perATing AnuAl...
-
Page 49: Specifications
Better than ±10 ppm (+14 °F to + 140 °F [–10 °C to +60 °C]) Modulation System: Low Level Amplitude Modulation Spurious Emission: >60 dB below carrier Int. Microphone Type: Condenser Ext. Mic. Impedance: 150 Ohms Specifications are subject to change without notice or obligation. FTA-230 O perATing AnuAl... -
Page 50: Troubleshooting
Please confirm the connections and connector sizes are correct. Headset Note: Earphone (speaker) Impedance: 8 or above MIC Impedance: 150 ±20% PTT pressed: Ground PTT not pressed: Open FTA-230 O perATing AnuAl... -
Page 51: Book Memory Channel List
123.000 Air Traffic Control General Use Unicom-Heliports ARTCC 04 136.075 UNICOM 7 123.050 Air Traffic Control General Use Unicom-Heliports ARTCC 05 136.125 UNICOM 8 123.075 Air Traffic Control General Use - - - ARTCC 06 136.150 FTA-230 O perATing AnuAl... - Page 52 STO VMT 127.600 TLV ATIS 132.500 SUNDSVALL VOLMET VIENNA(Schwechat) SDL VMT 127.800 VIE ATIS 122.950 TEL AVIV(BEN GURION RADIO) WARSAW(Okecie) TLV VMT 126.800 WAW ATIS 120.450 VIENNA(VOLMET WIEN AUSTRIA) ZURICH VIE VMT 126.000 ZRH ATIS 128.525 FTA-230 O perATing AnuAl...
- Page 53 FTA-230 O perATing AnuAl...
- Page 54 FTA-230 O perATing AnuAl...
- Page 55 Part 15.21: Changes or modifications to this device not expressly approved by YAESU MUSEN could void the user’s authorization to operate this device.
- Page 56 Copyright 2012 YAESU MUSEN CO., LTD. YAESU MUSEN CO., LTD. All rights reserved. Tennozu Parkside Building 2-5-8 Higashi-Shinagawa, Shinagawa-ku, Tokyo 140-0002 Japan No portion of this manual may be YAESU USA reproduced without the permission of 6125 Phyllis Drive, Cypress, CA 90630, U.S.A.
Need help?
Do you have a question about the FTA-230 and is the answer not in the manual?
Questions and answers