Table of Contents
Advertisement
Advertisement
Table of Contents

Related Manuals for Yaesu FTA-250L


Summary of Contents for Yaesu FTA-250L
- Page 1 AIR BAND TRANSCEIVER FTA-250L Operating Manual...
-
Page 2: Table Of Contents
Contents Controls & Connectors (Top / Front Panel) .....9 Introduction ................1 Safety Precautions ............2 Controls & Connectors (Left / Right Side) ....10 Important Notice! ...............4 Operation ................11 Accessories and Options ..........5 Using comm mode ............13 Supplied Accessories ............5 Using memory mode ............13 Options ................5 Reception of Weather Channel Broadcasts ....15 Before You Begin ...............6... -
Page 3: Introduction
PC Programming Software and your PC. We recommend that you read this manual in its entirety, so as to understand the many features of the FTA-250L completely. Keep this manual handy, so you may use it for reference. -
Page 4: Safety Precautions
Do not perform transmission in a crowded place for the safety of persons using a medical device such as a cardiac pacemaker. Also, Yaesu is not liable for damages caused through use of The radio wave emitted from this product can cause the medical de- this product by you or a third party except in the case where vice to malfunction and result in an accident. - Page 5 A fire, leak, overheating, explosion, or ignition can result. Install the belt clip securely. If they are installed improperly, the FTA-250L may fall or drop, result- ing in an injury or damage. CAUTION Do not place a heavy object on the power cord of the battery charger.
-
Page 6: Important Notice
1 to 2 inches (2.5 to 5 cm) away from your mouth and keep the antenna The FTA-250L has been tested and complies with the at least 1 inch (2.5 cm) away from your head and Federal Communications Commission (FCC) RF expo- body. -
Page 7: Accessories And Options
Availability of accessories may vary. Some accesso- ries are supplied as standard per local requirements, while others may be unavailable in some regions. Consult your YAESU Dealer for details regarding these and any newly available options. Connection of any non-YAESU-approved accessory, should it cause damage, may void the Limited War- ranty for the FTA-250L. -
Page 8: Before You Begin
, s l i d e t h e battery pack downward and out of the transceiver. FTA-250L O perATing AnuAL... -
Page 9: Charging The Battery Pack
Wind the cable one turn, SAD-20 then snap two halves. Low Battery Indication AC line outlet When the battery voltage is too low for reliable operation, the “ ” icon will blink on the LCD display. SBH-22 DC IN jack FTA-250L O perATing AnuAL... -
Page 10: Quick Guide
● Press the [ DWN ] or [ UP ] key. To cancel the emergency mode, press the [ BACK ] key, then press the [ DWN ]( ) key. ● Enter the frequency with the numeric keys. FTA-250L O perATing AnuAL... -
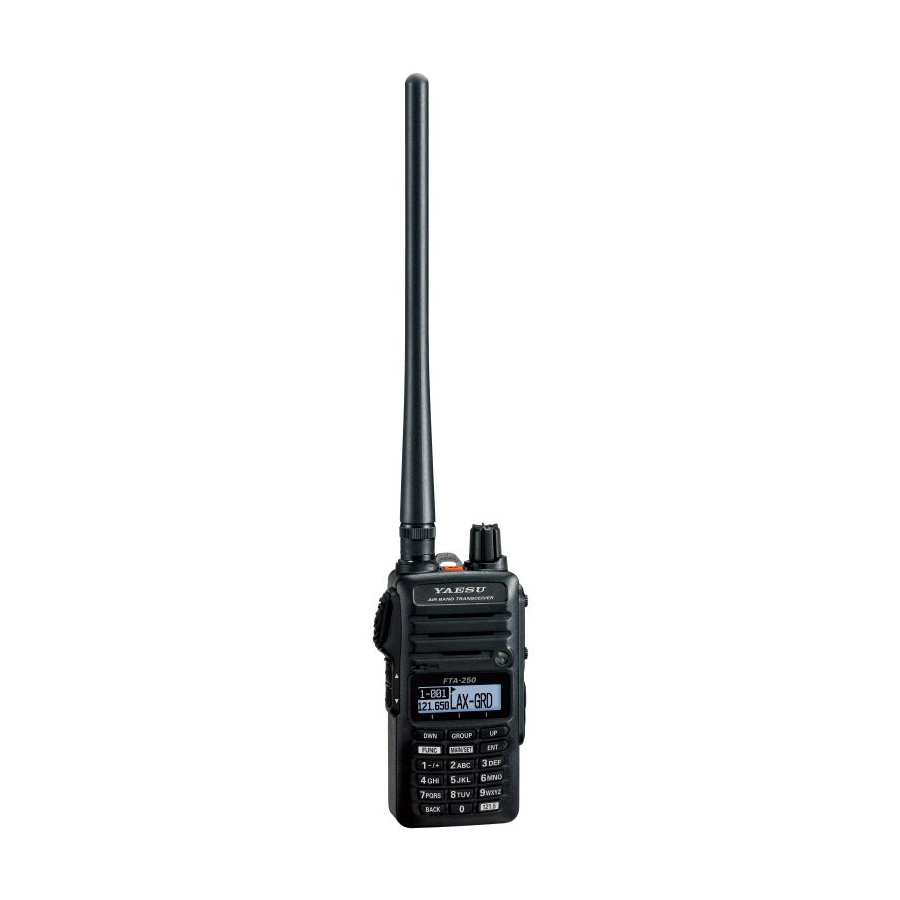
Page 11: Controls & Connectors (Top / Front Panel)
Press and hold to turn the lock function ON/OFF. PWR/VOL Knob  ・Power ON/OFF ・Volume adjustment Loudspeaker à Microphone Ä TX indicator Å Lights red during transmission. LCD (Liquid Crystal Display) Æ Displays frequency and transceiver status. FTA-250L O perATing AnuAL... -
Page 12: Controls & Connectors (Left / Right Side)
PTT (Push To Talk) Switch À Flip-Flop (▲/▼) key Á The FTA-250L automatically memorizes up to 9 operating frequencies that may be recalled for later use. Each press of the lower [▲/▼] key will change the transceiver operation to an earlier saved operating frequency or memory channel. -
Page 13: Operation
( WX ) mode [ DWN ] key à COMM ( ) mode The FTA-250L can receive 10 VHF weather channels to assist with flight planning. [ GROUP ] key à MEMORY ( ) mode [ UP ] key à... - Page 14 If no name is assigned, the memory channel frequency is displayed. Displays the memory channel frequency. (WX) mode Scans only the weather channels on which this icon is displayed. Emblem lights while the dual watch function is operating. Channel Number Display frequency. FTA-250L O perATing AnuAL...
-
Page 15: Using Comm Mode
The frequency input may be canceled by pressing the PTT switch before completing the entry. z Register frequently used frequencies into the memory channels. The memory channel may be easily recalled for later use. (page 14). FTA-250L O perATing AnuAL... - Page 16 [ 0 ] à [ 0 ] à [ 5 ] . is returned to the normal operation screen. z Only the memories registered in the current memory group may be selected. z To switch to another memory group, press the [ GROUP ] key. FTA-250L O perATing AnuAL...
-
Page 17: Reception Of Weather Channel Broadcasts
NOAA weather channels. To enable or disable the auto alarm function when receiving the weather alert signal, change the setting in the COMM SETUP menu. See page 24 for details. FTA-250L O perATing AnuAL... -
Page 18: Function Feature
DISP: k e y s a n d d i s p l a y i l l u m i n a t e a c c o r d i n g t o t h e S e t u p M o d e “BACKLIT” setting. FTA-250L O perATing AnuAL... - Page 19 3. Press the [ DWN ]( q ) key or [ UP ]( p ) key, to select the function you want to register newly, then press the [ GROUP ]( ) key. 4. Press the PTT switch to return to the normal operation screen. FTA-250L O perATing AnuAL...
-
Page 20: Scanning Operation
Scanning may also be started by pressing the [FUNC] key, and then pressing the [DWN]( ) key. z Scanning will stop temporarily when a signal is received, and the frequency display flashes. 2. To stop scanning, press any key on the keypad. FTA-250L O perATing AnuAL... -
Page 21: Memory Scan Skip
“ ” is not displayed à Scanning will be skipped “ ” is displayed à Scanning is not skipped To change the group number, press the [GROUP] key. To change the channel number, press the [DWN] or [UP] key. FTA-250L O perATing AnuAL... -
Page 22: Dual Watch Feature
Changes are registered and the changed memory The Priority Channel frequency is set, and the channel is displayed. display returns to the setup screen. 7. Press the PTT switch to return to the normal operation screen. FTA-250L O perATing AnuAL... -
Page 23: Accessing The 121.5 Mhz Emergency Frequency
When the signal on the PRIORITY CH drops out, the dual watch resumes. 3. Press the [ FUNC ] key, and then press the [ GROUP ] ) key to stop the dual watch function and re- turn to the operation before starting dual watch. FTA-250L O perATing AnuAL... -
Page 24: Adjusting The Squelch
1. Pressing the [ ▲ ] or [ ▼ ] key on the side of the transceiver will recall the memorized frequencies in order. Press hold the [▲] and [▼] keys at the same time, to delete the memorized frequencies and memory channels. FTA-250L O perATing AnuAL... -
Page 25: Advanced Operation
3. Press the [ DWN ]( ▼ ) or [ UP ]( ▲ ) key to select the item to be set, and then To return to the previous screen, press the [BACK] key to end the operation. press the [ GROUP ]( key. FTA-250L O perATing AnuAL... -
Page 26: Summary Of The Setup Menu
25 kHz / 8.33 kHz 25 kHz (8.33 kHz; Europe only) “Time Out Timer”, Forcibly stops transmission after TX TOT 1 / 2 / 3 / 4 / 5 MIN 5 MIN continuously transmitting for the selected time. FTA-250L O perATing AnuAL... - Page 27 Setting of the time until stopping talking and returning VOX DELAY 0.5 / 1.0 / 1.5 / 2.0 / 3.0 SEC 1.5 SEC to receiving state when VOX function is in operation. FTA-250L O perATing AnuAL...
- Page 28 EXT PO/KEY EXT PO/KEY: Lights for 5 seconds only when any key is pressed, or lights at all time when the power is supplied through the EXT DC jack. CONTRAST Display contrast setting LV01 - LV30 LV15 FTA-250L O perATing AnuAL...
- Page 29 ( ABOUT ) Item Description Selectable options Default Value Confirming the version of the software FTA-250L O perATing AnuAL...
-
Page 30: Resetting The Transceiver
4. Insert the plugs of the headset to the sockets of [ MAIN/SET ] and [ ENT ] the SCU-15. keys while turning the transceiver ON. Headset (not supplied) 3. Reset is complete when the sound “beeps” and the power turns on. SCU-15 Headset Adapter Cable FTA-250L O perATing AnuAL... -
Page 31: Troubleshooting For Headset Connection
MIC/SP jack and be fixed with the two screws. Can I purchase the optional PTT Switch from Yaesu? Contact your Aviation dealer for details regarding purchasing an aftermarket Push-To-Talk switch. -
Page 32: Specifications
150 Ohms The fully-charged battery lasts for 16 hours on the transceiver under the conditions below: Operation ratio ... TX:RX:Standby = 5:5:90 (sec) Specifications are subject to change without notice or obligation. Power Output ..5 W FTA-250L O perATing AnuAL... - Page 33 Les types d’antenne non inclus dans cette liste, ou dont le gain est supérieur au gain maximal indiqué, sont strictement interdits pour l’exploitation de l’émetteur. Part 15.21: Changes or modifications to this device not expressly approved by YAESU MUSEN could void the user’s authorization to op- erate this device.
- Page 34 EU Declaration of Conformity We, Yaesu Musen Co. Ltd of Tokyo, Japan, hereby declare that this radio equipment FTA-250 is in full compliance with EU Radio Equipment Directive 2014/53/EU. The full text of the Declaration of Conformity for this product is available to view at http://www.yaesu.com/jp/red...
- Page 36 Copyright 2017 YAESU MUSEN CO., LTD. All rights reserved. No portion of this manual may be reproduced without the permission of YAESU MUSEN CO., LTD. YAESU MUSEN CO., LTD. Tennozu Parkside Building 2-5-8 Higashi-Shinagawa, Shinagawa-ku, Tokyo 140-0002 Japan YAESU USA...
Need help?
Do you have a question about the FTA-250L and is the answer not in the manual?
Questions and answers