Table of Contents
Advertisement
Available languages
Available languages
Advertisement
Chapters
Table of Contents

Related Manuals for Microlife BP3NA1-1X


Summary of Contents for Microlife BP3NA1-1X
- Page 1 Instruction Booklet for Model # BP3N 1-1X Ref #867...
-
Page 2: Table Of Contents
utomatic Blood Pressure Monitor - Instruction Manual Table of contents Introduction 1.1. Features of your blood pressure monitor 1.2. Important information about self measurement Important Information on Blood Pressure and its Measurement 2.1. How does high/low blood pressure arise? 2.2. Which values are normal? 2.3. -
Page 3: Introduction
1. Introduction 1.1.Features of your utomatic Blood Pressure Monitor Your blood pressure monitor with Irregular Heartbeat Detection, and PC Link Blood Pressure nalyzer Software is a fully automatic digital blood pressure measuring device for use by adults on the upper arm at home or in your doctor’s/nurse’s office. It enables very fast and reliable measurement of systolic and diastolic blood pressure as well as pulse through the oscillometric method. -
Page 4: Which Values Are Normal
Blood pressure values must lie within certain normal ranges in order to prevent particular diseases. 2.2. Which values are normal? Blood pressure is very high if your diastolic pressure is above 100 mmHg and/or your systolic blood pressure is over 160 mmHg, while at rest. In this case, please con- sult your physician immediately. -
Page 5: What Can Be Done If Regular High/Low Values Are Obtained
Further information • If your values are mostly normal under resting conditions but exceptionally high under conditions of physical or psychological stress, it is possible that you are suffering from so-called “labile hypertension.” Consult your doctor. • Correctly measured diastolic blood pressure values above 120mmHg require immediate medical treatment. -
Page 6: Components Of Your Blood Pressure Monitor
D) Your physical condition • fter a medical examination, and with your doctor’s approval and direc- tion; exercise. • Choose sports which require stamina and avoid those which require strength. • void reaching the limit of your performance. • With previous illnesses and/or an age of over 40 years, please consult your doctor before beginning your exercise routine. -
Page 7: Using Your Monitor For The First Time
Wide Range Rigid Cuff: For arm circumference 22cm - 46 cm (8.7” - 18.1”) If you ever need to buy a replacement cuff, use only Microlife brand cuffs. Call Microlife customer service at 1-800-568-4147 for information. Please Note: rm circumference should be measured with a measuring tape in the middle of the relaxed upper arm. -
Page 8: Cuff Tube Connection
4.3. Cuff tube connection Insert the cuff tube into the opening on the side of the monitor indicated by the drawing of a cuff. 4.4. Select the User This blood pressure monitor is designed to store 99 measurements for each of two users. Before taking a measurement, be certain that the correct user has been selected. -
Page 9: Measurement Procedure
(measured in the center). The permissible range is printed on the cuff. If this is not suitable for your use, please call 1-800-568-4147. Note: Only use clinically approved Microlife cuffs! • loose cuff or a sideways protruding air pocket causes false measurement values. -
Page 10: Fitting The Cuff
5.3. Fitting the Cuff a) The cuff is pre-formed for easier use. Remove tight or bulky clothing from your upper arm. b) Wrap the cuff around your upper left arm. The rubber tube should be on the inside of your arm extending downward to your hand. Make certain the cuff lies approximately 1/2”... -
Page 11: Measuring Procedure
Comment: If it is not possible to fit the cuff to your left arm, it can also be placed on your right arm. However, all measurements should be made using the same arm. Cuff on Comparable blood pressure measurements always require the right arm same conditions (Relax for several minutes before taking a meas- urement). -
Page 12: Irregular Heartbeat Detector
5.5. Irregular Heartbeat Detector This symbol indicates that certain pulse irregularities were detected during the measurement. In this case, the result may devi- ate from your normal basal blood pressure – repeat the measure- ment. In most cases, this is no cause for concern. However, if the symbol appears on a regular basis (e.g. -
Page 13: Traffic Light Indicator
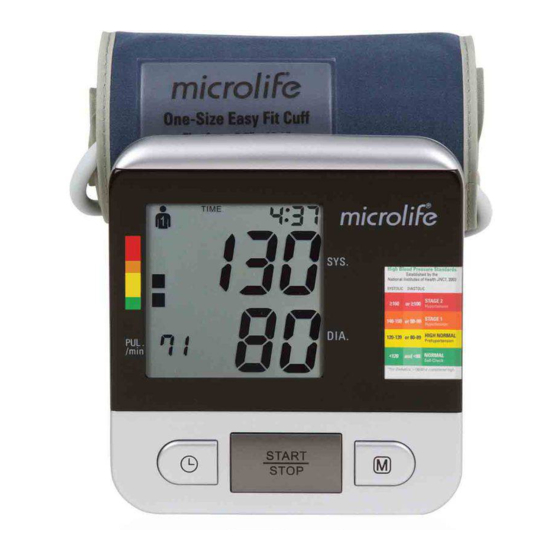
5.6. Traffic Light Indicator The bars on the left-hand edge of the display show you the range within which the indi- cated blood pressure value lies. Depending on the height of the bar, the readout value is either within the normal (green), borderline (yellow) or danger (red) range. The classification is based on standards established by the National Institutes of Health JNC7, 2003. -
Page 14: Memory - Displaying The Last 99 Measurements
5.7. Memory – Displaying the last 99 Measurements t the end of a measurement, this monitor automatically stores each result with date and time. This unit stores 99 memories for each of 2 users. Viewing the stored values With the unit off, press the "M" button. The display first shows " ", then shows an average of all measurements stored in the unit. -
Page 15: Setting The Medication Reminder
5.9. Setting the Medication Reminder This instrument allows you to set two alarm times at which an alarm signal will then be trig- gered. This can be a useful aid, for instance as a reminder to take medication or to remind you to take your blood pressure at the same time each day. -
Page 16: Battery Charge Indicator
5.10. Battery Charge Indicator Batteries almost discharged When the batteries are approximately 75% used the battery symbol will flash as soon as the instrument is switched on (if at least one of the batteries still has some charge). lthough the instrument will con- tinue to measure reliably, you should obtain replacement batteries. -
Page 17: Using The C Dapter
If electrical power is interrupted, (e.g., by accidental removal of the C adapter from the outlet) the monitor must be reset by removing the plug from the socket and reinserting the C adapter connection. Please consult Microlife if you have any questions regarding the C adapter by calling 1-800-568-4147. -
Page 18: Error Messages/Troubleshooting
7. Error Messages/Troubleshooting If an error occurs during a measurement, the measurement is discontinued and a corresponding error code is displayed. We recommend you switch the device off and take a new measurement making sure you allow time for relaxation (example: error no. 1). Error No. - Page 19 Other possible errors and their solutions If problems occur when using the device, the following points should be checked: Malfunction Remedy The display remains blank when the instrument • Check battery installation or C adapter con- is switched on although the batteries are in nection is correct and wall outlet is working.
-
Page 20: Care And Maintenance
8. Care and Maintenance a) Do not expose the device to either extreme temperatures, humidity, dust or direct sunlight. b) The cuff contains a sensitive air-tight bubble. Handle this cuff carefully and avoid all types of stress through twisting or buckling. c) Clean the device with a soft, dry cloth. -
Page 21: Warranty
9. Warranty Your Microlife blood pressure monitor is guaranteed for a lifetime against manu- facturers’ defects for the original purchaser only, from date of purchase. The warran- ty does not apply to damage caused by improper handling, accidents, professional use, not following the operating instructions or alterations made to the instrument by third parties. -
Page 22: Certifications
10. Certifications Device standard: Device corresponds to the requirements of the standard for non-invasive blood pres- sure monitors: MI/ NSI SP10 IEC 60601-1 IEC 60601-1-2 Electromagnetic compatibility: Device fulfills the stipulations of the International standard IEC 60601-1-2 The B.H.S. (British Hypertension Society) has graded this product / or “Recommended for clinical and home use.”... -
Page 23: Technical Specifications
11. Technical specifications: Weight: 735 g (with batteries) Size: 160 (W) x 140 (L) x 98 (H) mm Storage temperature: –20 to +55°C (-4°F to +131°F) Humidity: 15 to 90% relative humidity maximum Operation temperature: 10 to 40°C ( 50°F - 104°F) Display: LCD-Display (Liquid Crystal Display) Measuring method:... -
Page 24: Contacts For Support
12. Contacts for Support Microlife US , Inc. 1617 Gulf to Bay Blvd 2nd Floor Clearwater, FL 33755 Toll Free Help Line: 1-800-568-4147 Email: custserv@microlifeusa.com Fax: (727) 451-0492 www.microlifeusa.com Made in China... - Page 25 Monitor de Presión rterial Manual de Instrucción para el modelo #BP3N 1-1X Ref #867...
- Page 26 Monitor de Presión rterial utomático – Manual de Instrucción Tabla de Contenido Introducción Características de su monitor de presión arterial Información importante sobre la automedición Información importante sobre la presión sanguinea y su medición Como sube/baja la presión alta Cuales son los valores normales? Que se puede hacer si se obtienen valores altos o bajos? Componentes de su Monitor de Presión arterial Utilización de su Monitor de Presión arterial por primera vez...
-
Page 27: Introducción
1. Introducción 1.1.Características de su medidor automático de presión arterial Su monitor de presión sanguinea con Detector de Latido Irregular y Programa analizador PC, es un monitor de presión sanguinea complétamente automático y digital para uso en adultos en la parte superior del brazo, tanto en el hogar como en el consultorio médico/enfermería. -
Page 28: Como Sube/Baja La Presión Alta
2. Importante información sobre la presión arterial y su medición 2.1 Como sube la presión alta/baja? Su nivel de presión sanguinea se determina en el centro circulatorio del cerebro y se ajusta a una var- iedad de situaciones conforme a la retroalimentación del sistema nervioso. Para ajustar la presión san- guinea, se altera la intensidad y frecuencia del corazón (pulso), así... -
Page 29: Que Se Puede Hacer Si Se Obtienen Valores Altos O Bajos
Información dicional • Si sus valores son mayormente normales bajo períodos de descanso pero excepcional- mente altos bajo condiciones de stress físico o mental, es possible que ested sufra de lo que se denomina “hypertensión labil”. Consulte con su médico. •... - Page 30 D) Su Estado Físico • Luego de un exámen médico, con el consentimiento del doctor y bajo su dirección; haga ejercicios. • Elija deportes que requieran stámina y evite los que demandan fuerza. • Evite alcanzar el límite de su capacidad •...
- Page 31 Brazaletes Para brazosde circunferencia 22-46 cm o 8.7”-18.1” (inclusive) Si usted necesita adquirir un brazalete nuevo, utilice solamente los de mavea Microlife. Nota: La circunferencia del brazo debe medirse con una cinta métrica en el medio de la parte superior del brazo en estado de relajación.
-
Page 32: Conección Del Tubo Del Brazalete
4.3 Conección del tubo del brazalete Inserte el tubo del brazalete dentro de la abertura lateral del monitor. 4.4. Selección del Usuario Este monitor de presión está designado para guardar 99 mediciones para cada uno de los dos usuarios. ntes de tomarse una medición, asegúrece que haber escogido el usuario correcto. -
Page 33: Procedimiento Para La Medición
Si la misma no se adapta a su necesidad, por favor llame al teléfono 1-800-568-4147. Nota: Use solamente los brazaletes clínicamente aprobados marca Microlife. • Un brazalete flojo o con protuberancias de aire a los costados causaría lecturas incorrectas. -
Page 34: Prueba Del Brazalete
5.3 Prueba del brazalete a) El brazalete esta pre-formado para facilitar su auo. segúrese de no tener ropa ajustada o en el brazo. b) Colóquese el brazalete alrededor del brazo izquierdo. La manguero debe estar ubicada en la parte interior del brazo extendido. segúrese de que el brazalete de encuentre de 1 a 2cm (1/2”... - Page 35 Nota: Si no es possible colocarse el brazalete en el brazo izquierdo, tam- bien se puede colocar en el derecho. Sin embargo, todas las mediciones deben ser tomadas en el mismo brazo. Para poder comparar las lecturas obtenidas se require que siempre se cum- Cuff on plan las mismas condiciones.
-
Page 36: Detector De Latido Irregular
5.5. Detector de Latido Irregular El símbolo indica que se ha detectado un pulso irregular durante la medición. En este caso, el resultado puede variar su presión básica. Repita la medición, esto no es motivo de inqui- etud. Sin embargo, si el símbolo aparece con regularidad (ej. Varias veces a la semana durante mediciones diarias), le aconse- jamos consulte con su médico. -
Page 37: Indicador De Luz De Tráfico
5.6. Indicador de Luz de Trafico Las barras en el lado izquierdo de la pantalla muestran el alcance de la presión arterial. Dependiendo de la altura de la barra, la lectura está dentro de los parámetros normales; (verde), al borde; ( marillo) on en peligro; (rojo). La clasificación está... -
Page 38: Como Descontinuar La Medición
5.7. Memoria – exhibición de las últimas 99 mediciones l final de una medición, este monitor almacena automáticamente cada resultado con la fecha y la hora. Esta unidad guarda 99 memorias para cada uno de los dos usuarios. Visualización de los valores almacenados Estando la unidad apagada, presione el boton “M”. - Page 39 5.9. omo fijar la alarma Este dispositivo le permite fijar dos horarios de alarma. Este rasgo es muy util para recordarle que tiene que tomar su medicina o medirse la presion cada dia a la misma hora. 1. Para fijar la hora de la alarma, presione el botón de la hora (el instrumento debió...
-
Page 40: Indicador De La Carga De La Batería
5.10. Indicador de batería Baterías casi completamente descargadas. Cuando las baterías llegana estar aproximadamente 75% discargadar, se podrá observar el siguiente símbolo centelleando en la pantalla al momento de encender la unidad. pesar de que el instrumento con- tinuará tomando las mediciones correctamente, usted ya debería reem- plazar las baterías. -
Page 41: Instalación Y Transmisión De Datos
Nota: Las baterías no se consumen cuando el adaptador esta conectado a la unidad. Si la corriente eléctria es interrumpida (e.j. por accidente o desconección. Por favor con- sulte a Microlife en caso de alguna pregunta con respecto al adaptador de corriente alterna C, llamando al número 1-800-568-4147. -
Page 42: Mensajes De Error/Como Se Detectan Y Eliminan
7. Mensajes de Error/Como se detectan y eliminan Si ocurre un error durante la medición, la misma será descontinuada y el códi- go de error se observará en la pantalla. Recomendamos apagar el dispositivo y efectuar una nueva medición, siempre y cuando usted se tome el tiempo necesario para relajarse. - Page 43 Otros posibles errores y soluciones Si ocurren problemas durante el uso del dispositivo, verifique los siguientes puntos: Mal funcionamiento Remedy La pantalla permanence en blanco cuando se • Revice la instalación de las baterías enciende el dispositivo, aún cuando las •...
-
Page 44: Cuidado Y Mantenimiento
8. Cuidado y mantenimiento a) No exponga este dispositivo a temperaturas extremas, Humedad, polvo o rayos del sol. b) Los brazaletes contienen burbujas de aire muy sensitivas. Manéjelos con cuidado para evi- tar todo tipo de stress al doblarlos o abrocharlos. -
Page 45: Garantía
9. Garantía Su monitor de presión Microlife tiene garantía por un vida contra defectos de fab- ricación válidos para el comprador únicamente, a partir de la fecha de adquisición. La garantía no cubre daños causados por mal uso, accidentes, uso profesional, el no seguimiento de las instrucciones de uso o alteraciones hechas al dispositivo por ter- ceras personas. -
Page 46: Certificaciones
10. Certificaciones Regulación del dispositivo: Este dispositivo, para procedimientos no Invasivos, està diseñado conforme a las reglas de fabricación Europeas y de los Estados Unidos de mérica: MI/ NSI SP10 IEC 60601-1 IEC 60601-1-2 Compatibilidad electromagnética: Este dispositivo cumple con las estipula- ciones Internacionales IEC60601-1-2 La B.H.S. -
Page 47: Especificaciones Técnicas
Mecanografíe la partición aplicada FB. *No previsto para el uso en niños 12 años o más menores. 12. Como contactarnos para asistencia Microlife US , Inc. 1617 Gulf to Bay Blvd, 2nd Floor, Clearwater, FL 33755 Toll Free Help Line: 1-800-568-4147 Email: custserv@microlifeusa.com... - Page 48 BP3N 1-1X-0211-1-867...
Need help?
Do you have a question about the BP3NA1-1X and is the answer not in the manual?
Questions and answers
my monitor has a slide switch on the same side as the AC adapter port - slide left to “1” or right to “3” - no explanation anywhere - what is it and how do you decide which position to keep it in, 1 or 3? see image below
The slide switch on the Microlife BP3NA1-1X blood pressure monitor lets you choose between taking a single measurement (position 1) or three consecutive measurements in Microlife Averaging Mode (position 3). To use Averaging Mode, slide the switch toward the "3." To take a single measurement, slide it toward the "1."
This answer is automatically generated