
Related Manuals for Gefen EXT-WHD-1080P-SR-TX


Summary of Contents for Gefen EXT-WHD-1080P-SR-TX
- Page 1 *Preferred Wireless for HDMI 5 GHz Short Range EXT-WHD-1080P-SR-TX EXT-WHD-1080P-SR-RX User Manual Release A2...
- Page 2 Important Safety Instructions Read these instructions. Keep these instructions. Heed all warnings. Follow all instructions. Do not use this product near water. Clean only with a dry cloth. Do not block any ventilation openings. Install in accordance with the manufacturer’s instructions.
- Page 3 FCC Statement This device complies with part 15 of the FCC Rules. Operation is subject to the following two conditions: (1) This device may not cause harmful interference, and (2) this device must accept any interference received, including interference that may cause undesired operation. This equipment has been tested and found to comply with the limits for a class B digital device, pursuant to part 15 of the FCC Rules.
-
Page 4: Technical Support
Technical Support (818) 772-9100 (800) 545-6900 8:00 AM to 5:00 PM Monday - Friday, Pacific Time (818) 772-9120 Email support@gefen.com http://www.gefen.com Mailing Address Gefen, LLC c/o Customer Service 20600 Nordhoff St. Chatsworth, CA 91311 Product Registration Register your product here: http://www.gefen.com/kvm/Registry/Registration.jsp... - Page 5 Wireless for HDMI 5 GHz Short Range is a trademark of Gefen, LLC. © 2015 Gefen, LLC. All Rights Reserved. All trademarks are the property of their respective owners. Gefen, LLC reserves the right to make changes in the hardware, packaging, and any accompanying documentation without prior written notice.
- Page 6 Flexible mounting options: ¼”-20 thread, wall mounting, shelf placement • Handheld IR remote for easy setup and operation • Firmware update via Mini-USB port using Gefen Syner-G™ software • WHDI 1.0, FCC Part 15, and ETSI-compliant • Additional Sender units (EXT-WHD-1080P-SR-TX) available separately 1080P ®...
-
Page 7: Packing List
The Wireless for HDMI 5 GHz Short Range ships with the items listed below. The packing contents for each product are listed below. If any of these items are not present in the box when you first open it, immediately contact your dealer or Gefen. EXT-WHD-1080P-SR •... -
Page 8: Table Of Contents
Table of Contents Getting Started Introduction......................2 Sender Unit ....................2 Receiver Unit ....................4 IR Remote Control ..................6 Installing the Batteries ................... 7 Installation ......................8 Connection Instructions ................. 8 Sample Wiring Diagram ................9 Basic Operation The Linking Process .................... 12 Getting Source Information ................. -
Page 11: Getting Started
Wireless for HDMI 5 GHz Short Range Getting Started... -
Page 12: Introduction
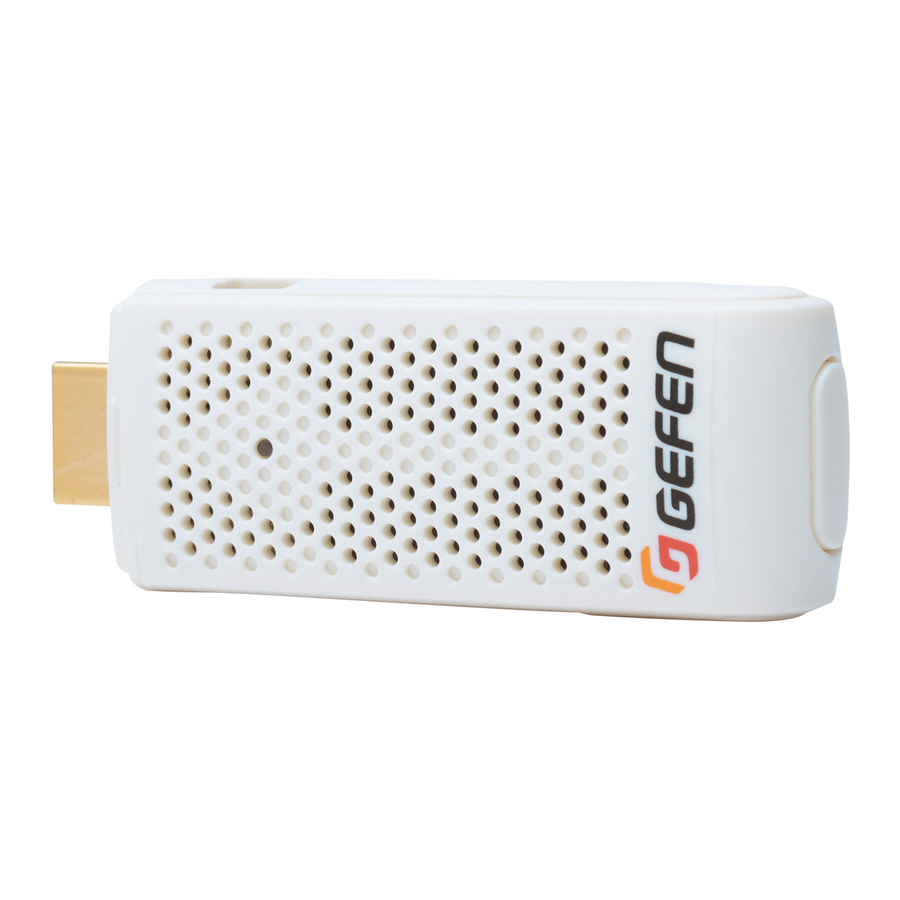
Introduction Page Title Sender Unit page | 2... - Page 13 Pairing / Info button Press this button to register a Sender unit with a Receiver unit. See Registering Sender Units (page 16) for more information. This button is also used when performing a firmware update using Gefen Syner-G™. page | 3...
-
Page 14: Receiver Unit
Introduction Page Title Receiver Unit ® Power Indicator ® Info Power Indicator Link Info ® Link Power Indicator Wireless for HDMI 5 GHz R Info Link Wireless for HDMI 5 GHz R HDMI IR IN Wireless for HDMI 5 GHz R HDMI IR IN HDMI... - Page 15 Introduction Name Description Power Indicator Press this button to power-on or power-off the Receiver unit. Info Press this button to display the info screen on the connected display. Link This LED indicator displays the current video status. See LED Indicator Messages (page 33) for more information on LED messages.
-
Page 16: Ir Remote Control
Introduction IR Remote Control Sender Sender Input Input *Preferred *Preferred ® ® RMT-WHD-1080P RMT-WHD-1080P Name Description This button is not used. Input This button is not used. ▲, ▼, ◄, ► Press these buttons to select the desired option in the Information Window. Press this button to accept the current change within the OSD. -
Page 17: Installing The Batteries
Introduction Installing the Batteries Warning! Risk of explosion if battery is replaced by an incorrect type. Dispose of used batteries according to the instructions. Push and pull-up the tab at bottom of the IR remote to remove the battery cover. Make sure that the batteries are installed with the correct polarity, as shown in the illustration, below. -
Page 18: Installation
Installation Connection Instructions Video ► Connect the Sender unit to the HDMI port on the HD source. Connect the included HDMI cable from the HDMI Out port on the Receiver unit to an HD display. IR Control - see ► Sample Wiring Diagram (page Connect the included IR Extender to the IR In port on the Receiver unit. -
Page 19: Sample Wiring Diagram
Installation Sample Wiring Diagram HDMI CABLE EXT-WHD-1080P-SR Presentation Source Sender unit with HDMI output EXT-WHD-1080P-SR (Up to 33 feet) Receiver unit HDMI Display IR Extender EXT-WHD-1080P-SR page | 9... -
Page 21: Basic Operation
Wireless for HDMI 5 GHz Short Range Basic Operation... -
Page 22: The Linking Process
The Linking Process Once the power supplies are connected, the Sender and Receiver unit(s) will begin the linking process. During this time, the LED indicator on the Power Indicator and Link LED indicator will flash blue for approximately 10 - 15 seconds. After this time, the source will be shown on the display that is connected to the Receiver unit. - Page 23 The Linking Process Figure 2.2 - LED indicators are solid blue solid blue when linked. An information window will be HDMI CH1 1920x1080 shown, in the upper-left corner of the display, for a few seconds after the Sender and Receiver unit are successfully linked.
-
Page 24: Getting Source Information
Getting Source Information To display the information window, do one of the following: ► Press the Info button on the Receiver unit ► Press the button on the back of the Sender unit. HDMI1 CH1 1920x1080 to HD source HDMI cable ®... - Page 25 Getting Source Information Information, similar to the following, will be shown on the display connected to the Receiver unit. HDMI CH2 1920x1080 = OFF Link icon Input Channel Resolution HDMI CH2 1920x1080 = OFF The Link icon indicates that the Receiver unit is connected to the Sender unit and is passing A/V data.
-
Page 26: Using Multiple Sender Units
Using Multiple Sender Units Registering Sender Units If purchasing additional Sender units, each Sender unit must be registered with a Receiver unit in order for the Sender unit to communicate with the Receiver unit. Up to eight Sender units can be registered to a Receiver unit. In the example, below, Sender unit S1 is already registered with the Receiver unit, allowing both Sender unit S1 and the Receiver unit to communicate. - Page 27 Using Multiple Sender Units Point the IR remote control at the IR sensor (or the IR extender) of the Receiver unit. Press the Sender button on the included IR remote control. The Select Transmitter window will be displayed. Sender Select Transmitter 1080PSRS Input Setup...
- Page 28 Using Multiple Sender Units 10. Press the OK button. 11. The display will go black and the following message will be displayed as the Receiver unit searches for additional Sender units. Searching..12. Press and hold the button on the back of the Sender unit until the LED indicator begins flashing slowly.
- Page 29 Using Multiple Sender Units 14. The Power Indicator LED indicator on the Receiver unit will slowly flash bright magenta, indicating that it is in register mode. ® Power Indicator Info Link Flashes magenta Wireless for HDMI 5 GHz R HDMI 15.
- Page 30 Using Multiple Sender Units 17. Once the pairing has completed, all Sender and Receiver units will automatically reboot and begin the linking process. 18. The registration process is now complete and the new Sender unit is ready for use. Sender unit S1 Receiver unit Sender unit S2 page | 20...
-
Page 31: Selecting A Sender Unit
Using Multiple Sender Units Selecting a Sender Unit Use this feature to switch between multiple Sender units. Point the IR remote control at IR sensor (or the IR extender) of the Receiver unit. Press the Sender button on the IR remote control. The list of available Sender units will be displayed within the Select Transmitter window. - Page 32 Using Multiple Sender Units After about 10 seconds, the image from the source device on the selected Sender unit will appear on the display. page | 22...
-
Page 33: Changing The Name Of A Sender Unit
Using Multiple Sender Units Changing the Name of a Sender Unit This feature allows the default name of a Sender unit, in the list, to be modified. Point the IR remote control at IR sensor (or the IR extender) of the Receiver unit. Press the Sender button. - Page 34 Using Multiple Sender Units Press the OK button. The Setup window will be displayed. The Add New Transmitter option will be highlighted. Press the ▼ button on the IR remote control to highlight the Modify Transmitter Name option. Setup Add New Transmitter Remove Transmitter Modify Transmitter Name Return...
- Page 35 Using Multiple Sender Units 12. The first character in the name will be highlighted with a cursor, as shown below. 1080PSRS ► Use the ◄ or ► buttons to move the cursor forward and backward within the name. Press the IR button, on the IR remote control, to erase the current character. ►...
-
Page 36: Removing Sender Units
Using Multiple Sender Units Removing Sender Units When a Sender unit is removed (unregistered), it will be removed from the Receiver unit and no longer be recognized. Point the IR remote control at IR sensor (or the IR extender) of the Receiver unit. Press the Sender button on the IR remote control. - Page 37 Using Multiple Sender Units Setup Add New Transmitter Remove Transmitter Modify Transmitter Name Return Press the ▼ button on the IR remote control to highlight the Remove Transmitter option. Setup Add New Transmitter Remove Transmitter Modify Transmitter Name Return Press the OK button. The Remove Registered Transmitter window will be displayed.
- Page 38 Using Multiple Sender Units 11. Press the OK button. 12. The selected Sender unit will be removed from the list. Removing 1080PSRS2 ..13. Once the Sender has been removed, select the Sender to be used. See Selecting a Sender Unit (page 21) for more information.
-
Page 41: Appendix
Wireless for HDMI 5 GHz Short Range Appendix... -
Page 42: Surface-Mounting Instructions
Surface-mounting Instructions The Receiver unit can be mounted to any flat surface, using the included wall anchors and screws. Drill two pilot holes for the Receiver unit, using the following measurement. 1.8 in. Insert the suppled wall anchors into the holes. Insert the screws into each wall anchor. -
Page 43: Led Indicator Messages
LED Indicator Messages The LED indicators on the Sender and Receiver unit provides basic information on the current state of the Wireless for HDMI 5 GHz Short Range. Table 3.1 - Sender unit LED indicators Status Description Power Indicator LED is off •... - Page 44 LED Indicator Messages Table 3.2 - Receiver unit LED indicators Status Description ® Power LED is off • No power supplied to the Receiver Power Indicator unit. Make sure the power supply is connected to the Sender unit. Info Link ®...
-
Page 45: Icon Messages
Icon Messages The following table lists the icon messages that are used and their meaning. Table 3.3 - Icon messages Message Description Initial power-up • This icon is displayed when the Sender and Receiver unit are both powered and attempting to link with one another. -
Page 46: Supported Resolutions
Supported Resolutions The following table lists all available resolutions and timings that are supported by the Wireless for HDMI 5 GHz Short Range. VESA timings are only supported when using DVI. Table 3.4 - Supported SD, HD, and VESA timings Resolution Timings 480p... -
Page 47: Specifications
Specifications Supported Formats Resolutions (max.) • 1080p Full HD Connectors, Controls, and Indicators HDMI (Sender) • 1 x HDMI Type A 19-pin, female HDMI (Receiver) • 1 x HDMI Type A 19-pin, female Power Connector (Sender) • 1 x USB Mini-B Power Connector (Receiver) •... - Page 48 Specifications Physical Dimensions (W x H x D) • 1.2” x 0.65” x 3.2” (30mm x 16mm x 80mm) (Sender) • 3.8 x 1.4” x 3.8” (95mm x 35mm x 95mm) (Receiver) Unit Weight • 0.06 lbs (0.03 kg) (Sender) •...
-
Page 49: Index
Index Connection Instructions Packing List FCC Statement Receiver Unit Features HDMI, port Info, button IR In IR sensor Link, indicator Getting Source Information Mini-B USB, port Power Indicator Tripod connector USB, port Registering Sender Units Installation register mode IR Remote Control Register mode Battery cover Resolutions, supported... - Page 50 *Preferred Stretch it. Switch it. Split it. Gefen’s got it. ® 20600 Nordhoff St., Chatsworth CA 91311 20600 Nordhoff St., Chatsworth CA 91311 1-800-545-6900 1-800-545-6900 818-772-9100 818-772-9100 fax: 818-772-9120 fax: 818-772-9120 www.gefen.com www.gefen.com support@gefen.com support@gefen.com...
Need help?
Do you have a question about the EXT-WHD-1080P-SR-TX and is the answer not in the manual?
Questions and answers