Table of Contents
Advertisement
Quick Links
Download this manual
See also:
User Manual
Advertisement
Table of Contents

Related Manuals for Messoa PTZ900


Summary of Contents for Messoa PTZ900
-
Page 1: Quick Start
Network Camera PTZ900 Quick Start Guide 201407 900 A1... -
Page 2: Product Overview
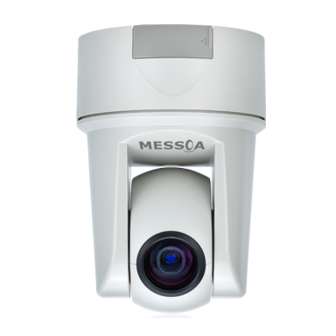
English Product Overview Physical Characteristics Figure 1 - 1: Physical Dimensions – without Ceiling Bracket Figure 1 - 2: Physical Dimensions – with Ceiling Bracket... - Page 3 English Figure 1 - 3: Pictorial Index...
- Page 4 English Table 1 - 1: Pictorial Index Definition Index # Name Descriptions Default Button Press via paperclip or thin object to restore to the factory defaults by pressing and holding the button for 5 seconds. SD Card Slot Insert SDHC/SDXC card for file storage. (SD card sold separately) Reset Button Press via paperclip or thin object to reboot the unit.
-
Page 5: Installation
English Installation Package Content Check everything in the packing box matches to the order form and the packing slip. In addition to this manual, items below are included in the packing box. One Network Dome PTZ Camera One printed Quick Start Guide ... - Page 6 English Step 1. Mark Mounting Area Use the mounting template to mark out and prepare a mounting area. Place the supplied mounting template on a mounting surface. Drill 7 mm holes x 3 at the mounting surface corresponding to the 3 indicated positions for plastic anchors (supplied). Please then insert the 3 plastic anchors (supplied) into the 3 drilled holes on the mounting surface.
- Page 7 English Step 2. Mounting Scheme Fasten the unit to the mounting ceiling surface with safety wire. Directly use 3 screws to attach the bracket to the ceiling until the bracket is tightened safely. The screw holes (x3) for ceiling attachment Figure 2 - 2: Attach Bracket to Ceiling Caution Be sure to tighten the screw nuts firmly as the following figure shown.
- Page 8 English Attach the safety wire to the hook of the camera to ensure the camera won’t fall down. Figure 2 - 4: Attach Safety Wire with Camera and Bracket Push the hooks (x4) of the ceiling bracket into the hook holes (x4) of the camera bottom. Figure 2 - 5: Align Hooks of Bracket with Camera Bottom...
-
Page 9: Dismantle The Camera From The Ceiling Bracket
English Push the camera upward to attach the bottom of the camera to the ceiling bracket tightly and then push the camera body forward. Finally, the camera is assembled to the ceiling bracket firmly. 1. Push camera forward to firmly combine with bracket 2. - Page 10 English Press up the circle marked hook with one hand, and pull the camera body backward by the other hand to fully dismantle the camera from the ceiling bracket. Press the hook to release it first Pull camera backward to dismantle from bracket Figure 2 - 8: Push Hook to detach Camera from Bracket Warning...
-
Page 11: Connecting The Wires
English 2.2. Connecting the Wires After opening the rear lid of the camera, you will see various connectors for different usages. Please refer to the following parts for more details. Power AC 24V Connect the power terminal with AC 24V power source. DC 12V ... -
Page 12: Network Topology
English Connection Network Topology The unit, which is equipped with Ethernet RJ-45 network interface, can deliver video images and audio in real time via either Internet or Intranet. Please refer to the skeleton drawings shown below for understanding. Figure 2 - 9: Network Topology Type 1 Below table lists the minimum requirement to implement and operate the unit. -
Page 13: Connecting Process
Start Internet Explorer and enter IP address: 192.168.1.30. A login window should pop up. In the window, enter the default user name: admin and password: 1234 to log in. Further administration on the unit can be found in “User Manual” available on MESSOA website. Figure 2 - 10: Login Window... -
Page 14: Viewing Preparation
English Viewing Preparation Images of the unit can be viewed through Microsoft Internet Explorer 8 or above. Before viewing, follow these steps to enable the display. Enable Cookies as instructions below In Internet Explorer, click Internet Options on the Tools menu. ... - Page 15 English Scroll down to the ActiveX controls and plug-ins radio buttons and set as follows: 【 Download signed ActiveX controls 】 Prompt (recommended) 【 Download unsigned ActiveX controls 】 Prompt 【 Initialize and script ActiveX not marked as safe for scripting 】 Prompt Figure 2 - 12: Security Setting 2/4 【...
- Page 16 English 【 Run ActiveX controls and plug-ins 】 Enable 【 Script ActiveX controls marked safe for scripting* 】 Enable Figure 2 - 14: Security Setting 4/4 Press OK to save the settings. Close all Microsoft Internet Explorer Windows and restart a new window. This will allow the new settings taking effect. ...
- Page 17 Please note that IP Finder works only on Microsoft Windows XP, Microsoft Windows Vista, and Microsoft Windows 7. Steps to get the utility program running are listed below. Download IP Finder from MESSOA Website to the computer. Double click on IPFinder.exe in the IP Finder folder, and the IP Finder window should pop out.
Need help?
Do you have a question about the PTZ900 and is the answer not in the manual?
Questions and answers