
Related Manuals for Belling BEL FSEC50DOPSS


Summary of Contents for Belling BEL FSEC50DOPSS
- Page 1 50cm Electric Freestanding Cooker Electric Seperate Oven and Grill with Solid Hotplates User Guide & Installation Handbook...
-
Page 2: Table Of Contents
CONTENTS User Section ........... 2 - 17 Introduction . -
Page 3: User Section
INTRODUCTION Thank you for buying this Belling pulling on the doors or handles. Open appliance. the door and grasp the frame of the cooker, taking care that the door does We hope that the following information not shut on your fingers. - Page 4 INTRODUCTION Environmental Protection We are committed to protecting the environment and operate an Environmental Management System which complies with BS EN ISO 14001. Disposal of packaging • All our packaging materials are recy- clable and environmentally friendly. • Please help us to protect our envi- ronment by disposing of all packag- ing in an environmentally friendly manner.
-
Page 5: Be Safe - Not Sorry
BE SAFE - NOT SORRY When you are cooking, keep • • Do not drape tea towels over the children away from the vicinity flue vents or doors, as this creates a of the appliance. fire hazard. Children should be supervised to •... -
Page 6: About Your Appliance
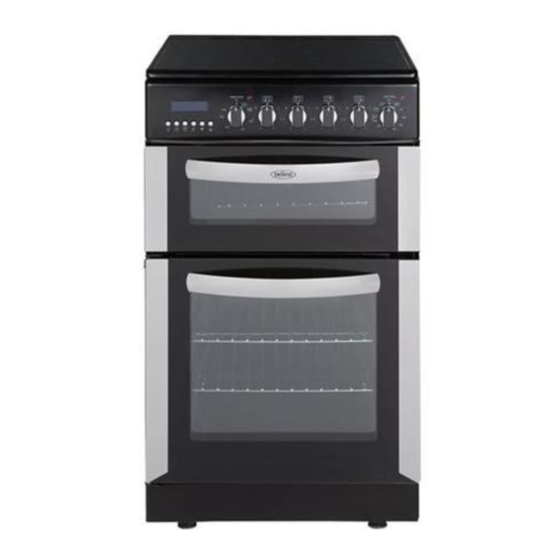
ABOUT YOUR APPLIANCE Purpose The cooker should be used for preparing household meals only. It must not be used for any other purpose. Parts Identification 1 - control panel 2 - Top oven 3 - oven door 4- rear left ceramic zone 5 - rear right ceramic zone 6 - front left ceramic zone 7 - front right ceramic zone... -
Page 7: Using The Hob
USING THE HOB Before first use IMPORTANT: You should clean the hob surface (see “Cleaning and maintenance” section). o You should switch on one cooking zone at a time, for 5 minutes at the maximum setting. This will help to eliminate any new smell that exists and evaporate any humidity that has formed on the heating elements during transit. - Page 8 USING THE HOB Residual heat indicator o After a zone is switched off, the corresponding cooking zone indicator will show a flashing letter “H”. This means that the temperature of the zone is over 60°C and is therefore high enough to cause injury.
- Page 9 USING THE HOB o For a faster heat up of a zone, you can turn the control knob to 6. Then when the contents of the saucepan are boiling, you may turn the control knob to a lower setting. o Food or liquid that has a high sugar content may damage the hob top if it comes into contact with the hob surface.
-
Page 10: Using The Grill
USING THE GRILL Caution: Accessible parts may be hot when the grill is used, young chil- dren should be kept away. Detachable grill pan handle Trivet Handle The handle should be removed from the pan during grilling, to prevent overheat- ing. - Page 11 USING THE GRILL+TOP OVEN Preheating For best results, preheat the Oven/Grill for 5 minutes. To switch on the Top Oven Turn the control knob clockwise to turn on the top oven and adjust to required temperature settings. The indicator light on the control panel will go out when se Figure 10 b lected temperature has been reached...
-
Page 12: Using The Main Oven
USING THE OVEN Accessible parts may be hot when Always turn the control knob to off (G) the oven is used. Young children when cooking has finished. should be kept away. Please note: The appliance incorporates a safety thermostat which cuts the elec- tric supply to the oven if the temperature Using the main oven becomes excessive. -
Page 13: Baking Guide
USING THE OVEN Baking guide margarine is used it may be necessary to reduce the temperature setting. NOTE: The temperature settings and times given in the baking guide are based on dishes made with block margarine. If soft tub Dish Recommended Approximate temperature ˚C... -
Page 14: Traditional Fruit Cakes
USING THE OVEN Traditional fruit cakes Roast turkey It should be remembered that all ovens Roasting turkey involves cooking two dif- can vary, therefore cooking times can ferent types of meat - the delicate light vary, making it difficult to be precise breast meat, which must not be allowed when baking fruit cakes. -
Page 15: Roasting Guide
USING THE OVEN Roasting guide Notes: The times given in the roasting guide are When cooking stuffed meat or poul- only approximate, because the size and try calculate the cooking time from age of the bird will influence cooking the total weight of the meat plus the times as will the shape of a joint and the stuffing. - Page 16 USING THE TIMER ALARM VOLUME SETTING 4. After entering this value the clock will switch off the power and You can select the 3-level volume of your oven by pressing the the alarm will beep. HAND icon will start flashing. You can silence button.
-
Page 17: Care And Cleaning
USING THE TIMER CARE & CLEANING Caution: Any cleaning agent used incorrectly may damage the appli- the current time of the day (18:30), the word “auto” and the sign appear. The oven will switch to the standby mode and it will ance. - Page 18 CARE & CLEANING Painted, plastic and metal finish Cleaning the hotplate parts • Clean the hot plates with a damp control knobs, door handles & doors, fas- sponge and then dry them by turn- cia panel ing them on for a few seconds. Only use a clean cloth wrung out in hot •...
- Page 19 INSTALLATION Positioning • Remove all packing materials includ- ing the protective film covering the chrome-plated and stainless steel parts (if applicable). • The kitchen should be dry and well ventilated. Position the cooker ensuring free access to all the con- trols.
- Page 20 IMPORTANT SAFETY NOTICE This cooker MUST be secured to the wall, please follow the instructions below. Safety chain anchors o In order to eliminate the risk of the oven falling forward, two chains have been installed at the rear of the cooker. Before use, these will need to be fastened securely to the wall behind the appliance with the anchor brackets supplied.
-
Page 21: Installation Instructions
INSTALLATION INSTRUCTIONS Dimensions Whilst every care is taken to eliminate burrs and raw edges from this product, All sizes are nominal, and some varia- please take care when handling - we rec- tion is to be expected. The ‘depth’ of ommend the use of protective gloves the cooker, as given below, is to the during installation. - Page 22 INSTALLATION INSTRUCTIONS Connect to the electricity supply IMPORTANT: 1. Access to the mains terminal is gained by opening the terminal block We recommend that this appliance is con- cover at the rear of the appliance nected by a competent person, who is a (use a small flat-bladed screwdriver).
-
Page 23: Technical Data
TECHNICAL DATA Electrical supply 220 - 240V ~ 50Hz Dimensions All sizes are nominal so some variation is to be expected. Countries of destination GB - Great Britain, IE - Ireland Warning: This appliance must be earth- Databadge is located at the bottom of the front frame, behind the door. - Page 24 Custome In case of difficulty within the UK and Northern Ireland, please call Customer Care Helpline on 0844 815 3746 When you dial this number you will hear a recorded message and be given a number of options. This indicates that your call has been accepted and is being held in a queue.
Need help?
Do you have a question about the BEL FSEC50DOPSS and is the answer not in the manual?
Questions and answers