
Related Manuals for Belling GT 755


Summary of Contents for Belling GT 755
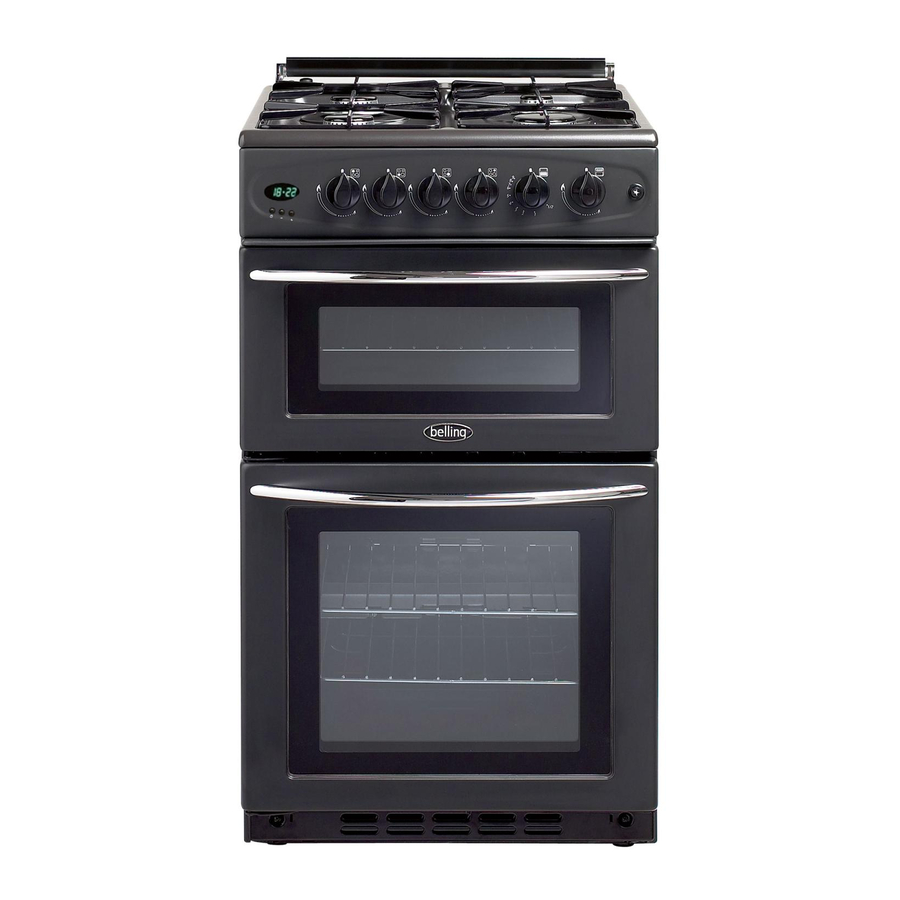
- Page 1 GT 755 - GT 756 Slot-in Natural Gas Double Cavity Cooker INSTALLATION AND USER INSTRUCTIONS Note: These appliances are supplied for use with the category of gas specified (Natural Gas I2H) and cannot be converted to any other gas.
-
Page 2: Table Of Contents
Safety advice in case of a chip pan fire / Choosing your utensils ... 16 Using the Grill GT 755 & GT 756 Grill Operation ... 17 Grilling Guidelines / Use of the Grill Pan Handle ... 18 Using the Ovens ... -
Page 3: Introduction
It's stylish and practical design will enhance your kitchen and make cooking a pleasure. The GT 755 model features a conventional main oven, a grill and a hob with 4 gas burners. The GT 756 model features a conventional main oven with light, a top conventional oven/grill, a hob with 4 gas burners and a clock/minute minder. -
Page 4: Installing Your Cooker
Installing your cooker Unpacking After unpacking your cooker, make sure that you remove all the packing from the ovens and grill, and any stickers from the oven doors and hob. Examine your cooker. Make sure there is no damage or missing items. If there is anything damaged or missing, please contact your supplier for advice. - Page 5 Space for THIS APPLIANCE MUST NOT BE INSTALLED ON A NON-FIXED RAISED Fixing BASE. To ensure that critical air gaps are maintained under the product, we recommend that this product is mounted on a solid base and that the feet do not sink into any carpet or soft flooring.
- Page 6 wall. If the wall mounted adapter backplate (Fig.1) is to be fitted behind the appliance then the suitable area for this fitting is shown as the area in (Fig.2). The temperature rise of areas at the reara of the cooker that are likely to come into contact with the flexible hose do not exceed 70°C.
- Page 7 readily accessible wall socket which is adjacent to and not more than 1.25m Legal Requirements away from the appliance. The socket must be capable of electrical isolation. The mains lead should be routed such that it cannot touch hot parts of the cooker i.e.
- Page 8 letter 'N' or coloured black. The wire coloured brown must be connected to the terminal marked with the letter plug, ensure that all strands of wire are securely retained in each terminal. Do not forget to tighten the mains lead clamp on the plug. As the appliance must be earthed, do not use 2-pin socket outlets.
-
Page 9: For Your Safety
For your safety When used properly your Belling GT 755,GT 756 Gas cooker is completely safe, but as with any electric or gas appliance there are some precautions you must take in its use. Never.. • Never allow anyone except an authorised Belling Service Agent to service or repair your cooker. -
Page 10: Always
For your safety Always.. • Always take care when touching any part of the cooker which may be hot. Use dry oven gloves when removing or replacing food or dishes. Care should be taken to avoid touching the heating elements inside the oven. -
Page 11: Know Your Cooker / Specification
Supply Frequency Maximum Wattage GT 755 Grill Wattage Top Oven Wattage GT 756 Conventional Oven Wattage GT 755 Conventional Oven Wattage GT 756 inc 25W-230V Lamp 2.5 Rear Left Burner Front Left Burner Front Right Burner Rear Right Burner Supply Pressure... -
Page 12: Using The Timer (Gt 756)
Using the timer (G756 Only) 3 Button LED Clock/Minute Minder To Set Time of Day Step 1 Check that the electricity supply to the cooker is turned on. Step 2 When switched on the display will shou 0.00 flashing intermittently. Step 3 Press the "1"... -
Page 13: Minute Minder Operation
Minute minder operation D O . ::: .::::::: i. ::::. .::: .: .:::, :::::::. :::. ::::::: ::::::: .::::::: NOTE: If necessary the minute minder can be cancelled before the bleeper sounds by pressing the "+" and "-"buttons together until 0.00 appears in the display window. To adjust the pitch of the bleeper, press the "... -
Page 14: Know Your Control Panel
Know your Control Panel Rear left burner Rear left burner Clock/Minute Minder Using the Hob GENERAL NOTES ON SAFETY 1 When the hob is in use do not leave unattended and make sure there are no small children in the vicinity. Check that pan handles are positioned correctly and always keep an eye on the pan whenever oils or fats are used, as they are easily immflamable. -
Page 15: The Hob Glass Lid / Burner Operation / Advice On Pan Suitability
The hob glass lid on the cooker is toughened for your protection and safety. Before opening it remove any food deposits from its surface. The glass lid is purely decorative and is not intended as a work surface and should not be used for this purpose. -
Page 16: Safety Requirements For Deep Fat Frying Important
IMPORTANT: As there could be some fire risk attached to the heating of oil, particularly for deep fat frying, cooking utensils containing oil must not be left unattended (e.g. to answer the telephone) or in close proximity to hotplates. In the unfortunate event of a fire it will assist in smothering the flames if the pan lid is replaced. Turn off all the gas taps. -
Page 17: Using The Grill
Parts may become hot when the grill is in use, children must be kept away. ALWAYS ENSURE THE DOOR IS OPEN WHEN GRILLING GT 755 Grill Operation Turn the grill on by depressing and turning the grill control knob anti-clockwise to the large flame position. -
Page 18: Grilling Guidelines / Use Of The Grill Pan Handle
Use the following chart for guidelines. For thicker foods requiring longer cooking, turn the control to a lower setting after the initial sealing on both sides. The thicker the food, the lower the control should be set. When grilling thicker food, the grill rack should be turned over to its lowest position. Food Toasting of Bread products Small cuts of meat, sausages,... -
Page 19: Using The Ovens
Using the Ovens Your appliance has either one or two conventional ovens. The ovens have different heat zones with the thermostat settings referring to the temperature on the middle shelf; above the shelf it is hotter and below it is cooler. The main oven has two shelves and five possible shelf positions (reference numbered 1 to 5 from the top down). -
Page 20: Temperature Conversion
Temperature Conversion The oven temperature control markings are gas marked 0 to 9. The equivalent degrees Celsius (sometimes called Centigrade) and degrees Fahrenheit are shown below as a guide. (Centre Oven Temperatures) Gas Mark Celcius °C Main Conventional Oven Cooking Guide This chart is for guidance only, follow food manufacturers recommendations whenever available. -
Page 21: Care And Cleaning/Replacing The Oven Lamp
Care and Cleaning TURN OFF COOKER AT MAIN WALL SWITCH BEFORE CLEANING Before switching on again, ensure that all controls are in the OFF position. Refer to instructions below for cleaning the 'Cookclean' removable side oven panels. Glass Lid (Glass) Clean with a cloth wrung out in soapy water. - Page 22 Oven & Grill compartments Remove the grill/meat pan and grid. It is best to wash these items immediately after use to prevent stains from being burnt on when used again. Wipe around the oven or grill compartment, removing stubborn stains with a fine soap impregnated steel wool pad.
-
Page 23: Something Wrong With Your Cooker
Something Wrong with your Cooker? Before contacting your Belling approved Service Centre/Installer, check the problem guide below; there may be nothing wrong with your cooker. Problem Slight odour or small amount of smoke when using the cooker for the first time. Sinking of cakes Over/Under cooking Fast/Slow cooking... -
Page 24: Customer Care
Customer Care Centre In case of difficulty within the UK please call, having the model number and serial number to hand: Opening Hours for Customer Care Centre Monday to Friday Saturday Sunday For Belling Customer Helpline please call 0871 22 22 503 0844 815 3746 For Belling Service please call 0871 22 22 503...
Need help?
Do you have a question about the GT 755 and is the answer not in the manual?
Questions and answers