Table of Contents

Related Manuals for Sunny SF-T808M


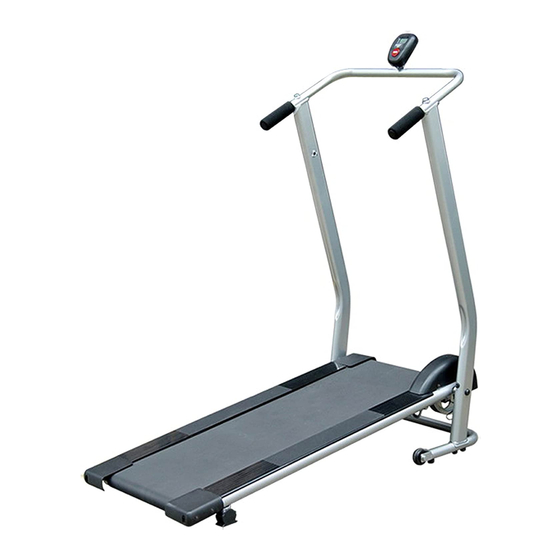
Summary of Contents for Sunny SF-T808M
- Page 1 MANUAL TREADMILL Owner’s Manual SF-T808M...
-
Page 2: Table Of Contents
Table of Contents Features of the Equipment / ■ Safety Precautions ■ Parts List Hardware Packing List / ■ Overview Drawing Assembly Instructions ■ Folding and Moving ■ Running Belt Adjustment ■ Maintenance and Treatment ■ ■ Operating Instructions ■ Warm Up Exercises... -
Page 3: Features Of The Equipment
1. Features of the Equipment This foldable treadmill integrates the functions of running and jogging with its computer displaying Scan, Time, Speed, Distance, Calories, and Total Distance. This treadmill‘s set up dimension is 48 L x 25 W x 48 H inch and the fold up dimension is 16 L x 25 W x 49 H inch. -
Page 4: Parts List
3. Parts List Description Description Main frame Left rail Left handlebar support Front wheel Right handlebar support End plug Front handlebar Buffer cushion Computer Emery cloth Base support Magnetic sensor Ball bearing Sensor Ball bearing M8X35 Bolt Connection bolt M6X70 Bolt Flywheel cover M3X8 Crosshead bolt Running deck... -
Page 5: Hardware Packing List
4. Hardware Packing List 5. Overview Drawing... -
Page 6: Assembly Instructions
6. Assembly Instructions This treadmill needs two people to assemble it. Put all the parts on the floor, and follow the below assembly instructions to assemble this treadmill. Step 1: Install the Flywheel Cover Attach the Flywheel cover (10) to the Main frame (1) with two Screws (40) and Flat washers (51). (See figure 1) Step 2: Install the Base Support Attach the Base support (6) to the Left and Right handlebar supports (2,3) with four Bolts (43). - Page 7 Step 4: Install the Front Handlebar Connect the Sensor wire I (55) from the Right handlebar support (3) to the Sensor wire II (52) from the Front handlebar (4). (See figure 4a). Attach the Front handlebar (4) on the arc plates of Left and Right handlebar supports (2, 3) with two Bolts (37) and Arc washers (49).
-
Page 8: Folding And Moving
7. Folding and Moving Folding: To fold up the treadmill please turns the Lock knob (23) counterclockwise and remove it from the Left handlebar support (2). Raise the rear part of the Main frame (1) all the way up by your right hand then insert the Lock knob (23) to the upper hole of Left handlebar support (2) and tighten it. -
Page 9: Running Belt Adjustment
8. Running Belt Adjustment After assembly, please try running and check the following points: 1) Check if the values of the Computer can display properly or not; be sure the wire and the plug are correctly connected and the batteries are placed. 2) Check if the running belt turns smoothly or not and the running belt deviates or not when operating. -
Page 10: Maintenance And Treatment
9. Maintenance and Treatment Maintenance 1) You may feel the resistance of the running belt getting bigger after using for a long time because the running belt and the plate need cleaning and lubricating, user’s normal maintenance is very essential. Please clean and lubricate the belt and belt plate as below: Raise up the belt in one side, wipe some lubricant to the belt plate and do it the same in the other side. -
Page 11: Operating Instructions
10. Operating instruction 1) Unfold the equipment to exercise location, tighten the knob, adjust the equipment and do warm-up exercise, then you can come to the exercise step. 2) When stepping, hold the handlebars with your hands, lean forward your body a little, step on the running belt stably. -
Page 12: Warm Up Exercises
11. Warm Up Exercises A successful exercise program consists of a warm-up, aerobic exercise, and a cool-down. Do the entire program at least two and preferably three times a week, resting for a day between workouts. After several months, you can increase your workouts to four or five times per week. Warming up is an important part of your workout, and should begin every session. - Page 13 Warm Up Exercises Calf-Achilles Stretch Lean against a wall with your left leg in front of the right and your arms forward. Keep your right leg straight and the left foot on the floor; then bend the left leg and lean forward by moving your hips toward the wall. Hold, then repeat on the other side for 15 counts.
Need help?
Do you have a question about the SF-T808M and is the answer not in the manual?
Questions and answers