Advertisement
Quick Links
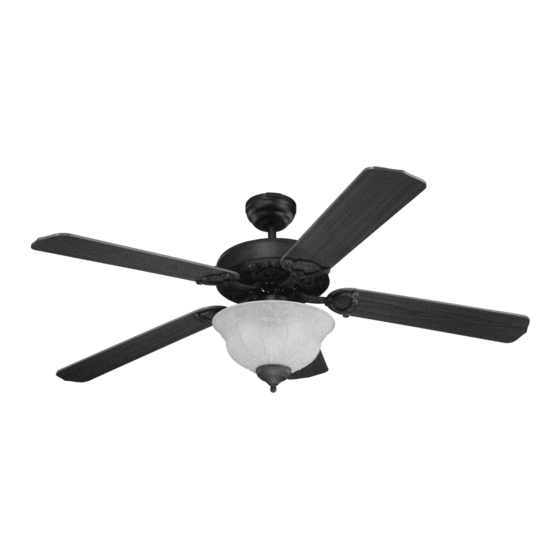
Owner's Guide and Installation Manual
5OR52XXD-L Series Fan
UL Model No. : AC-552-1
Attach sales receipt to this card and retain as your proof of purchase
RETAILER NAME:
DATE OF PURCHASE:
MODEL NUMBER:
To register your fixture, please visit our website www.montecarlofans.com
8.11 kgs
17.84 lbs
Total fan weight with light kit
Advertisement

Subscribe to Our Youtube Channel
Related Manuals for Monte Carlo Fan Company 5OR52XXD-L Series


Summary of Contents for Monte Carlo Fan Company 5OR52XXD-L Series
- Page 1 Owner’s Guide and Installation Manual 5OR52XXD-L Series Fan UL Model No. : AC-552-1 Attach sales receipt to this card and retain as your proof of purchase RETAILER NAME: DATE OF PURCHASE: MODEL NUMBER: To register your fixture, please visit our website www.montecarlofans.com 8.11 kgs...
- Page 2 All set screws must be checked and tightened where necessary before installation. Tools Required for Assembly (not included): Electrical Tape, Phillips Screwdriver, Pliers, Safety Glasses, Stepladder and Wire Strippers. Customer Service 800-969-3347 Customer Service Center 7400 Linder Ave. Skokie, IL 60077 www.montecarlofans.com © 2013 Monte Carlo Fan Company 7/1/2013...
- Page 3 Note:If Installing The Secondary Support Safety Ball. This must be done to prevent the fan body from the bracket. Cable in the U.S., Do Not Remove Knockouts In rotating when the blades are in motion. The Outlet Box. © 2013 Monte Carlo Fan Company 7/1/2013...
- Page 4 Install rubber pad between fan Pass leadwires and safety cable Remove side covers from canopy ex- body and canopy. posing 4 holes. 2 closed holes and 2 through the canopy. open “L” shape holes. © 2013 Monte Carlo Fan Company 7/1/2013...
- Page 5 Re-install the screws re- as shown. Tighten screws securely. Repeat this process 4 more times until all blades are assembled. moved in the previous step and tighten se- curely. © 2013 Monte Carlo Fan Company 7/1/2013...
- Page 6 32 to secure glass. in step 32, threading the pull chains lock washer. through each of the holes. Hand- tighten finial nut securely. © 2013 Monte Carlo Fan Company 7/1/2013...
- Page 7 ) and remove one preassem- holes on switch housing and twist bled screws from switch housing cover. Keep screw for later use. clockwise until tight. Re-install the screws removed in step 36. Tighten all screws securely © 2013 Monte Carlo Fan Company 7/1/2013...
-
Page 8: Troubleshooting
Reset the lights by turning off the wall switch, breaker,or by remote. Replace bulbs with the correct wattage bulbs, turn the power on. CAUTION: Make sure main power is turned off before entering switch housing. © 2013 Monte Carlo Fan Company 7/1/2013... - Page 9 Dec.2010 Aircool spec. Mar.2012 New format Jul.2013 Update for CUL regulation...
Need help?
Do you have a question about the 5OR52XXD-L Series and is the answer not in the manual?
Questions and answers