Table of Contents
Advertisement
Quick Links
AIR BRUSH
KIT
6ml/min
INSTRUCTION MANUAL
SPECIFICATIONS
Operating Air Pressure:
15-30psi (1-2Bar)
Nozzle Size:
ø0.5mm
Spray Width:
10mm
Flow Rate:
6ml/min
Feed Type:
Suction
Paint Pot Size:
22ml
Air Inlet:
1/8" BSP
ozito.com.au
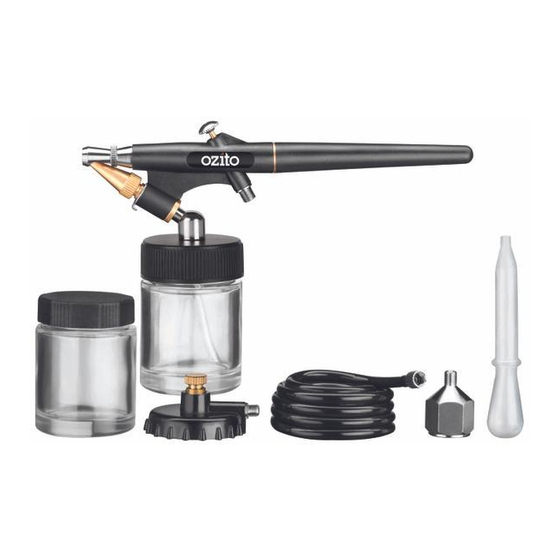
WHAT'S IN THE BOX
Air Brush
Paint Pots
Air Hose
Connection Hood
Dropper
ABK-PRO
Advertisement
Table of Contents

Related Manuals for Ozito ABK-PRO


Summary of Contents for Ozito ABK-PRO
-
Page 1: Air Brush
Air Brush 6ml/min INSTRUCTION MANUAL Paint Pots SPECIFICATIONS Operating Air Pressure: 15-30psi (1-2Bar) Nozzle Size: ø0.5mm Spray Width: 10mm Flow Rate: 6ml/min Air Hose Feed Type: Suction Paint Pot Size: 22ml Air Inlet: 1/8” BSP ozito.com.au Connection Hood Dropper ABK-PRO... -
Page 2: Know Your Product
KNOW YOUR PRODUCT SETUP & PREPARATION AIRBRUSH 1. ASSEMBLY 1 Paint Outlet 4 Paint Regulator Dial 2 Variable Trigger 5 Paint Inlet WARNING! ENSURE tHE tOOl IS dISCONNECtEd fROm 3 Air Inlet 6 Paint Pot tHE AIR SUPPly BEfORE PERfORmING ANy Of tHE fOllOWING OPERAtIONS. -
Page 3: Operation
OPERATION 2. ASSEMBLY cont. 3. PREPARATION Attaching to an Air Compressor NOtE: fOR BESt RESUltS, SURfACE PREPARAtION ANd PAINt tHINNING ARE tHE tWO mOSt ImPORtANt AREAS. ENSURE To connect to an air compressor, you will need to have a 1/4” All SURfACES ARE fREE Of dUSt, dIRt ANd GREASE. - Page 4 It IS CRUCIAl tO ClEAN tHE AIRBRUSH AftER EACH USE. Please refer to the cleaning procedure. 3 Repeat step 2 until desired fluid output is reached. ABK-PRO...
-
Page 5: Cleaning Procedure
Check with your local council authority for recycling advice. Note: Ozito Industries will not be responsible for any damage or injuries caused by the repair of the airbrush by an unauthorised person or by mishandling Recycling packaging reduces the need for landfill and raw materials. - Page 6 GENERAL AIR TOOL SAFETY WARNINGS WARNING! WARNING! Read all safety warnings and all instructions. failure to follow the warnings In the event that an air line is cut or broken, the air supply must be turned off at the and instructions may result in electric shock, fire and/or serious injury. compressor.
-
Page 7: Warranty
• Failure to perform maintenance as set out within the instruction manual. • If the tool is disassembled or tampered with in any way. • Professional, industrial or high frequency use. OZItO 1114 Australia/New Zealand (Head Office) 1-23 Letcon Drive, Bangholme, Victoria, Australia 3175.
Need help?
Do you have a question about the ABK-PRO and is the answer not in the manual?
Questions and answers