Advertisement
Quick Links
AIRLESS PAINT
SPRAYER
650W
INSTRUCTION MANUAL
SPECIFICATIONS
Input Power:
650W
Voltage:
230-240V ~ 50Hz
Max. Pressure:
3000psi (21MPa)
Max. Flow Rate:
1.09±10% l/min
Spray Tip Size:
515
Outlet Paint Connector: 1/4-18NPSM
Max. Hose Pressure:
12000psi (83MPa)
High Pressure Hose:
7.6m
Full-load Current:
2.0~3.1A
Short Circuit Rating:
5kA
Paint Temperature:
5~40°C
Weight:
7.69kg
ozito.com.au
1
IN ORDER TO MAKE A CLAIM UNDER THIS
WARRANTY YOU MUST RETURN THE PRODUCT
TO YOUR NEAREST BUNNINGS WAREHOUSE WITH
YOUR BUNNINGS REGISTER RECEIPT. PRIOR TO
RETURNING YOUR PRODUCT FOR WARRANTY
PLEASE TELEPHONE OUR CUSTOMER SERVICE
HELPLINE:
Australia 1800 069 486
New Zealand 0508 069 486
TO ENSURE A SPEEDY RESPONSE PLEASE
HAVE THE MODEL NUMBER AND DATE OF
PURCHASE AVAILABLE. A CUSTOMER SERVICE
REPRESENTATIVE WILL TAKE YOUR CALL
AND ANSWER ANY QUESTIONS YOU MAY
HAVE RELATING TO THE WARRANTY POLICY
OR PROCEDURE.
OZITO
Australia/New Zealand (Head Office) 1-23 Letcon Drive, Bangholme, Victoria, Australia 3175.
WARRANTY
The benefits provided under this warranty are in addition
to other rights and remedies which are available to you at law.
Our goods come with guarantees that cannot be excluded
at law. You are entitled to a replacement or refund for a major
failure and for compensation for any other reasonably foreseeable
loss or damage. You are also entitled to have the goods repaired
or replaced if the goods fail to be of acceptable quality and the
failure does not amount to a major failure.
Generally you will be responsible for all costs associated with
a claim under this warranty, however, where you have suffered
any additional direct loss as a result of a defective product you
may be able to claim such expenses by contacting our customer
service helpline above.
1 YEAR REPLACEMENT WARRANTY
Your product is guaranteed for a period of 12 months from
the original date of purchase. If a product is defective it will
be replaced in accordance with the terms of this warranty.
Warranty excludes consumable parts, for example: carbon
brushes, chuck, depth rod, chuck key, auxiliary handle.
WARNING
The following actions will result in the warranty being void.
• If the tool has been operated on a supply voltage other
than that specified on the tool.
• If the tool shows signs of damage or defects caused
by or resulting from abuse, accidents or alterations.
• Failure to perform maintenance as set out within the
instruction manual.
• If the tool is disassembled or tampered with in any way.
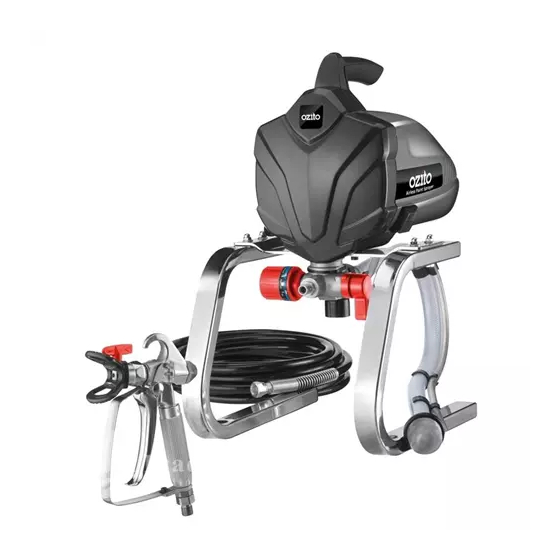
WHAT'S IN THE BOX
Airless Sprayer
Spray Gun
High Pressure Hose
Hex Key and Spanner x 2
Cleaning Brush
Fine Needle x 3
ASG-6000
0916
Advertisement

Related Manuals for Ozito ASG-6000


Summary of Contents for Ozito ASG-6000
- Page 1 Hex Key and Spanner x 2 Cleaning Brush Fine Needle x 3 ASG-6000 WARRANTY IN ORDER TO MAKE A CLAIM UNDER THIS The benefits provided under this warranty are in addition to other rights and remedies which are available to you at law.
-
Page 2: Know Your Product
KNOW YOUR PRODUCT SETUP & PREPARATION AIRLESS SPRAY GUN 1. ASSEMBLY 1 Pressure Control Dial 6 Inlet Hose 2 Stand 7 Priming Lever WARNING! ENSURE THE TOOL IS dISCONNECTEd 3 Return Pipe 8 On/Off Switch FROM THE POWER SUPPLY bEFORE PERFORMING ANY OF THE FOLLOWING OPERATIONS. - Page 3 2. ASSEMBLY CONT. 3. PREPARATION Spray Tip & Guard WARNING! THIS TOOL IS RECOMMENdEd FOR THE Note: The spray gun comes assembled from the factory. If the USE WITH RESIdUAL CURRENT dEvICE WITH A RATEd RESIdUAL CURRENT OF 30MA OR LESS. spray gun has been disassembled for cleaning, follow the steps below to re-assemble.
- Page 4 OPERATION 4. PREPARATION CONT. 5. TEST SETTINGS 5 Wait for air bubbles to clear 6 Return priming lever to Setting Pressure return pipe, this is indicated spray position. 1 Set the pressure control 2 Test this pressure setting by a steady stream of paint on a scrap piece of dial to a medium - high out of return pipe.
- Page 5 3 Avoid stopping and starting as this can lead to a patchy finish, It is best to start spraying outside the surface to be sprayed and avoid stopping in the middle of the surface, continue just past the opposite edge. ASG-6000...
-
Page 6: Pressure Release Procedure
8. PRESSURE RELEASE 9. SPRAY TIP SELECTION Interim Procedure Spray tips are numbered so that: • The first digit, when multiplied by two, gives the spray If taking a break from spraying for more than several minutes, width in inches perform the pressure release procedure below. - Page 7 Spare parts can be ordered from the Special Orders desk at your local bunnings Warehouse. For further information, or any parts not listed here, visit www.ozito.com.au or contact Ozito Customer Service: Australia 1800 069 486 New Zealand 0508 069 486...
- Page 8 When using an extension lead on a reel, always unwind the lead completely. Use of an extension lead not Note: The supply of 230V and 240V on Ozito tools are interchangeable for Australia and New Zealand. suitable for the power input of the tool or which is damaged or defective may result in a risk of fire and electric shock.
- Page 9 AIRLESS PAINT SPRAYER 650W Cleaning Manual This cleaning process must be followed immediately after use to prevent paint from drying inside the pump and hose. Failure to follow this instruction may permanently seize the paint sprayer. 0916...
-
Page 10: Table Of Contents
CONTENTS PRESSURE RELEASE PROCEDURE Know Your Product..............Page 2 WARNING! BEFORE BEGINNING THE CLEANING PROCESS, ENSURE THE PRESSURE RELEASE PROCEDURE BELOW IS PERFORMED. Pressure Release Procedure..........Page 3 Follow this procedure diligently as a build-up of dried paint on the Acrylic Vs Oil Based.............. -
Page 11: Acrylic Vs Oil Based
ACRYLIC VS OIL BASED 5 Continue this process until only cleaning solution is ejected from the spray tip. Add more cleaning solution if all of the paint has not been removed. Note: If the cleaning solution bucket becomes cloudy with paint during cleaning, skip to If coating material was water based (acrylic paint), use ONLY water when performing the cleaning section: Cleaning of the inlet hose. - Page 12 THE INLET HOSE 4 While holding the upper part of the spray gun, loosen the handle by applying a 21mm spanner to the grooves located on the bottom part of the handle. Rotate 1 Squeeze the tabs on the inlet hose clamp 2 Pull the filter out and rinse under anticlockwise until the handle can be together and slide the hose clamp away...
-
Page 13: Storage
SPASG6000-071A Note: There are a range of filters available to suit specific types of coating materials. To order a filter to suit your coating material please contact Ozito Customer Service. Spare parts can be ordered from the Special Orders Desk at your local Bunnings Warehouse.
Need help?
Do you have a question about the ASG-6000 and is the answer not in the manual?
Questions and answers