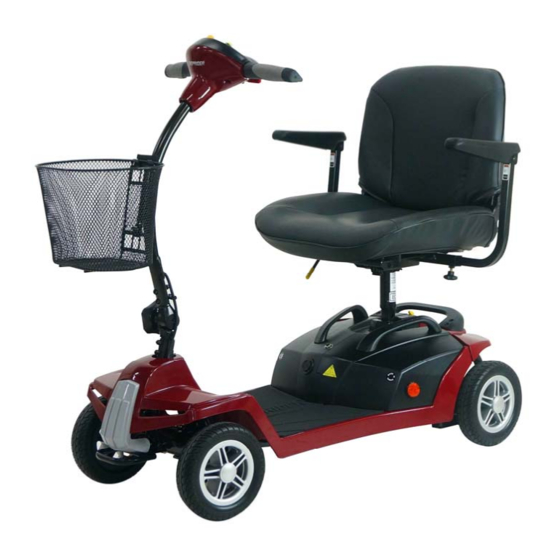
Summary of Contents for Shoprider Mikra TE-7A
- Page 1 Mikra Model – TE-7A USER MANUAL Please ensure that this manual is read and understood before using the scooter. September 2014 KB&S - XXXXX Rev 1...
-
Page 2: Table Of Contents
Contents Page Introduction Intended Use Technical Specification Feature Guide Safety Advice Adjustments Tiller angle Seat swivel Seat removal Seat height Arm width adjustment Tiller Controls Brake Release / Freewheel Operation Starting to Drive Getting Started ... -
Page 3: Introduction
Intended Use The SHOPRIDER Mikra is intended for indoor or outdoor use in pedestrian areas by a single individual with limited mobility up to a maximum weight of 113kg (18st). It is intended to be used by those suffering from some disability or impairment which prevents a normal level of personal mobility. -
Page 4: Feature Guide
Feature Guide ‘Mikra’ 1. Tiller control head 2. Detachable swivel padded seat with fold down back 3. Detachable basket (Capacity 5kg) 4. Right side battery box 5. Left side battery box 6. Anti-tip wheels 7. Puncture proof non-marking wheels 8. Tiller angle adjustment knob... -
Page 5: Safety Advice
Connect any other devices to the batteries as this could cause permanent damage and void your warranty. Use any other batteries/charger other than those supplied by SHOPRIDER. Travel through water or over soft terrain (mud, sand etc.) ... -
Page 6: Adjustments Tiller Angle
Adjustments Tiller Angle Adjustment At the bottom of the tiller stem is the angle adjustment knob. Rotate the hand knob anticlockwise to loosen and adjust to the required angle. Re-tighten the hand knob fully before use. DO NOT fully undo the hand knob as the internal components may become detached from the assembly. -
Page 7: Seat Removal
Continued….. Seat Removal To remove the seat, fold down the back of the seat and simply lift the seat away from the chassis while lifting the seat swivel lever. Do not hang baggage or other objects on the back of the seat as this may affect stability. -
Page 8: Tiller Controls
Tiller Controls Maximum Speed Knob The speed control enables you to set the maximum speed of the scooter. Turn clockwise to increase the maximum speed and anti-clockwise to decrease. Always start at a slow speed until accustomed with the characteristics of your scooter. Do not put excessive pressure on the dial. -
Page 9: Brake Release / Freewheel Operation
Brake Release / Freewheel Operation The brake release lever is situated at the right rear of the scooter. This lever allows you to disengage the drive mechanism and push the scooter in ‘freewheel’ mode. To disengage the drive, pull the lever up as shown in the image below. The scooter can now be pushed. -
Page 10: Starting To Drive
Starting to Drive Getting Started Note: You must fully charge the batteries prior to first use (see ‘Batteries and Charging’) Select an area with plenty of space. Mount the scooter by lifting the arm and sliding onto the seat. Ensure the seat is securely locked in the forward facing position before driving. -
Page 11: Ramps / Slopes
Charge the batteries completely (approx 8 hours) prior to first use. The SHOPRIDER Mikra uses two 12Amp, 12 Volt sealed VRLA AGM batteries. The battery packs are located under the front of the seat. They can be easily removed by simply lifting by the handle on the top. - Page 12 Continued….. Battery Charger The battery charger is a 2-amp switch mode type off board. The battery charging ports are located on the left side of the tiller head and on the front of the battery pack. Before using your scooter for the first time be sure to fully charge the batteries, this may take up to 12 hours.
-
Page 13: Dismantling
Dismantling The scooter can be easily and quickly dismantled into five parts for transportation and storage. No tools are required. Firstly remove the basket and seat as described earlier. Remove the seat and battery packs (left side first). Locate the release lever as shown below. The lever is sprung, push it to the rear of the scooter and lift the main body by the seat post as shown. -
Page 14: Tiller Lock Lever
Routine Maintenance We suggest that your scooter should undergo a full service at least once a year by an authorised SHOPRIDER dealer. Please check the following on a weekly basis: Front wheels spin freely ... -
Page 15: Troubleshooting
Troubleshooting Your scooter is fitted with the latest in electronic controls that are programmed to protect the electrical system from abnormal overloads. Fuses There are two fuses on the battery cables to give protection against possible overload on the wiring. Check List If your scooter fails to operate, please check the following: ... -
Page 16: Further Information
Further Information Safety Information Regarding Electromagnetic Interference (EMI) Scooters and powerchairs are designed to operate under certain conditions. However, radio waves or electromagnetic fields may affect the operation of the scooter. The source of EMI could be radio or television transmitters or portable devices such as mobile phones, portable CB radios etc. - Page 17 Continued….. Product Stability Scooters and powered wheelchairs are designed to allow the user flexibility of movement in restricted areas. Driving at maximum speed and attempting sharp turns can create a situation where the product becomes unstable. Therefore it is essential that the user pay attention to the guidance set out in this manual.
- Page 18 Notes...
- Page 19 Notes...
- Page 20 York Road, Bridgend Industrial Estate, Bridgend CF31 3TB Tel: 01656 674488 Fax: 01656 674499 Email: sales@romamedical.co.uk www.romamedical.co.uk Shoprider reserve the right to change specifications without prior notice Manufactured by: Phisiang Machinery MFG. CO. LTD No. 108 Hsin-He Rd, Hsin-Feng Hsiang, Hsinchu County, Taiwan...


Need help?
Do you have a question about the Mikra TE-7A and is the answer not in the manual?
Questions and answers