Table of Contents
Advertisement
Quick Links
Download this manual
See also:
User Manual
HDMI® or Component Standalone
Capture Device – 1080p
USB2HDCAPS
DE: Bedienungsanleitung - de.startech.com
FR: Guide de l'utilisateur - fr.startech.com
ES: Guía del usuario - es.startech.com
IT: Guida per l'uso - it.startech.com
NL: Gebruiksaanwijzing - nl.startech.com
PT: Guia do usuário - pt.startech.com
For the most up-to-date information, please visit: www.startech.com
Manual Revision: 04/24/2015
*actual product may vary from photos
Advertisement
Table of Contents

Related Manuals for StarTech.com USB2HDCAPS


Summary of Contents for StarTech.com USB2HDCAPS
- Page 1 DE: Bedienungsanleitung - de.startech.com FR: Guide de l'utilisateur - fr.startech.com ES: Guía del usuario - es.startech.com IT: Guida per l'uso - it.startech.com NL: Gebruiksaanwijzing - nl.startech.com PT: Guia do usuário - pt.startech.com For the most up-to-date information, please visit: www.startech.com Manual Revision: 04/24/2015...
- Page 2 StarTech.com. Where they occur these references are for illustrative purposes only and do not represent an endorsement of a product or service by StarTech.com, or an endorsement of the product(s) to which this manual applies by the third-party company in question. Regardless of any direct acknowledgement elsewhere in the body of this document, StarTech.com hereby...
-
Page 3: Table Of Contents
Table of Contents Product Diagram ..................1 Front View ..............................1 Rear View ..............................1 Introduction ....................2 Packaging Contents ..........................2 System Requirements ..........................2 Standalone Operation ................3 PC Operation ...................3 Hardware Installation ..........................3 Software Installation ................4 Software Operation ................7 Launching Application .......................... -
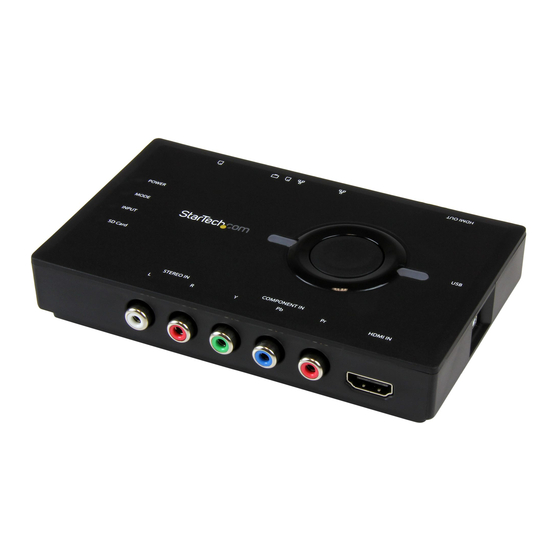
Page 4: Product Diagram
Product Diagram Front View 1. RCA Audio Input Port 2. Component Video Input Port 3. HDMI Audio/Video Input Port 4. USB 2.0 Port Rear View 1. HDMI Audio/Video Output Port 2. LAN Port 3. Mode Switch 4. SD SLOT 5. Record Button Instruction Manual... -
Page 5: Introduction
For Standalone Operation: • SD Card For PC Operation: • Computer system with: • Available USB 2.0 port • Microsoft® Windows 8/8.1 (32/64bit) / 7 (32/64bit) / Vista (32/64bit) Note: The USB2HDCAPS product will not record digitally encrypted content. Instruction Manual... -
Page 6: Standalone Operation
Standalone Operation 1. Insert your SD Card into the SD slot. 2. Connect the included USB 2.0 Cable from the USB 2.0 Port on the USB2HDCAPS to any USB power source. 3. Set the Mode Switch to Standalone Operation. 4. Using the required audio/video cabling (HDMI cable not included), connect your audio/video source (DVD, DVR, VCR, etc.) to the USB2HDCAPS using either the... -
Page 7: Software Installation
3. Using the required audio/video cabling (HDMI cable not included), connect your audio/video source (DVD, DVR, VCR, etc.) to the USB2HDCAPS using either the HDMI input port or the Component video / RCA Audio input ports, depending on your audio/video source. - Page 8 4. Select Quick Installation from the menu that appears. The installation will begin. 5. Select Typical Installation and click Install. Instruction Manual...
- Page 9 6. You will receive a request to start HiVision HD Capture. Click the Start button to continue. 7. You will be asked to select a language for installation. Select your desired language and click OK. 8. Follow the prompts to complete the VivaStation installation. When prompted to, click Finish.
-
Page 10: Software Operation
Software Operation Launching Application 1. Once installation is complete, an icon will be created on your desktop called “VivaStation. ” Click this icon to launch the software. 2. Upon launching the software, you will be prompted to select the device and the source to import. -
Page 11: Volume Control
Volume Control To adjust the volume, click the Volume buttons. Down Mute Playback To access files saved on your computer, click the Playback button. Schedule Recordings To sechedule times when you want the device to start and stop recording, click the Schedule Records button. -
Page 12: Network Streaming Operation
(frames per seconds, paths where files are saved, etc.), click the Additional Settings button. Network Streaming Operation 1. Connect the included USB 2.0 Cable from the USB 2.0 Port on the USB2HDCAPS to any USB power source. 2. Set the Mode Switch to Network Streaming Operation. -
Page 13: Technical Support
Limitation of Liability In no event shall the liability of StarTech.com Ltd. and StarTech.com USA LLP (or their officers, directors, employees or agents) for any damages (whether direct or indirect, special, punitive, incidental, consequential, or otherwise), loss of profits, loss of business, or any pecuniary loss, arising out of or related to the use of the product exceed the actual price paid for the product. - Page 14 StarTech.com is an ISO 9001 Registered manufacturer of connectivity and technology parts. StarTech.com was founded in 1985 and has operations in the United States, Canada, the United Kingdom and Taiwan servicing a worldwide market.
Need help?
Do you have a question about the USB2HDCAPS and is the answer not in the manual?
Questions and answers