eTIGER S4 Cell+Line Manual
Hide thumbs
Also See for S4 Cell+Line:
- Quick start manual (14 pages) ,
- Quick start manual (100 pages) ,
- Manual (252 pages)

Related Manuals for eTIGER S4 Cell+Line


Summary of Contents for eTIGER S4 Cell+Line
- Page 1 Security Kit / Security Kit Plus - S4 Cell + Line GSM and Landline Alarm System www.etiger.com...
-
Page 2: Specifications
Features GSM/PSTN transmitter Supports up to 30 remote controls, 50 wireless accessories and 50 RFID tags Can store up to 5 phone numbers, 5 SMS numbers, and 2 CMS numbers (for systems connected to a Central Monitoring System) Arm / disarm the system by SMS, phone call, or App (on iOS or Android) Can be disarmed by RFID tag Built-in siren (100dB) and call function from the panel SMS alerts for power failure, power recovery and low battery... - Page 3 Quick Start-up...
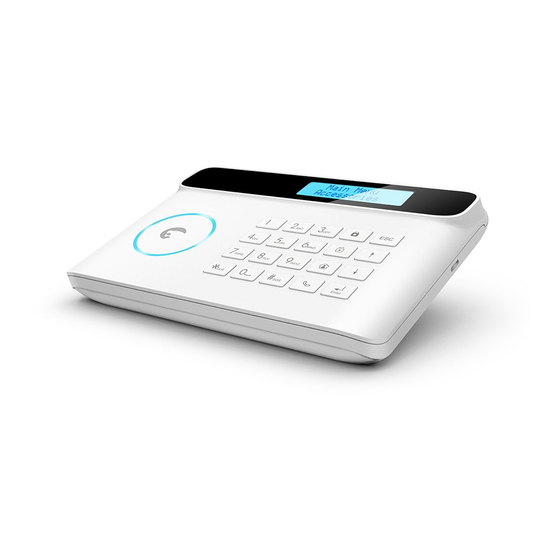
- Page 4 Control Panel Layout (Front) LCD Display Disarm LED Status Indicator Stay (Home Mode) (armed / disarmed) Call RFID Tag Reader Control Panel Layout (Back) Monitoring MIC Tamper Switch SIM card Slot Speaker Output for wired sensors Wired sensors (24h zone) Wired siren 500mA Electronic lock LOCK P1...
-
Page 5: Turning Your System On
Connect your System The Security Kit - S4 Cell + Line features a dual GSM and PSTN transmitter. This means that the control panel of your alarm system will communicate with you either through a SIM card (GSM module) or through your telephone landline (PSTN module). a. - Page 6 To disarm the system: send “0” by SMS to the number of your system’s SIM card. By app (in GSM mode only): Click on “Arm” in the app. The app is available for download on the App Store and Google Play (more information on etiger.com).
- Page 7 Register Wireless Accessories & RFID Tags Type your admin code followed by “Enter” on the control panel to enter the setup menu. Enter the Connection Mode by navigating through the menu: "ACCESSORIES" --> "WIRELESS SENSORS" , "RFID TAG" or "REMOTE" --> "ADD A NEW"...
- Page 8 Control Panel Operations...
-
Page 9: Home Mode
Arm the System Setup from the Control Panel Press the Arm button " " on the control The control panel of your alarm system panel. The control panel beeps once: the features an LCD display that enables you to system is armed. navigate through the menu of the control panel and set up your alarm system. - Page 10 Main Menu Sub Menu 1 Sub Menu 2 Sub Menu 3 Comments Note Select the phone or SMS number you want to edit, type in the phone PHONE [1~5] IS: If you want to set a CMS center phone number and confirm with the key "Enter". Use the key " " to clear. PHONE NUMBERS SMS NUM [1~5] IS: number, please refer to the instructions...
- Page 11 Main Menu Sub Menu 1 Sub Menu 2 Sub Menu 3 Comments Note SYSTEM SETTINGS DATE AND TIME YYYY-MM-DD TIME (e.g. 2014-06-20 14H30) The entry and exit delay is only for sensors This function can be used if you do not want to bring a remote connected as Delay Zone accessories (see ENTRY DELAY 000-300...
- Page 12 Main Menu Sub Menu 1 Sub Menu 2 Sub Menu 3 Comments Note This function enables you to determine the number of times the control RINGING TIMES SYSTEM SETTINGS <0-9> panel will ring before taking your call (for control by phone call). SIREN SWITCH <ON OR OFF?>...
- Page 13 Control by Phone Call This feature is available only after having enabled it from the control panel, as explained on page 11 of this manual. Method 1 When an alarm has been triggered, the control panel dials the stored phone numbers. When you pick up the phone, follow the voice instructions to control the panel from distance (refer to the instructions in the table below).
- Page 14 Zone Setup of Accessories Every detector can be assigned to 4 different categories of zones: Home Zone, Delay Zone, Normal Zone and 24-H Zone. To assign a detector to a zone, follow the instructions on page 10 of this manual (the zone will be assigned at the time of connection of the accessory). Normal zone When the system is armed, if a sensor is triggered, the siren rings out.
- Page 15 SMS Operations...
- Page 16 SMS Operations IMPORTANT: BEFORE USING FOR THE FIRST TIME INSERT A SIM CARD IN THE CONTROL PANEL BEFORE STARTING SMS OPERATIONS. MAKE SURE THE SIM CARD DOES NOT REQUIRE ANY PIN CODE. SAVE A SMS NUMBER IN THE CONTROL PANEL (USING THE CONTROL PANEL). Only stored numbers can control and configure the system.
- Page 17 Disarm the System Settings Enquiry Send: Send: System disarmed. System:Disarmed AC power:on Arm the System Note The values indicated hereinabove will Send: change after having set up the system. System armed. Home Mode Send: System in home mode.
- Page 18 Store Phone Numbers Store Phone Numbers for SMS Notifications Send: Send: Phone numbers: SMS numbers: Copy, paste, then edit (case sensitive): Copy, paste, then edit (case sensitive): Phone numbers: 1. 067890033 SMS numbers: 2. 067890022 1. 067890033 3. 067890011 2. 067890022 4.
- Page 19 Rename Zones SMS Alert for Accessory Low Battery (available for two-way acessories such as Motion Detectors) Send "91~99". For example for zone 1, send: For accessories assigned to zones that have been renamed, an SMS will be sent under the format “Zone name battery”.
-
Page 20: Entry And Exit Delay Time
Rename RFID Tag Entry and Exit Delay Time Send: Send: Rename RFID tags: Entry delay time(0-300sec):0 Exit delay time(0-300sec):0 Copy, paste, then edit (case sensitive): Copy, paste, then edit (case sensitive): Entry delay time(0-300sec):10 Exit delay time(0-300sec):20 Rename RFID tags: 1. - Page 21 Siren Volume and Ringing Time Disarm Password Send: Send: Siren volume(0=Mute,1=High):1 Disarm password (4 digits): Siren ringing time(1-9min):5 1234 Copy, paste, then edit Copy, paste, then edit (case sensitive): (case sensitive): Siren volume(0=Mute,1=High):0 Disarm password (4 digits): Siren ringing time(1-9min):1 8888...
- Page 22 Change System Language Restore System to Factory Settings by SMS Send the code corresponding to the language you want to set. For example, for Send: English, send “0001”. 0000 0001 The settings will be restored to default Refer to the table below for the full list of values.
- Page 23 Accessories...
-
Page 24: Wireless Remote Control
Wireless Remote Control Disarm LED indicator Home Mode Arm the system Press the Arm button " " to arm the alarm system. The LED indicator lights up (the control panel beeps once). The system is armed. If an intruder is detected, the siren rings out. - Page 25 Mute Mode Press the Home Mode button " " and then the Arm " " or Disarm " " button immediately after. Doing so, the control panel does not beep when you arm or disarm your system. Emergency Mode Regardless the status of the system, the alarm is triggered when the SOS button "SOS"...
- Page 26 Wireless Motion Detector Features The ES-D1A is a high performance wireless motion detector boasting a digital dual-core fuzzy logic infrared control chip with intelligent analysis. This technology identifies interferences created by body motion and reduces the false alarm rate. With automatic temperature compensation and anti-air turbulence technology, it easily adapts to environmental changes.
- Page 27 Usage Open the case and remove the battery activation strip. Self-testing will start for 30 seconds. When the sensor is in operation, if it is triggered more than twice within 3 minutes, it will switch Connect Button to standby mode to save power. If no movement is detected within the next 3 minutes, the sensor goes back to working mode.
- Page 28 Testing A. After the installation, turn the detector on. After one minute of self-testing, press the test button, walk in the scope of detection and watch the LED indicator to make sure the detector is working. B. The LED indicator blinks once when body movement is detected. C.
- Page 29 Wireless Door / Window Contact Features The ES-D3A is a Door / Window Contact that can be installed on doors, windows, and any other objects that open and close. The sensor sends a signal to the control panel when the magnet is separated from the transmitter.
- Page 30 Installation Open the case and remove the battery activation strip. Mount the sensor on the door and the magnet on the door frame. Make sure the magnet is placed above the transmitter. Mount the magnet max. 0.4" away from the transmitter and secure the transmitter and magnet with double- sided tape or screws.
- Page 31 Your eTiger security systems supports additional indoor and/or outdoor sirens so to enable you to extend your system according to your needs. To register an additional eTiger siren, refer to the instructions provided in the manual that comes with your siren.
- Page 32 Troubleshooting and Safety Instructions...
- Page 33 LCD display “Enter“ to enter the setup menu control panel If you are experiencing issues that are not described in the FAQ above, visit etiger.com download the latest update of this user manual and for additional support.
- Page 34 Precautions For a safer use of the product and to optimize the lifespan of the product, we recommend you to follow the precautions below: The wireless accessories must be connected to the control panel. Low power voltage may affect transmission distance. Do not press the SOS key on the remote control if it is unnecessary to avoid disturbing neighborhood.
- Page 35 Standards This product bears the selective sorting symbol for waste electrical and electronic equipment (WEEE). This means that this product must be handled pursuant to European Directive 2002/96/EC in order to be recycled or dismantled to minimize its impact on the environment. For further information, please contact your local or regional authorities.
-
Page 36: Fcc Statement
(1) This device may not cause harmful interference, and (2) This device must accept any interference received, including interference that may cause undesired operation. Any change or modification not expressly approved by eTIGER may void the user’s authority to operate the equipment. - Page 37 www.etiger.com...
Need help?
Do you have a question about the S4 Cell+Line and is the answer not in the manual?
Questions and answers