QSC TouchMix-8 User Manual
Hide thumbs
Also See for TouchMix-8:
- User manual (71 pages) ,
- Technical notes (2 pages) ,
- User manual (146 pages)

Subscribe to Our Youtube Channel
Related Manuals for QSC TouchMix-8


Summary of Contents for QSC TouchMix-8
- Page 1 TouchMix™ User Guide Firmware Version 2.0 TouchMix-8 TouchMix-16 TD-000472-00-B *TD-000472-00*...
-
Page 2: Important Safety Instructions
QSC authorized service station or QSC International Distributor. Failure to perform necessary repairs could lead to additional damage or to safety hazards. Failure to perform necessary repairs voids the limited warranty and QSC is not responsible for any injury, harm or related damages arising from any failure to perform those repairs. -
Page 3: Maintenance And Repair
QSC authorized service station or an authorized QSC International Distributor. QSC is not responsible for any injury, harm or related damages arising from any failure of the customer, owner or user of the apparatus to facilitate those repairs. -
Page 4: Table Of Contents
Table of Contents Maintenance and Repair . . . . . . . . . . . . . . . . . . . . . . . . . . . . . . . . . . . . . . . . . . . . . . . . . . . . . . .iii FCC Statement . - Page 5 Level-Match Your QSC Speakers . . . . . . . . . . . . . . . . . .
- Page 6 Mixing Surface . . . . . . . . . . . . . . . . . . . . . . . . . . . . . . . . . . . . . . . . . . . . . . . . . . . . . . . . . . . . . . . . . . . . . . . . . . . . . . . . 25 Right Side of the TouchMix-8 Mixing Surface .
- Page 7 FX Masters . . . . . . . . . . . . . . . . . . . . . . . . . . . . . . . . . . . . . . . . . . . . . . . . . . . . . . . . . . . . . . . . . . 46 FX Masters –...
- Page 8 TouchMix-8 . . . . . . . . . . . . . . . . . . . .
-
Page 9: Touchmix™ How To
Register and Update STOP We know you want to get right to using your TouchMix, but before you do please stop and take a moment to visit www.qsc.com and register your TouchMix. By registering you can… • Download TouchMix firmware so that your mixer has all the latest features, refinements and performance enhancements. -
Page 10: Build A Mix Using Presets
To Recall a Factory Scene: Select a Scene: Recall Menu Scenes TM16 Rock Band TM8 Country You’ll see a list of Factory programmed scenes. Select one and touch Recall. Once you’ve recalled a scene you can make modifications to suit the show you’re mixing. -
Page 11: Name Your Auxiliary Outputs
In addition to the Main L/R (left/right) output mix, TouchMix-16 is also capable of controlling eight additional output mixes (six mono and two stereo). TouchMix-8 has four mono Aux outputs). These additional mixes are known as Auxiliaries, or “Auxes” for short. -
Page 12: Name The Effects Channels (Or Mixes)
• Other instruments either don’t need any effects or have their own effects (guitar pedals, internal effects on keyboards). Input Instrument FX Send Effect Processor FX Preset Name Kick Snare Dense Reverb D Live Plate Med Hi Hat Rack Tom Dense Reverb D Live Plate Med Floor Tom... -
Page 13: Using The Fx Izard
Using the FX izard The FX Wizard is the easiest and fastest way to set up your effects. Only effects that work for the Source and Type of input you have selected will be shown. So any effect you select using the wizard will be a valid one although it may or may not work in the context of your mix. Here’s how to use it. -
Page 14: Using The Input Channel Fx Tab
Using the Input Channel FX Tab You can also operate your effects from the input channel area of your mixer. In 1 To Run Effects from the Input Channel: Inputs 1-8 Welcome to the channel FX screen. From here you can… Select an FX Processor: Select a Different Processor: Lush Reverb... -
Page 15: Using The Fx Channel Effect Tab
Aux 9/10 To Adjust the Level of the Effect Sent to the Auxiliary Outputs: TouchMix-8 Auxes 1-4, TouchMix-16 Auxes 1-6 and 7/8, 9/10. Use the "FX Returns to Monitors" knobs to control the amount of effect heard in the monitor speakers. -
Page 16: Using The Fx Overview
Using the FX Overview If you would prefer to see the send and return levels for all your effects at once, the FX overview is where you want to go. To use the FX Overview: Menu Overview 1. The columns are the Input channels. Use the Nav Strip to change the group of Input channels. -
Page 17: Dca Nroups
DCA Nroups TIP!: See "Tips & Tricks" on page 20 for more on DCA’s. A DCA groups faders together so the overall level of all the channels in the group can be controlled by a single DCA fader. A DCA fader does not change the position of any of the faders in the group. -
Page 18: Connecting Remote Devices
Connecting Remote Devices There are several ways to connect your wireless devices to TouchMix using the included Wi-Fi dongle or an external Wi-Fi router. See "Remote Control Settings" for more detail on allowing or restricting access by remote devices. Create Own (TouchMix) Network Direct wireless connection between TouchMix and your devices. -
Page 19: Ired Connection To An Existing Network Using Static Ip Addresses
Connection to an Existing Network Using Automatic IP Addresses Install a USB-to-Ethernet adapter into one of the mixer’s USB ports (visit qsc.com for a list of validated adaptors). Using an RJ45 cable, connect the adapter to a port of the router. -
Page 20: Homework Completed
These settings will give you the optimum signal to noise performance and get the most GAIN B from your QSC powered speakers. The mixer’s output meters will reflect when you’re Rotate 4 detents (clicks) past zero “running out of speaker”. Note that you will see the “Limit” light on your speakers illuminate as the mixer drives them harder during louder portions. -
Page 21: Qsc Nxd Amplifier Settings
QSC NXD Amplifier Settings If you are using a QSC GXD amplifier, you can optimize the gain and sensitivity for use with your TouchMix. Refer to "Output Channel – QSC GXD Amplifier Settings" on page 45 Phantom Power (+48V) Most condenser microphones and some direct boxes require phantom power from the mixer. On TouchMix, phantom power may be turned on or off on a per channel basis. -
Page 22: Auxiliary (Stage Monitor) Mixes
Auxiliary (Stage Monitor) Mixes There are two general approaches to setting up stage monitor mixes: Input by Input With all the performers on stage, ask each performer in turn to play or sing just one thing (Kick, Snare, Guitar, Sax, etc). Ask each performer how much of that instrument they want in their monitor. -
Page 23: Eq Tab
EQ Tab For the Main and mono Aux outputs, the EQ tab displays the 1/3 octave graphic Low Mid High Mid High equalizer. To better fit the screen, the equalizer has been divided into four sections – Low, Low-Mid, High-Mid and High. The four windows will display the setting of all faders. Touch any of the windows to work on that part of the frequency spectrum. -
Page 24: Setup Tab
Touch to enter a new name for the output. (not available on Main output) to name the output. Link Linking: Available only on Auxes 1-8 (TouchMix-16), and 1-4 (TouchMix-8). This Links odd-to-even pairs of auxiliary mixes to create a stereo mix. Delay In Delay: Delay is most commonly used for remote fill speakers. -
Page 25: Recording
Repeat for all channels you wish to record. Play Inputs 1-8 All mixer inputs (TouchMix-16 – 20 inputs, TouchMix-8 –12 inputs) may be recorded simultaneously. In addition, you can record the Main mix. Record/ 2-Trk Rec To Select Stereo Mix to Record:... -
Page 26: Recording Directory Structure
Make sure that no other channels Record/ 3. To begin recording: Play are armed for recording. 4. Operate the transport normally. The .wav files for the 2-track recording can be found in the session folders Track21 and Track22 (TouchMix-16,) or Track14 and Track15 (TouchMix-8). TD-000472-00-B... -
Page 27: Security
Everyone else can still operate the mixer in Simple Mode. To Log In If a security level has been enabled and the mixer has been locked, the screen displays the QSC and TouchMix logos as well as a Login button. Enter Password to Log in:... -
Page 28: Tips & Tricks
Tips & Tricks Low-Cut Filters (AKA High Pass Filters) Most small mixers lack this really useful feature. But once you learn how to use it, you’ll never want to mix a show without it. There really are only a few instruments on stage like kick drum, larger toms, bass and keyboards that are even capable of producing low frequencies. For most everything else, low frequencies just cause problems. -
Page 29: About Effects Routing
About Effects Routing We have effects on a mixer because we want to apply them to one or more inputs in order to enhance the sound. This means that somehow the mixer has to be able to take the sound from selected input channels and "send" the sound to the effects processor. Back in the day, before mixers had effects processors built in, the audio was "sent"... - Page 30 — Figure 9 is a diagram of a single channel and one effects send and return. Lets walk through the diagram. Channel Fader Audio Input Channel Input Channels Dynamics Main Main Left Sends Main Right Master (10) — Figure 9 — Audio (1) is input via one of the TouchMix inputs (2).
-
Page 31: About Dca Nroups
About DCA Nroups What is a DCA? DCA stands for Digitally Controlled Amplifier. What this function does is allow a single fader to control the level of a group of channels. Let’s say that you have your drum mix set up and it’s perfect but the drums are just a bit hot relative to the rest of the mix. When you assign a DCA to all the drum microphones, you can pull down a single fader and bring down the level of all the drums at once without changing their mix. -
Page 32: Reference
7. Menu – Displays a choice of menu options, including Mixer Setup. 8. Record/Play − Displays recording controls and options. — Figure 11 — Left Side of the TouchMix-8 Mixing Surface Refer to — Figure 12 1. Rear Panel labels. -
Page 33: Right Side Of The Touchmix-16
Right Side of the TouchMix-16 TouchMix-16 Mixing Surface Refer to — Figure 13 Stereo In Stereo In 17/18 19/20 1. ¼” TRS inputs (17/18 and 19/20) Aux Out Aux Out – Line level, stereo. 9/10 2. ¼” TRS outputs Aux (7/8 & 9/10) Monitor –... -
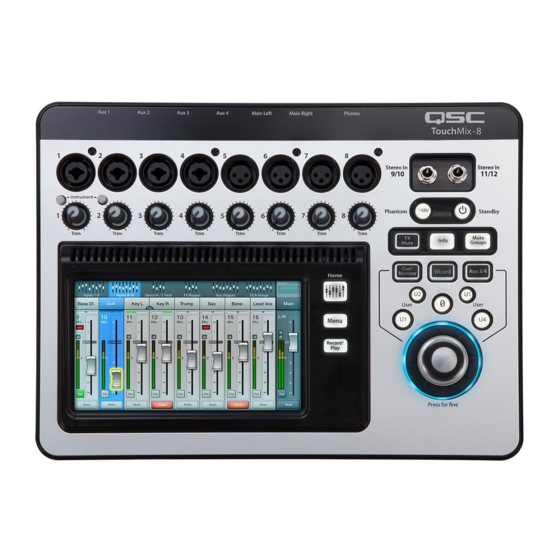
Page 34: Right Side Of The Touchmix-8
Right Side of the TouchMix-8 Mixing Surface TouchMix-8 Refer to — Figure 14 1. ¼” TRS inputs (9/10 and 11/12) – Line level, stereo. Stereo In Stereo In 9/10 11/12 2. Phantom +48V – Displays input channel Phantom Power buttons. -
Page 35: Touchmix-16 Back Panel
1 Drives must be formatted using the FAT32 file system. For best results use 7200 RPM, USB 3 hard drives or high-speed SSD. Drive performance is critical for recording. For more information and to see a list of qualified drives, visit qsc.com. At this time, the TouchMix does not support importing or re-importing digital audio files that have been created or edited on another device. -
Page 36: Home
Inputs 1–8 and 9–16 – Display the fader settings for main mic/line inputs. (TouchMix-8, Inputs 1–8 only) Stereo In/2-Track Playback – Displays the fader settings for stereo line inputs 17/18 and 19/20 (TouchMix-8 9/10, 11/12) and for 2-track playback from USB. -
Page 37: Here And Hat Things Are On The Home Screen Channels
here and hat Things Are on the Home Screen Channels Refer to — Figure 18 Scene: Gigmaster 7 1. Select button – Displays the channel name. Touch to access Master Channel controls. 2. Pan Indicator – Adjust in Master Channel. Main Lead G tr 3. -
Page 38: Input Channel
• The TouchMix-16 uses the first two fader banks for input channels 1–8 and 9–16 respectively. • The TouchMix-8 uses the first fader bank for Input channels 1–8. • The red line in Inputs 1-8 fader bank is a clip indication that is persistent (sticky) until cleared. -
Page 39: Input Channel - Eq
Input Channel – EQ Controls and displays the settings for Input Channel equalization. Home Select an Touch Select Select Input Bank Button EQ Tab In 2 Inputs 1-8 — Figure 20 Refer to – 1. EQ Tab – Selects the EQ screen. 2. -
Page 40: Input Channel - Compressor
Input Channel – Compressor The Compressor controls the dynamic range of a signal above a set Threshold. Home Select an Touch Select Select Input Bank Button Comp Tab In 2 Comp Inputs 1-8 — Figure 21 Refer to – 1. Comp Tab – Selects the Compressor screen. 2. -
Page 41: Input Channel - Nate
Input Channel – Nate The Gate passes audio above a set Threshold, and attenuates or silences audio below the Threshold. Home Select an Touch Select Select Input Bank Button Gate Tab In 2 Gate Inputs 1-8 — Figure 22 Refer to –... -
Page 42: Input Channel - Fx Sends
Input Channel – FX Sends Controls how much of the Input channel’s audio is sent to the FX devices. In addition, you can adjust the FX Sends at Menu > FX Overview. Home Select an Touch Select Select Input Bank Button FX Tab In 2... -
Page 43: Input Channel - Pitch Correct
Input Channel – Pitch Correct Pitch Correct (available on Input channels 1 through 16) shifts the frequency of an input signal to match the nearest “correct” musical pitch. The mixer has only one Pitch Corrector which can be assigned to only one channel at a time. IMPORTANT!: You can enable or disable the Pitch-Correct feature using User Buttons without regards to the position of the Enable button on this screen. -
Page 44: Input Channel - Aux Sends
Auxiliary outputs are used to create a mix for stage monitors, in ear monitors, remote speakers or video / broadcast. For the TouchMix-16, there are six (1-6) mono and two (7/8 – 9/10) stereo Aux mixes. For the TouchMix-8 there are four (1–4) mono Aux mixes. -
Page 45: Input Channel - Presets
4. Factory / User Switch – Toggles between Factory and User presets. • Factory Presets – A library of QSC designed input-channel presets. • User Presets – User Presets may be stored to and recalled from Internal memory or an External (USB) storage device. -
Page 46: Input Channel - Setup
Stereo Input channels 17/18 and 19/20 (TouchMix-16,), and 9/10 and 11/12 (TouchMix-8) do not have a mechanical gain control, only Digital Gain. 9. Arm to Record – Sets the channel to be included in a multi-track recording. -
Page 47: Output Channel
Output Channel Output Channel – EQ The Main LR and Aux 1 – 6 (Aux 1 – 4 TouchMix-8) outputs have a 1/3 octave graphic EQ. Stereo auxes 7/8 and 9/10 use a parametric EQ identical to the input channel’s EQ. -
Page 48: Output Channel - Limiter
Output Channel – Limiter The Limiter keeps the audio level from going above the set Threshold. Home Select the Touch a Select Aux Bank Select Button Limiter Tab Aux 1 Main Limiter Aux Outputs Refer to — Figure 34 1. Limiter Tab – Selects the Limiter screen 2. -
Page 49: Output Channel - Filters
Output Channel – Filters Available on the Main L/R and Aux 1 – 6 (TouchMix-16,) and 1 – 4 (TouchMix-8) outputs. These narrow, cut-only, filters are useful for dealing with feedback. Home Select the Touch a Select Aux Bank Select Button... -
Page 50: Output Channel - Presets
Output Channel – Presets Store, recall and copy the settings associated with an output channel. Home Select the Touch a Select Aux Bank Select Button Presets Tab Aux 1 Main Presets Aux Outputs Refer to — Figure 36 1. Presets Tab – Selects the Presets screen 2. -
Page 51: Output Channel - Setup / Delay
— Figure 37 — for details. 8. Speaker Settings Button – Click this button to determine the best settings for your QSC K Series, KW Series, and KLA Series Loudspeakers. Refer Output Channel – Speaker Settings on page 44 for details. -
Page 52: Speaker Settings
Output Channel – Speaker Settings Provides help in properly adjusting QSC K, KW and KLA powered loudspeakers when used with the TouchMix. Home Select the Touch Speaker Touch a Select Aux Bank Settings Select Button Setup Tab Aux 1 Main... -
Page 53: Qsc Nxd Amplifier Settings
Output Channel – QSC NXD Amplifier Settings Provides information for properly adjusting QSC GXD Amplifiers when used with the TouchMix. Home Select the Touch a Touch GXD Select Aux Bank Amp Settings Select Button Setup Tab Aux 1 Main Setup... -
Page 54: Fx Masters
Refer to 1. Effect Tab – Selects the FX Master Effect screen 2. Aux Send Knobs (TouchMix-16,, 1–10) (TouchMix-8, 1–4) – Adjust level of processed audio going to the Aux mixes. 3. Reset Button – Returns processor and Aux Send controls to their default settings. -
Page 55: Fx Masters - Preset
FX Masters – Preset Recall presets for the selected FX channel based on the current FX device. All Presets are available for all FX channels. Home Select the FX Touch a Select Masters Bank Select Button Presets Tab FX 1 Presets FX Masters Refer to... -
Page 56: Fx Masters - Setup
FX Masters – Setup Setup allows you to rename the FX Master channel, and assign the channel to Mute and DCA Groups Home Select the FX Touch a Select Masters Bank Select Button Setup Tab FX 1 Setup FX Masters —... -
Page 57: Fx Processors
FX Processors FX Processors – Basic Chorus The Chorus FX Varies the pitch of a signal at a steady rate to “thicken” a sound. Select FX Home FX Masters Select Select Chorus Channel Effect FX 1 E ect Chorus FX Masters Refer to —... -
Page 58: Fx Processors - Dense Reverb
FX Processors – Dense Reverb The Dense Reverb (presets with a “D” suffix) is a model of a DSP reverb with more dense reflections that some may find more representative of actual acoustic spaces. FX Masters Select FX Select Select Home Channel Effect... -
Page 59: Fx Processors - Mono And Stereo Delay
FX Processors – Mono and Stereo Delay These effects delay the audio signal to create echo and similar effects. Controls for the stereo delay may be linked or operated independently. FX Masters Select FX Select Select Home Channel Effect Stereo Delay FX 1 E ect Stereo Delay... -
Page 60: Menu
Menu The Menu provides links to some of the mixer’s functionality and global settings. In addition the Menu provides quick access to Clear Clip, Mute, Cue, and global Screen mode. Press Menu Menu 1. DCA Nroups – Refer to DCA Groups on page Menu 2. -
Page 61: Scenes
When power is removed from the mixer, then restored, the mixer returns to the state of the last auto save. NOTE!: It is possible to recall a TouchMix-16, scene on a TouchMix-8, and recall a TouchMix-8 scene on a TouchMix-16,. The TouchMix-8 will simply ignore those input channels and mix buses it doesn’t have. -
Page 62: Security
Security Provides four levels of password-enabled security to TouchMix functionality. Touch Touch Menu Security Security Menu Refer to — Figure 54 Security Setup 1. Passwords Administrator Set Passwords IMPORTANT!: Setting the password for Administrator enables the Overwrite Scenes Recall Recall All Access and/or Presets Scenes... -
Page 63: Dca Nroups
DCA Nroups DCA Groups allow you to mute and control the signal level of channels assigned to it. The DCA does not move the faders or change the mute state of channels assigned to it. Press Touch the Home DCA Bank DCA 2 DCA Groups Refer to... -
Page 64: Remote Control Settings
Remote Control Settings Controls the availability of mixer functionality to logged-in devices on a device by device basis. When a new device connects to the mixer’s network and the TouchMix Control App is launched, the mixer displays a message indicating that a new device is connected. Touch Touch Menu... -
Page 65: User Buttons
User Buttons Provides a means to assign the four User Buttons to various functions giving one-touch access to the assigned function. Press Touch Menu User Buttons User Menu Buttons Refer to — Figure 56 User Button Setup By default the User buttons are assigned to: User Button 1 User Button 2 User Button 3... -
Page 66: Mixer Setup
– The TouchMix saves various events that take place when the TouchMix is on. This log can be saved to a USB device then sent to QSC Technical Support for use in troubleshooting TouchMix system errors. This file requires special software to read it. -
Page 67: Talkback / Noise
— Figure 60 Refer to (TouchMix-8 does not have the Talkback feature.) 1. Assignments – These buttons select the destination for the noise or talkback signals. Note that it is possible to route talkback to the four FX devices. This is very useful when auditioning and selecting effects. -
Page 68: Network Setup
Network Setup Network setup is done on the TouchMix only. ireless Network Setup Manages the mixer’s Wireless Network. Connect iPhones and iPads running Apple iOS6 or later. Make sure the supplied Wireless USB Adapter is installed in one of the mixer’s USB ports. Use only the adapter supplied with the mixer. IMPORTANT!: Do not remove or install the Wireless USB Adapter while recording or playing back audio. -
Page 69: Ired Network Setup
• If the TouchMix software version is 1.xx.xxxx, the iOS TouchMix App must be 1.xx.xxxx. • If you are in doubt, download the latest ToucMix software from QSC.com, and the latest TouchMix App from the App Store. 2. Are other iOS devices able to see and log on to the TouchMix? •... -
Page 70: Mute Nroups
Mute Nroups Mute Groups allow you to mute a group of assigned channels, at the same time, by pressing the Mute Group mute button. Press Mute Groups Mute Groups About Mute Nroups When a channel is in one or more Mute Groups, all Mute Groups containing the same channel and the Channel Mute itself, must be unmuted for audio to pass. -
Page 71: Phones And Monitor
Phones and Monitor Controls the output level for the Phones Cue and Monitor Cue Press Press Phones Monitor Phones Monitor NOTE!: Refer to — Figure 66 NOTE!: The Monitor Level control is available only on the TouchMix-16. Phones (1) and Monitor (2) Level – Controls the level of the Cue signal on the Phones and Monitor outputs. -
Page 72: Record / Playback
IMPORTANT!: All USB memory devices must be formatted as FAT32 to work with TouchMix. Drive performance is critical for recording. For more information and to see a list of qualified drives, visit qsc.com. At this time, the TouchMix does not support importing or re-importing digital audio files that have been created or edited on another device. -
Page 73: Recording Setup
Recording Setup Recall, initiate, and manage recording sessions. Press Touch Record / Play New / Recall Session: New / Recall Record/ Play Session Naming here Refer to — Figure 68 1. New Session Button – Displays a keyboard used to enter a name and initiate a new session. -
Page 74: 2-Channel − Playback And Record
— Figure 69 1. Source Select Buttons – Select the source for 2-Track recording. Main L/R, Aux 7/8 or Aux 9/10. (TouchMix-8 only Main L/R) 2. Record Pick-off Point Switch – Determines if the recorded audio is affected by the channel EQ and Dynamics (Post), or is not affected by the channel EQ and Dynamics (Pre). -
Page 75: Izard
izard FX izard The FX Wizard aids in adding FX to channels and routing those FX to monitors so your mixes have depth and sound fantastic! Press Touch FX Wizard Wizard Wizard Wizard Refer to — Figure 71 1. FX1, 2, 3, 4 Buttons – Selects which of the four FX mixes you want to work with. NOTE!: The Source, Type, and FX Preset windows provide a means of selecting an Effect based on what the source is. -
Page 76: Nain Izard
Nain izard The Gain Wizard aids in adjusting analog input gains to avoid clipping and distortion so your mixes sound great! Press Touch Gain Wizard Wizard Gain Wizard Wizard Refer to — Figure 72 NOTE!: The Gain Wizard is designed to assist after setting the Input Trim knobs, and during a performance. -
Page 77: Dimensions
Dimensions TouchMix-8 13.1 in (333 mm) Power Phones Cue / Monitor Aux 3/4 ® Right Left Aux 1 Aux 2 Aux 3 Aux 4 Main Left Main Right Phones TouchMix-8 Stereo In Stereo In 9/10 11/12 Instrument Phantom Standby Trim... - Page 78 TouchMix-16 14.2 in (360 mm) Power Talkback Main Right Main Left Aux 6 Aux 5 Aux 4 Aux 3 Aux 2 Aux 1 ® Aux 1 Aux 2 Aux 3 Aux 4 Aux 5 Aux 6 Main Left Main Right Talkback TouchMix-16 Stereo In...
-
Page 79: Touchmix-16
USB WiFI adapter, Soft Carrying Case, Power Supply 1 A list of drives that have been validated by QSC may be found at qsc.com. The hard-drive market is huge and continuously changing so there are many drives QSC has not validated that will work. - Page 80 © 2015 QSC Audio, Ltd Revised 1/26/2015 Main L/R Output Mic/Line Main Left From DCA Masters Meter Meter Over Ch Fader From DCA Masters Mute Trim 1/3 Oct GEQ Low Cut High Cut Notch Filters Mute Digital Low Cut High Cut...
- Page 81 © 2014 - 2015 QSC Audio Products, LLC. All rights reserved. QSC, the QSC logo, and TouchMix are registered trademarks of QSC Audio Products, LLC in the U.S. Patent and Trademark office and other countries. iPad, iPhone and iOS are trademarks of Apple Inc., registered in the U.S. and other countries. Leslie® is a registered trademark of Hammond USA.
Need help?
Do you have a question about the TouchMix-8 and is the answer not in the manual?
Questions and answers