QSC TouchMix-8 User Manual
Hide thumbs
Also See for TouchMix-8:
- User manual (81 pages) ,
- Technical notes (2 pages) ,
- User manual (146 pages)
Table of Contents
Advertisement
Quick Links
Advertisement
Table of Contents
Troubleshooting

Related Manuals for QSC TouchMix-8


Summary of Contents for QSC TouchMix-8
- Page 1 TouchMix™ User Guide TouchMix-8 TouchMix-16 TD-000472-00-A *TD-000472-00*...
-
Page 2: Important Safety Instructions
QSC authorized service station or QSC International Distributor. Failure to perform necessary repairs could lead to additional damage or to safety hazards. Failure to perform necessary repairs voids the limited warranty and QSC is not responsible for any injury, harm or related damages arising from any failure to perform those repairs. -
Page 3: Maintenance And Repair
QSC authorized service station or an authorized QSC International Distributor. QSC is not responsible for any injury, harm or related damages arising from any failure of the customer, owner or user of the apparatus to facilitate those repairs. -
Page 4: Table Of Contents
Level-Match Your QSC Speakers ........ - Page 5 Auxiliary (Stage Monitor) Mixes ..............12 Input by Input .
- Page 6 QSC Speaker Settings ........
- Page 7 TouchMix-8 ........
-
Page 8: Touchmix™ How To
Register and Update STOP We know you want to get right to using your TouchMix, but before you do please stop and take a moment to visit www.qsc.com and register your TouchMix. By registering you can… • Download TouchMix fi rmware so that your mixer has all the latest features, refi nements and performance enhancements. -
Page 9: Build A Mix Using Presets
The factory scenes list includes a scene named Default. This scene will “zero” the mixer by returning all controls to their factory settings. Menu Scenes Recall To Zero the TouchMix: Default If you'd like to navigate around the mix and see what the recalled settings are, return to the Home screen. To Return to the Home screen: Build a Mix Using Presets What is a Channel Preset? -
Page 10: Name Your Auxiliary Outputs
Name Your Auxiliary Outputs What is an Auxiliary? In addition to the Main L/R (left/right) output mix, TouchMix is also capable of controlling eight additional output mixes (six mono and two stereo). These additional mixes are known as Auxiliaries, or “Auxes” for short. The auxiliary outputs are typically used to drive stage monitor speaker systems or in-ear monitors (IEM) for performers. -
Page 11: Name The Effects Channels (Or Mixes)
• Other instruments either don’t need any effects or have their own effects (guitar pedals, internal effects on keyboards). Input Instrument FX Send Effect Processor FX Preset Name Kick Snare Dense Reverb D Live Plate Med Hi Hat Rack Tom Dense Reverb D Live Plate Med Floor Tom... -
Page 12: Using The Fx Wizard
Using the FX Wizard The FX Wizard is the easiest and fastest way to set up your effects. Only effects that work for the Source and Type of input you have selected will be shown. So any effect you select using the wizard will be a valid one although it may or may not work in the context of your mix. Here’s how to use it. -
Page 13: Using The Input Channel Fx Tab
Using the Input Channel FX Tab You can also operate your effects from the input channel area of your mixer. In 1 To Run Effects from the Input Channel: Inputs 1-8 Welcome to the channel FX screen. From here you can… Select an FX Processor: Select a Different Processor: Lush Reverb... -
Page 14: Using The Fx Channel Effect Tab
Using the FX Channel Effect Tab Go to the FX Channel Effect Tab (From the Input Channel FX tab): The FX Master Effect tab offers control over advanced Effects functionality. FX 1 Effect To Access the FX Master Effect Tab: FX Masters This is where you can select which processor is associated with the selected FX mix or channel. -
Page 15: Using The Fx Overview
Using the FX Overview If you would prefer to see the send and return levels for all your effects at once, the FX overview is where you want to go. Menu To use the FX Overview: Overview 1. The columns are the Input channels. Use the Nav Strip to change the group of Input channels. -
Page 16: Dca Groups
DCA Groups TIP: See "Tips & TricksLow-Cut Filters (AKA High Pass Filters)" on page 17 for more on DCA’s. A DCA groups faders together so the overall level of all the channels in the group can be controlled by a single DCA fader. A DCA fader does not change the position of any of the faders in the group. -
Page 17: Using Wi-Fi
Make sure that the included USB Wi-Fi adapter is installed in one of the mixer’s USB ports. IMPORTANT: QSC does not support the use of Wi-Fi adapters other than those included with the mixer or that have been specifi cally approved by QSC. -
Page 18: Homework Completed
These settings will give you the optimum signal to noise performance and get the most GAIN B from your QSC powered speakers. The mixer’s output meters will refl ect when you’re Rotate 4 detents (clicks) past zero “running out of speaker”. Note that you will see the “Limit” light on your speakers illuminate as the mixer drives them harder during louder portions. -
Page 19: Work On Your Inputs
Work on Your Inputs Acceptable Acceptable Ask the performers in turn to do what they do to make their audio contribution to the performance. Without un-muting their channels, bring the channel’s input gain Trim up while watching the channel meter on the Home screen. -
Page 20: Mix By Mix
Mix by Mix In this approach, you'll dial in a complete monitor mix for one performer at a time. There are two ways of doing this. Overview Screen (TouchMix and TouchMix App) One way is from the Aux Overview screen. The Aux Overview screen, as the name implies, provides a view of all the aux mixes for a bank of channels at once, in matrix format. -
Page 21: Filters Tab
The delay provides a read out in msecs. (up to 100), meters (up to 34.3) and feet (up to 113). View Settings QSC Speaker Settings: Please refer to "Level-Match Your QSC Speakers" on page 11 for details. Pre/Post Fader Pre / Post Fader Post Available for the Aux mixes only, this switch determines if the point from which the signal is taken is before or after the channel fader. -
Page 22: Recording
TouchMix makes it easier than ever to capture a live performance in a stereo or a multi-track recording. All you need is a USB hard-drive. NOTE: Hard-drive requirements – A list of hard-drives that QSC has qualifi ed may be found at qsc.com. There are far too many hard-drives available for us to test them all so there are certainly many unlisted drives that will work well with TouchMix. -
Page 23: Recording Directory Structure
Recording Directory Structure When you create a new Session, TouchMix creates a new folder on the USB drive named for the Session. Within the folder there is a folder for each channel. When you begin recording, the .wav fi les are written from the channels to their folders. If you start, stop and resume recording, additional .wav fi... -
Page 24: Tips & Trickslow-Cut Filters (Aka High Pass Filters)
Tips & Tricks Low-Cut Filters (AKA High Pass Filters) Most small mixers lack this really useful feature. But once you learn how to use it, you’ll never want to mix a show without it. There really are only a few instruments on stage like kick drum, larger toms, bass and keyboards that are even capable of producing low frequencies. For most everything else, low frequencies just cause problems. -
Page 25: About Effects Routing
About Effects Routing We have effects on a mixer because we want to apply them to one or more inputs in order to enhance the sound. This means that somehow the mixer has to be able to take the sound from selected input channels and "send" the sound to the effects processor. Back in the day, before mixers had effects processors built in, the audio was "sent"... - Page 26 — Figure 9 is a diagram of a single channel and one effects send and return. Lets walk through the diagram. Channel Fader Audio Input Channel Input Channels Dynamics Main Main Left Sends Main Right — Figure 9 — Audio (1) is input via one of the TouchMix inputs (2). 2.
-
Page 27: About Dca Groups
About DCA Groups What is a DCA? DCA stands for Digitally Controlled Amplifi er. What this function does is allow a single fader to control the level of a group of channels. Let’s say that you have your drum mix set up and it’s perfect but the drums are just a bit hot relative to the rest of the mix. When you assign a DCA to all the drum microphones, you can pull down a single fader and bring down the level of all the drums at once without changing their mix. -
Page 28: Touchmix™ Reference
8. Record/Play − Displays recording controls and options. Menu Record/ NOTE: The TouchMix-16 is shown Play — Figure 11. The layout is similar to the TouchMix-8. For an illustration of the TouchMix-8 layout, see “Dimensions” on page — Figure 11 — TD-000472-00-A... -
Page 29: Right Side Of The Mixing Surface
Right Side of the TouchMix Surface 1. ¼” TRS inputs (17/18 and 19/20) – Line level, stereo. TouchMix-16 Hardware TouchMix-16 App 2. ¼” TRS outputs Aux (7/8 & 9/10) – For line-level / in-ear monitors. Stereo In Stereo In 17/18 19/20 3. -
Page 30: Backside Of The Mixing Surface
* All USB memory devices must be formatted as FAT32 to work with TouchMix. Drive performance is critical for recording. For more information and to see a list of qualifi ed drives, visit qsc.com. At this time, the TouchMix does not support importing or re-importing digital audio fi les that have been created or edited on another device. -
Page 31: Where And What Things Are On The Home Screen Channels
Where and What Things Are on the Home Screen Channels Scene: 1. Select button – Displays the channel name. Touch to access Master Channel controls. Gigmaster 7 2. Pan Indicator – Adjust in Master Channel. 3. Channel Cue – Routes the channel signal to the Phones and Monitor M a i n Lead Gt r outputs. -
Page 32: The Nav (Navigation) Strip
The Nav (Navigation) Strip Inputs 1-8 Inputs 9-16 Stereo In / 2 Track FX Masters Aux Outputs DCA Groups — Figure 15 — To access the Nav Strip – From any screen, press Home once or twice to display Home page. Blue Nav Strip Bank –... -
Page 33: Input Channel
2. Nav Strip – Touch to select. For the TouchMix-16, the fi rst two selectors are for Input channels 1–8, and 9–16. The TouchMix-8 uses the fi rst selector for Input channels 1–8. The red line in Inputs 1-8 selector is a clip indication that is persistent until cleared. - Page 34 Controls and displays the settings for Input-Channel equalization. Home Select an Touch Select Select Input Bank Button EQ Tab In 2 In 2 Inputs 1-8 1. EQ Tab – Selects the EQ screen. 2. Parametric EQ Graph – A graphic representation of the equalization curve based on the EQ settings.
-
Page 35: Compressor
Compressor The Compressor controls the dynamic range of a signal above a set Threshold. Home Select an Touch Select Select Input Bank Button Comp Tab In 2 Comp Inputs 1-8 1. Comp Tab – Selects the Compressor screen. 2. Meter, In – RMS input level 3. -
Page 36: Gate
Gate The Gate passes audio above a set Threshold, and attenuates or silences audio below the Threshold. Home Select an Touch Select Select Input Bank Button Gate Tab In 2 In 2 Gate Inputs 1-8 1. Gate Tab – Selects the Gate Screen. 2. -
Page 37: Fx Sends
FX Sends Controls how much of the Input channel’s audio is sent to the FX devices. In addition, you can adjust the FX Sends at Menu > FX Overview. Home Select an Touch Select Select Input Bank Button FX Tab In 2 Inputs 1-8 1. -
Page 38: Pitch Correct
Pitch Correct Refer to — Figure Pitch Correct (available on Input channels 1 through 16) shifts the frequency of an input signal to match the nearest “correct” musical pitch. The mixer has only one Pitch Corrector and it can be assigned to only one channel at a time. FX Masters Select FX Select Effect... -
Page 39: Auxes
Auxes Auxiliary outputs are used to create a mix for stage monitors, in ear monitors, remote speakers or video / broadcast. There are six (1-6) mono and two (7/8 – 9/10) stereo Aux mixes. Home Select an Touch Select Select Input Bank Button Auxes Tab... -
Page 40: Presets
Information provided varies and may include style of music, instrument details, microphone/pick-up type and position, or other helpful information. 4. Factory / User Switch – Displays a list of Factory or User presets. • Factory Presets – A library of QSC designed input-channel presets. (— Figure •... -
Page 41: Setup
18. Save Button – After pressing Save/Save As, the Save Preset As screen displays. The save button saves the currently active preset to the location selected, and with the name displayed on this screen. 19. Enter Name Field – You can do one of the following: IMPORTANT: Presets and Scenes are saved as fi... -
Page 42: Output Channel
Output Channel The Main LR and Aux 1 – 6 outputs have a 1/3 octave graphic EQ. Stereo auxes 7/8 and 9/10 use a parametric EQ similar to the input channel’s EQ. Home Select the Touch a Select Aux Bank Select Button EQ Tab Aux 1... -
Page 43: Limiter
Limiter The Limiter keeps the audio level from going above the set Threshold. Home Select the Touch a Select Aux Bank Select Button Limiter Tab Aux 1 Main Limiter Aux Outputs 1. Limiter Tab – Selects the Limiter screen 2. Meter In – RMS input level 3. -
Page 44: Filters
Filters Available on the Main L/R and Aux 1 – 6 outputs, these narrow, cut-only fi lters are useful for dealing with feedback. Home Select the Touch a Select Aux Bank Select Button Filters Tab Aux 1 Main Filter Aux Outputs 1. -
Page 45: Presets
Presets Store, recall and copy the settings associated with an output channel. Home Select the Touch a Select Aux Bank Select Button Presets Tab Aux 1 Main Preset Aux Outputs 1. Presets Tab – Selects the Presets screen 2. Current Preset Label – Displays the name of the current active preset. 3. -
Page 46: Setup
7. View Settings Button – Click this button to determine the best settings for your QSC K Series, KW Series, and KLA Series Loudspeakers. Refer to — Figure 34 — the QSC Speaker Settings topic for details. -
Page 47: Qsc Speaker Settings
QSC Speaker Settings Provides help in properly adjusting QSC K, KW and KLA powered loudspeakers when used with the TouchMix. Home Select the Touch a Touch View Select Aux Bank Settings Select Button Setup Tab View Settings Aux 1 Main... -
Page 48: Aux Overview
Aux Overview Provides an overview of Aux Sends for all Input channels and FX Mixes, along with the Aux Master faders for each Aux mix. All aux sends, pan controls, and master fader levels may be adjusted by touching to select and using the Master Encoder. Menu Press Select an... -
Page 49: Aux Mix-On-Faders (Ipad Only)
Aux Mix-on-Faders (iPad Only) Presents Aux mixes one at a time using a large-fader view. Menu Press the Select an Aux Overview Twice Input Bank Menu Overview Overview Inputs 1-8 1. Input and FX Bank Selectors – The Nav Strip functions as it does for the Main L/R mix. -
Page 50: Fx Masters
FX Masters Effect FX controls common to all Effects. Refer to the individual FX Processor topics for details. Home Select the FX Touch a Select Masters Bank Select Button Effect Tab FX 1 Effect FX Masters 1. Effect Tab – Selects the FX Master Effect screen 2. -
Page 51: Preset
Preset Recall presets for the selected FX channel based on the current FX device. All Presets are available for all FX channels. Home Select the FX Touch a Select Masters Bank Select Button Presets Tab FX 2 Preset FX Masters 1. -
Page 52: Setup
Setup Setup allows you to rename the FX Master channel, and assign the channel to Mute and DCA Groups Home Select the FX Touch a Select Masters Bank Select Button Setup Tab FX 2 Setup FX Masters 1. Setup Tab – Selects the Setup screen. 2. -
Page 53: Basic Chorus
Basic Chorus The Chorus FX Varies the pitch of a signal at a steady rate to “thicken” a sound. Home FX Masters Select FX Select Effect Select Chorus Channel FX 1 Effect Chorus FX Masters 1. LFO Type Switch – Selects how the pitch will be varied. Sine will vary the pitch smoothly. -
Page 54: Dense Reverb
Dense Reverb The Dense Reverb (presets with a “D” suffi x) is a model of a DSP reverb with more dense refl ections that some may fi nd more representative of actual acoustic spaces. Select FX Home FX Masters Select Effect Select Channel Dense Reverb... -
Page 55: Mono And Stereo Delay
Mono and Stereo Delay These effects delay the audio signal to create echo and similar effects. Controls for the stereo delay may be linked or operated independently. Home FX Masters Select FX Select Effect Select Channel Pitch Shift FX 1 Effect Stereo Delay FX Masters... -
Page 56: Phantom Power
Phantom Power Supplies +48 VDC output to Inputs 1-16. Phantom power is not available on the 1/4” phone jack connectors of channels 13 – 16. Phantom power may be switched on and off independently for each Press Touch Mic Menu Phantom Mic Phantom Menu... -
Page 57: Mixer Setup
6. Software Version Label – Displays the version number of the currently installed fi rmware. 7. Upgrade Button – When QSC makes an update to the TouchMix fi rmware, you can download it from the QSC website and onto a USB device. -
Page 58: Connect The Ipad
Connecting Your iPad In order to connect an iPad to the QSC TouchMix, you must fi rst install the supplied Wireless USB Adapter into one of the USB ports on the mixer’s rear panel. Use only the adapter supplied with the Mixer. -
Page 59: Scenes
Scenes Scenes provide the ability to store and recall all mix parameters. Press Touch Menu Scenes Menu Scenes 1. Current Scene Label – Displays the name of the most recently recalled scene. 2. Save / Save As Button – Displays a page with options for naming a scene and selecting internal or USB storage. -
Page 60: Dca Groups
DCA Groups DCA Groups allow you to mute and control the signal level of channels assigned to it. The DCA does not move the faders or change the mute state of channels assigned to it. Press Touch the Home DCA Bank DCA 2 DCA Groups You can also access the DCA Groups screen by touching Menu >... -
Page 61: Mute Group Edit Screen
Mute Group Edit Screen 1. Close Edit Button – Returns to the Mute Group Mute screen. 2. Mute Group Select Buttons – Selects the Mute Group for editing. 3. Mute Buttons – Mutes / unmutes the channels assigned to the Mute Group. -
Page 62: Fx Wizard
FX Wizard The FX Wizard aids in adding FX to channels and routing those FX to monitors so your mixes have depth and sound fantastic! Press Touch FX Wizard Wizard Wizard Wizard 1. FX1, 2, 3, 4 Buttons – Selects which of the four FX mixes you want to work with. -
Page 63: Gain Wizard
Gain Wizard The Gain Wizard aids in adjusting analog input gains to avoid clipping and distortion so your mixes sound great!. Press Touch Gain Wizard Wizard Gain Wizard Wizard NOTE: The Gain Wizard is designed to assist after setting the Input Trim knobs, and during a performance. -
Page 64: Record / Playback
IMPORTANT: All USB memory devices must be formatted as FAT32 to work with TouchMix. Drive performance is critical for recording. For more information and to see a list of qualifi ed drives, visit qsc.com. At this time, the TouchMix does not support importing or re-importing digital audio fi... -
Page 65: Recording Setup
Recording Setup Recall, initiate, and manage recording sessions. Press Touch Record / Play New / Recall Session: New / Recall Record/ Session Naming here Play 1. New Session Button – Displays a keyboard used to enter a name and initiate a new session. 2. -
Page 66: 2-Channel − Playback And Record
2-Channel − Playback and Record The Main L/R, Aux 7/8, or 9/10 can be recorded then played back over the Main L/R Outputs. Press Select the Touch the Home 2-Trk Bank Select Button 2-Trk PB 2-Trk Rec Stereo In/2-Trk 2-Track Recording Setup Refer to —... -
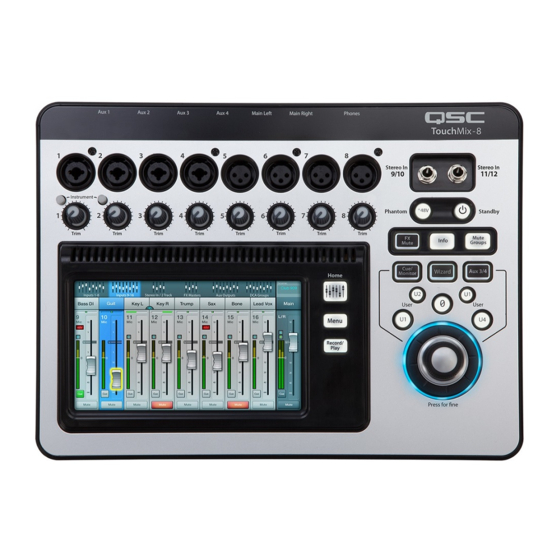
Page 67: Dimensions
Dimensions TouchMix-8 13.1 in (333 mm) Accessory Power Phones Only Cue / Monitor Aux 3/4 Right Left Aux 1 Aux 2 Aux 3 Aux 4 Main Left Main Right Phones TouchMix-8 Stereo In Stereo In 9/10 11/12 Instrument Phantom Standby... -
Page 68: Touchmix-16
TouchMix-16 14.2 in (360 mm) Power Talkback Main Right Main Left Aux 6 Aux 5 Aux 4 Aux 3 Aux 2 Aux 1 Accessory Only Aux 1 Aux 2 Aux 3 Aux 4 Aux 5 Aux 6 Main Left Main Right Talkback TouchMix-16 Stereo In... -
Page 69: Specifi Cations
USB WiFI adapter, Soft Carrying Case, Power Supply 1 A list of drives that have been validated by QSC may be found at qsc.com. The hard-drive market is huge and continuously changing so there are many drives QSC has not validated that will work. Always test a new drive before using it for a critical session. Minimum requirement is USB 3.0 HD, SSD or 7800 RPM, FAT32 format. -
Page 70: Block Diagram
TouchMix Block Diagram © 2014 QSC Audio, Ltd Revised 9/30/2014 Main L/R Output Mic/Line Main Left Ch Fader From DCA Masters Meter From DCA Masters Over Mute Trim Meter 1/3 Oct GEQ Low Cut High Cut Notch Filters Digital Low Cut... - Page 71 © 2014 QSC Audio Products, LLC. All rights reserved. QSC, the QSC logo, and TouchMix are registered trademarks of QSC Audio Products, LLC in the U.S. Patent and Trademark offi ce and other countries. iPod and iOS are trademarks of Apple Inc., registered in the U.S. and other countries. Leslie® is a registered trademark of Hammond USA. All other trademarks are the property of their respective owners.
Need help?
Do you have a question about the TouchMix-8 and is the answer not in the manual?
Questions and answers