
Related Manuals for Stelpro STCNP


Summary of Contents for Stelpro STCNP
- Page 1 User’s gUide sTCNP SINGLE proGrammING ELEctroNIc thErmoStat for hEatING fLoorS INSSTCNP15MA0914 For further information or to consult this guide online, please visit our website (15mA Version) at www.stelpro.com...
- Page 2 WArNiNg Before installing and operating this product, the owner and/or installer must read, understand and follow these instructions and keep them handy for future reference. If these instructions are not followed, the warranty will be considered null and void and the manufacturer deems no further responsibility for this product.
-
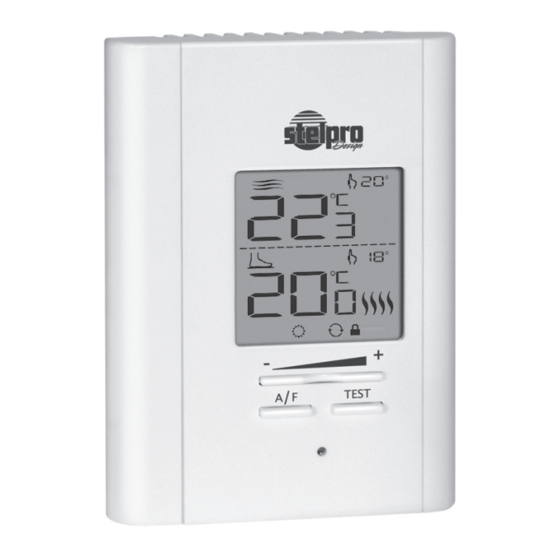
Page 3: Ambient Mode
DEScrIptIoN The STCNP single programming electronic thermostat can be used to control heating floors with electrical current − with a resistive load − ranging from 0 A to 16 A at 120/208/240 VAC. It has an easy user interface. It keeps the temperature of a room... -
Page 4: Installation
parts supplied: • one (1) thermostat; • two (2) mounting screws; • four (4) solderless connectors suitable for copper wires; • one (1) floor sensor. INStaLLatIoN thermostat selection and sensor location The thermostat must be mounted on a connection box, at around 1.5 m (5 feet) above the floor level, on a section of the wall exempt from pipes or air ducts. - Page 5 3. Using a screwdriver, loosen the screw retaining the mounting base and front part of the thermostat. Remove the front part of the thermostat from the mounting base by tilting it upward. 4. Align and secure the mounting base to the connection box using the two screws supplied.
-
Page 6: Wire Installation
thermostat). For connections with aluminum wires, you must use CO/ALR connectors. Please note that thermostat wires do not have polarity, meaning that any wire can be connected to the other. Then, connect the wires of the floor temperature sensor at the indicated location behind the thermostat. 4-wire iNstallatioN 6. -
Page 7: Operation
opEratIoN Ambient temperature (Ambient mode) Floor temperature (Floor mode) Security mode Single programming Day mode mode TEST Night mode EGFPD button Red Indicator (EGFPD Test) first Start-up At the first start-up, the thermostat is initially in the Day and modes. The temperature is displayed in degrees Celsius and the standard factory set point adjustment is 25°C. - Page 8 points (both in modes). They can be displayed in degrees Celsius or Fahrenheit (see “Display in degrees Celsius/Fahrenheit”). Out of any adjustment mode, press down the + button to increase the set point, or the - button to decrease it. Set points can only be adjusted by increments of 1 degree.
- Page 9 factory adjustment of the timer is 8 hours. With this adjustment, the thermostat automatically returns to Day mode 8 hours after being switched to the Night mode. You can switch from the mode to the mode without affecting the timer adjustment. For example, if you want a night temperature lower than the day temperature, both Day/Night modes set points will first have to be set at the desired temperatures.
- Page 10 in the Day mode, you must manually return to the Night mode. If you want to automatically return to the Night mode, the Single programming mode must be selected. Single programming mode The Single programming mode, which is associated to the Night mode timer, allows alternating between the Day/Night modes and the two corresponding set points over a 24-hour period.
- Page 11 is effective. The figures that replace the ambient temperature indicate the current timer adjustment. If needed, adjust the timer by pressing down the + button to increase the value, or the - button to decrease it. The Night mode timer adjustment range is from 1 hour to 23 hours in the Single programming mode.
-
Page 12: Temperature Control
24°C) Sensor Selection If you want to use the STCNP thermostat of Stelpro with a temperature sensor already installed in the floor (other than the sensor supplied with this thermostat), you must contact the Stelpro customer service to validate the compatibility between the sensor and the thermostat. - Page 13 EGFPD, the red indicator turns off. b) Failed test: The red indicator does not light up and the entire display blinks during 5 seconds. In this case, disconnect the heating system at the electrical panel and call Stelpro’s customer service. INSSTCNP15MA0914...
- Page 14 Security mode This mode imposes a maximum temperature set point which is impossible to exceed regardless of the mode in progress. However, it is still possible to lower the set point at your discretion. Please note that when the Security mode is activated, it is impossible to switch from the mode to the mode, and conversely.
- Page 15 mode, the maximum set point of the Security mode, the Celsius/Fahrenheit mode, the remaining time of the timer and the maximum floor temperature. These parameters are saved every minutes when a change occur, except for the Day/Night mode and the remaining time of the timer, which are saved only if the Single programming mode was not activated.
-
Page 16: Troubleshooting
troUBLEShootING DEFECTIVE PArT ProblEM or PArT To CHECK • In normal operating conditions, the thermostat housing can reach nearly The thermostat is hot. 40°C at maximum load. It is normal and will not affect the operation of the thermostat. • Check if the thermostat is properly Heating is always on. -
Page 17: Technical Specifications
tEchNIcaL SpEcIfIcatIoNS Supply voltage: 120/208/240 VAC, 50/60 Hz maximum electrical current with a resistive load: 16 A 3840 W @ 240 VAC 3330 W @ 208 VAC 1920 W @ 120 VAC temperature display range: 0 °C to 40 °C (32 °F to 99 °F) temperature display resolution: 1 °C (1 °F) temperature set point range (ambient mode):... -
Page 18: Limited Warranty
The warranty is limited to the factory repair or the replacement of the unit, and does not cover the cost of disconnection, transport, and installation. Email : contact@stelpro.com Website : www.stelpro.com stelpro DesigN iNc. | saint-Bruno-de-Montarville | Québec | J3V 6l7 INSSTCNP15MA0914...
Need help?
Do you have a question about the STCNP and is the answer not in the manual?
Questions and answers