
Subscribe to Our Youtube Channel
Related Manuals for Stelpro STE302P


Summary of Contents for Stelpro STE302P
- Page 1 User’s gUide sTe302P Multiple prograMMing electronic therMostat Energy Verified INSSTE302P0514 For further information or to consult this guide online, please visit our website at www.stelpro.com...
- Page 2 WArNiNg Before installing and operating this product, the owner and/or installer must read, understand and follow these instructions and keep them handy for future reference. If these instructions are not followed, the warranty will be considered null and void and the manufacturer deems no further Moreover, the following instructions must be adhered responsibility for this product.
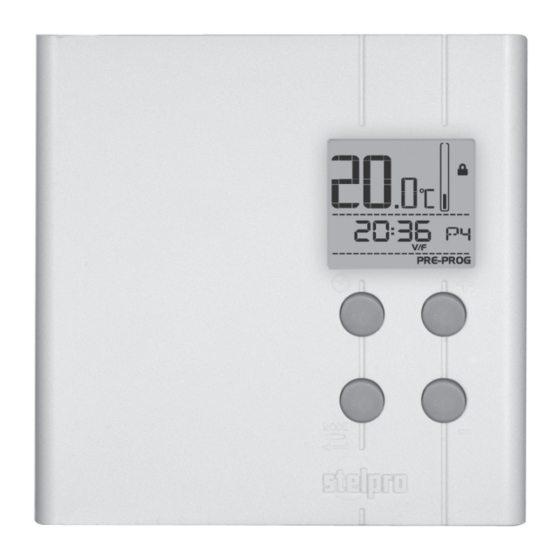
- Page 3 Description The multiple programming electronic thermostat STE302P can be used to control electric heating units such as electric baseboards, convectors, or aeroconvectors. It keeps the temperature of a room at the requested set point with a high degree of accuracy. This product is designed for installations with electrical current –...
-
Page 4: Thermostat Mounting And Connection
thermostat mounting and connection Cut off power supply on lead wires at the electrical panel in order to avoid any risk of electric shock. 2. Ensure that the air vents of the thermostat are clean and clear of any obstruction. 3. -
Page 5: Wire Installation
5. Pass the wires from the wall through the opening on the mounting base and connect them using the supplied solderless connectors. When making the connection with aluminum wire, make sure that you are using connectors identified CO/AL. Please note that the thermostat wires do not have polarity. Therefore, the way they are connected is not important. - Page 6 6. Place all the wires into the connection box. 7. Align the little slots located on the top of the thermostat with those on the mounting base and secure the thermostat to the mounting base. Note that you can also position the thermostat on the left or the right side of the junction box.
-
Page 7: Mode Button
operation Ambient temperature Heating power indicator Frost-free warning Security mode Fan mode Hour Programming period Anticipated start Mode (Manual; Days (L/M : Monday, Automatic; M/T : Tuesday, Preprogrammed M/W : Wednesday, J/T : Thursday, + button (to increase) V/F : Friday, S/S : Saturday and D/S : Sunday) - button (to decrease) -
Page 8: Ambient Temperature
adjustment of the hour and the day To adjust the hour and the day: 1. In any mode (Manual, Automatic or Prepro grammed), out of any adjustment mode, press down the button and release it. 2. The current time mode (24H/12H) is displayed. Press down the button to select the desired format. -
Page 9: Manual Mode
Display in either degrees celsius/Fahrenheit The thermostat can display the ambient temperature and the set point in degrees Celsius (standard factory setting) or Fahrenheit. 1. In any mode (Manual, Automatic or Preprogrammed), out of any adjustment mode, press down the button for 3 seconds and release it. - Page 10 Programming procedure of the Automatic mode Programming the Automatic mode can be done in the Automatic mode or the Manual mode. 1. Out of any adjustment mode, press down the button during 3 seconds and release it. It then enters into the programming of period 1 of the 5 days of the week.
- Page 11 2. When the period is displayed, simultaneously press down the buttons to erase the programming. The time of the period displays --:-- and the set point displays --.- to indicate that the programming is erased. 3. Then, exit the programming mode as described in the previous section. preprogrammed mode ( The Preprogrammed mode allows a quick and easy programming of the thermostat.
-
Page 12: Anticipated Start
View of the preprogramming It is possible to view the current preprogramming. However, it is impossible to modify a preprogramming. 1. Access the Preprogrammed mode (if required) by pressing down the button until the display shows 2. Out of any adjustment mode, simultaneously press down the button and release. -
Page 13: Security Mode
• By pressing down the button. • By not pressing down any buttons during 1 minute. In any case, the adjustment is saved. Frost-free warning icon is displayed when the temperature set point is between 3°C (37°F) and 5°C (41°F). A minimum temperature will be maintained to ensure frost control. -
Page 14: Fan Mode
of 1°F). Press down the button to confirm your selection. The activation of the Security mode is thus completed and the thermostat returns to normal operation. It is possible to exit the Security mode adjustment at any time: • By pressing down the button. - Page 15 3. All icons disappear except the icon that continues to flash. Press down the button to activate or deactivate the Fan mode (indicated by the icon that turns on or off). Press down the button to confirm your choice. 4. If the Fan mode is deactivated, the thermostat returns to normal operation. If it is activated, the minimum operating time in seconds blinks (90 seconds by default).
- Page 16 heating power indicator The level of power used to maintain the temperature at the set point is expressed as a percentage indicated by the number of bars in the thermometer displayed. The heating power used is displayed as follows: 4 bars = 76% to 100% 3 bars = 51% to 75% 2 bars = 26% to 50% 1 bar = 1% to 25%...
- Page 17 trouBleshooting ProbleM DeFeCTIVe PArT or PArT To CHeCK • In normal operating conditions, the thermostat housing can The thermostat is hot. reach nearly 40°C at maximum load. That is normal and will not affect the effective operation of the thermostat. •...
- Page 18 preprograMMings Quick selection 8 hours of sleep 9 hours of sleep Wake up time: Wake up time: Hour at Hour at which you which you come back come back from work: from work: * preprogramming by default Detailed preprogrammings 8 hours of sleep Monday-Friday Saturday-Sunday n°...
- Page 19 9 hours of sleep Monday-Friday Saturday-Sunday n° pre-prog (Wake up) (Leaving (Come (Sleep) (Wake up) (Sleep) time) back time) 21°C (70°F) 16.5°C (62°F) 21°C (70°F) 16.5°C (62°F) 21°C (70°F) 16.5°C (62°F) 21°C (70°F) 16.5°C (62°F) 21°C (70°F) 16.5°C (62°F) 21°C (70°F) 16.5°C (62°F) 21°C (70°F) 16.5°C (62°F) 21°C (70°F) 16.5°C (62°F) 21°C (70°F) 16.5°C (62°F) 10pm 10pm...
-
Page 20: Limited Warranty
0.5°C (0.5°F) temperature set point range: 3°C to 30°C (37°F to 86°F) temperature set point increments: 0.5°C (1°F) storage temperature: -40°C to 50°C (-104°F to 122°F) stelpro Design inc. | saint-Bruno-de-Montarville | Québec | J3V 6l7 INSSTE302P0514...
Need help?
Do you have a question about the STE302P and is the answer not in the manual?
Questions and answers