Stihl BT 45 Instruction Manual
Wood drill
Hide thumbs
Also See for BT 45:
- Instruction manual (64 pages) ,
- Manual (43 pages) ,
- Instruction manual (32 pages)
Table of Contents
Advertisement
Available languages
Available languages
STIHL BT 45
{
Instruction Manual
Manual de instrucciones
WARNING
Read Instruction Manual thoroughly
before use and follow all safety
precautions – improper use can
cause serious or fatal injury.
ADVERTENCIA
Antes de usar la máquina lea y siga
todas las precauciones de
seguridad dadas en el manual de
instrucciones – el uso incorrecto
puede causar lesiones graves o
mortales.
Advertisement
Chapters
Table of Contents

Related Manuals for Stihl BT 45


Summary of Contents for Stihl BT 45
- Page 1 STIHL BT 45 Instruction Manual Manual de instrucciones WARNING Read Instruction Manual thoroughly before use and follow all safety precautions – improper use can cause serious or fatal injury. ADVERTENCIA Antes de usar la máquina lea y siga todas las precauciones de seguridad dadas en el manual de instrucciones –...
- Page 2 Instruction Manual 1 - 33 Manual de instrucciones 34 - 71...
-
Page 3: Table Of Contents
Starting / Stopping the Engine www.stihlusa.com Operating Instructions Contact your STIHL dealer or the STIHL Releasing a Trapped Auger distributor for your area if you do not Cleaning the Air Filter understand any of the instructions in this manual. -
Page 4: Guide To Using This Manual
Indicates a risk of property damage, improper use may cause including damage to the machine or its serious or fatal injury. individual components. Have your STIHL dealer show you how Auger brake to operate your power tool. Observe all Engineering Improvements applicable local safety regulations, standards and ordinances. - Page 5 Most of these safety precautions and disease (Raynaud's phenomenon) or information contained in this manual. warnings apply to the use of all STIHL carpal tunnel syndrome. power drills. Different models may have These conditions reduce the hand's different parts and controls.
- Page 6 Be particularly alert and cautious when gloves improve your grip WARNING wearing hearing protection because and help to protect your The ignition system of the STIHL unit your ability to hear warnings (shouts, hands. produces an electromagnetic field of a alarms, etc.) is restricted.
- Page 7 Select bare ground for fueling and move operating this machine if it is damaged. at least 10 feet (3 m) from the fueling Your STIHL power tool uses an oil- In case of doubt, have it checked by your spot before starting the engine. Wipe off gasoline mixture for fuel (see the STIHL servicing dealer.
- Page 8 To do this with this STIHL cap, raise the broken; immediately stop use of the base of the cap may be prematurely...
- Page 9 If you cannot set the correct idle speed, securely mounted on the spark plug – a neutral position, turn the drilling tool. have your STIHL dealer check your loose boot may cause arcing that could power tool and make proper...
- Page 10 Control dust at the source lift bucket), have both hands free for where possible. Use good work operating the power tool in a cramped practices, such as operating the unit so environment. that the wind or operating process BT 45...
- Page 11 To reduce the risk of injury from contact backing the drilling tool out of the hole. If continue in slow steps frequently with the drilling tool, always switch off clearing drill. the engine and put the gear in the BT 45...
- Page 12 Always properly or if nonapproved replacement forest fire is greater in hot or dry press spark plug boot snugly onto spark parts were used, STIHL may deny weather. plug terminal of the proper size. (Note: If coverage.
-
Page 13: Mounting The Handles
"Storing the Machine" in the instruction opened up. manual). Screw the handle into clamp clockwise. Normal mounting procedure Move the handle to the required Hold the clamp firmly and unscrew position and tighten it down firmly. the handle counterclockwise. BT 45... -
Page 14: Using The Unit
The planting hole auger should be wing screws firmly. operated only with the gearbox set to position 1. The tool speed is too high for drilling planting holes when the gearbox is set to poistion 2. BT 45... -
Page 15: Fuel
This, in content. turn, increases the risk of piston seizure and damage to the engine. Use only STIHL two-stroke engine oil or equivalent high-quality two-stroke The chemical composition of the fuel is engine oils that are designed for use also important. -
Page 16: Fueling
Gaso- Oil (STIHL 50:1 or equiva- line lent high-quality oils) US gal. US fl.oz. 2 1/2 12.8... - Page 17 Such misalignment can result from Refueling handling, cleaning or an improper Flip the handle down. Take care not to spill fuel while fueling attempt at tightening. and do not overfill the tank – leave approx. 1/2" (13 mm) air space. BT 45...
- Page 18 If your cap still does not tighten Markings on filler cap and housing must properly, it may be damaged or align. broken; immediately stop use of the unit and take it to your authorized STIHL dealer for repair. BT 45...
- Page 19 (1) is aligned with the exterior marking. Right: Base of filler cap is in the cor- rect position – interior Flip the handle down. marking is below the clip. It does not align with the exte- rior marking. BT 45...
-
Page 20: Gearbox
– the drilling spindle must be stationary. It may be necessary to turn the drilling spindle slightly before the rotary knob can be moved to the required position. BT 45... -
Page 21: Starting / Stopping The Engine
Press in the starting throttle lock (4) of control. and hold it there. Let go of the throttle trigger and starting throttle lock. This is the starting throttle position. BT 45... - Page 22 Do not pull out the starter rope to full Now start the engine. length – it might otherwise break. BT 45...
-
Page 23: Operating Instructions
Storing for a short period: Wait for the engine to cool down. Empty the fuel tank and keep the machine in a dry place, well away from sources of ignition, until you need it again. For longer out-of- service periods – see "Storing the Machine". BT 45... -
Page 24: Cleaning The Air Filter
Take the air filter (3) out of the filter housing (4). Replace with a new filter – or, as a temporary measure, knock it out or blow it clear – do not wash. Replace any damaged parts. Install the filter in the filter housing. BT 45... -
Page 25: Adjusting The Carburetor
WARNING carefully clockwise until it is against its seat, then turn it back 1 full turn If the drilling spindle continues rotating when the engine is idling, have your power drill checked and repaired by your servicing dealer. BT 45... -
Page 26: Spark Plug
– use only spark plugs authorized by dirty air filter, – STIHL. Always press spark plug boot (1) snugly onto spark plug terminal (2) of the unfavorable running conditions, e.g. – proper size. (Note: If terminal has operating at part load. -
Page 27: Engine Running Behavior
Do not pull the rope over the edge of accordance with local servicing dealer. the guide bushing. environmental requirements. STIHL recommends that you have Do not pull out the rope more than Run the engine until the carburetor servicing and repair work carried out specified. -
Page 28: Maintenance And Care
Readjust idle Readjust electrode gap Spark plug Replace after 100 operating hours Spark arrestor in muffler Have checked by dealer All accessible screws and nuts (not adjust- Retighten ing screws) Check Anti-vibration elements Have replaced by servicing dealer BT 45... - Page 29 (very dusty work area, etc.), shorten the specified intervals accordingly. Drilling spindle Clean Inspect Auger Replace Safety labels Replace not in all versions, market-specific STIHL recommends an authorized STIHL servicing dealer. BT 45...
-
Page 30: Main Parts
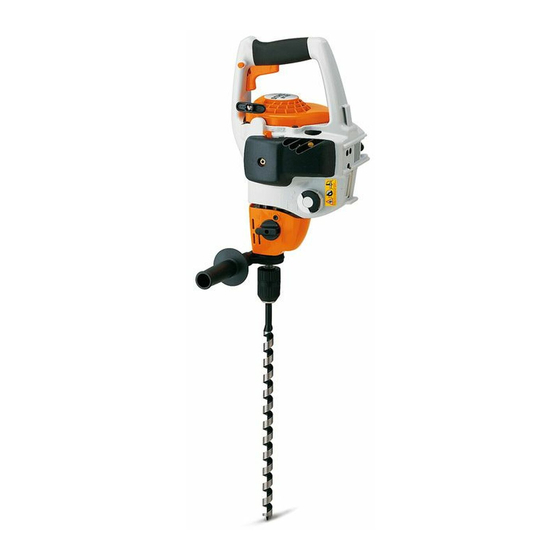
14 Choke Lever 15 Manual Fuel Pump 16 Planting Hole Auger 17 Flange 18 Assist Handle 19 Muffler with Spark Arresting Screen 20 Spark Plug Boot 21 Drilling Spindle 22 Adapter for Planting Hole Auger Depending on Model Special Accessory BT 45... -
Page 31: Specifications
Engine ignition lead. 10 Control Handle 21 Drilling Spindle Rear handle for holding and STIHL single cylinder two-stroke engine For attaching the chuck or adapter operating the power drill. to the power drill. Displacement: 1.66 cu.in 11 Carburetor Adjusting Screws (27.2 cc) -
Page 32: Maintenance And Repairs
Fuel tank capacity: 8.5 fl.oz (0.25 l) Genuine STIHL parts can be identified by the STIHL part number, the STIHL products must not be thrown in Gearbox { logo and, in some cases, by the garbage can. Take the product, the STIHL parts symbol K. -
Page 33: Stihl Incorporated Federal Emission Control Warranty Statement
STIHL Incorporated at no STIHL service center as soon as a cost to the owner. Any warranted part which is not scheduled for replacement BT 45... - Page 34 The following list specifically defines the Bring the product to any authorized warranty period. Any warranted part emission-related warranted parts: STIHL servicing dealer and present the which is scheduled for replacement as signed warranty card. Air Filter required maintenance will be warranted –...
-
Page 35: Trademarks
Any unauthorized use of these Ematic ™ ® trademarks without the express written EASYSTART FixCut ™ consent of ® FARM BOSS ANDREAS STIHL AG & Co. KG, HT Plus ™ ® Waiblingen is strictly prohibited. iCademy IntelliCarb ™ ® MAGNUM Master Control Lever ™... - Page 36 Liberación de una barrena Comuníquese con su representante de atascada STIHL o el distribuidor de STIHL para su Limpieza del filtro de aire zona si no se entiende alguna de las instrucciones dadas en el presente Gestión del motor...
-
Page 37: Acerca De Este Manual De Instrucciones
Los pasos individuales o Mejoramientos técnicos procedimientos descritos en el manual pueden estar señalados en diferentes La filosofía de STIHL es mejorar maneras: continuamente todos sus productos. Se usa un punto para denotar un Como resultado de ello, periódicamente paso o procedimiento. -
Page 38: Medidas De Seguridad Y Técnicas De Manejo
ADVERTENCIA no autorizadas no puedan usarla. Pida a su concesionario STIHL que le El uso de esta máquina puede ser Las medidas de seguridad y avisos enseñe el manejo de la herramienta peligroso. Si el taladro llega a tener contenidos en este manual se refieren al motorizada. - Page 39 No maneje esta La mayor parte de las herramientas algunos tipos de marcapasos. Para máquina cuando está fatigado. motorizadas de STIHL se ofrecen con reducir el riesgo de lesiones graves o un sistema antivibración ("AV") cuyo mortales, las personas portadoras de propósito es reducir la transmisión de...
- Page 40 Esté especialmente alerta y tenga STIHL. Si bien es posible conectar a la Póngase botas gruesas cuidado cuando se usa protectores de herramienta motorizada de STIHL con suela antideslizante.
- Page 41 Cuando transporte la herramienta Instrucciones para el llenado de dañada. En caso de dudas, pida que el motorizada en un vehículo, sujétela combustible concesionario de servicio de STIHL la firmemente para impedir su vuelco, el revise. derrame de combustible y daños. ADVERTENCIA...
- Page 42 Para hacer esto con esta tapa STIHL, máquina fuera de servicio de levante la empuñadura en la parte superior de la tapa hasta dejarla vertical...
- Page 43 / EE.UU inmediato y llévela a un es importante en cuanto a esto. Revise Arranque concesionario STIHL autorizado la condición y el apriete de la Arranque el motor solamente al aire para repararla. herramienta perforadora. libre, por lo menos 3 m (10 pies) del Tapa roscada lugar en que lo haya llenado.
- Page 44 Si no puede regular correctamente la ADVERTENCIA marcha en vacío, pida a su concesionario STIHL que revise la Su herramienta motorizada es una herramienta motorizada y haga los máquina que debe ser manejada por ajustes o reparaciones solamente una persona.
- Page 45 Utilice buenas Mantenga la presión de alimentación a prácticas de trabajo, tal como trabajar un mínimo. Si se percibe o escucha que de manera que el viento o el proceso de la herramienta perforadora ha chocado BT 45...
- Page 46 En caso de emergencia, apague el Para reducir el riesgo de sacudidas motor inmediatamente – mueva el eléctricas y daños a la propiedad, interruptor de parada a 0 o STOP siempre esté atento a la presencia de tubos y cables subterráneos y de BT 45...
- Page 47 El uso desmontable, la misma tiene que ser herramienta motorizada si le falta el de piezas no fabricadas por STIHL firmemente instalada.) Una conexión chispero o está dañado. Recuerde que puede causar lesiones graves o suelta entre el borne de la bujía y el...
-
Page 48: Montaje De Los Mangos
Antes de contrahorario. guardar la máquina por más de unos pocos días, siempre vacíe el tanque de combustible (vea el capítulo "Almacenamiento de la máquina" en el manual de instrucciones). BT 45... -
Page 49: Uso
La barrena plantadora sólo debe mariposa. hacerse funcionar con la caja de engranajes en la posición 1. La velocidad será demasiado alta para perforar hoyos cuando la caja de engranajes está en la posición 2. BT 45... -
Page 50: Combustible
Este motor está certificado para con diversos niveles de contenido de funcionar con una mezcla de 50 a 1 de etanol. gasolina sin plomo y aceite STIHL para motores de dos tiempos. ADVERTENCIA Su motor requiere una mezcla de gasolina de alta calidad y aceite para... -
Page 51: Llenado De Combustible
Gaso- Aceite (STIHL 50:1 ó aceite diseñados para usar en motores lina de alta calidad equivalente) enfriados por agua o por aire (por... - Page 52 Quite la tapa de llenado. Carga de combustible Tenga cuidado de no derramar el combustible y no llene en exceso el tanque. - deje un espacio de aire de Gire la manija hacia abajo. aproximadamente 13 mm (1/2 pulg). BT 45...
- Page 53 STIHL autorizado para repararla. La orejeta de la empuñadura deberá encajar completamente en Tapa de llenado con marcas y símbolos la hendidura (flecha) y la empuñadura debe quedar...
- Page 54 La base de la tapa de lle- nado está en posición correcta – la marca inte- rior está debajo de la pinza. No queda ali- neada con la marca La manija está en posición vertical: exterior. Gire la manija hacia abajo. BT 45...
-
Page 55: Caja De Engranajes
únicamente cuando el motor se encuentra a marcha en vacío – el árbol de perforación debe estar detenido. Puede ser necesario girar el árbol de perforación levemente antes de poder mover la perilla a la posición deseada. BT 45... -
Page 56: Instalación De La Barrena
1, 2 ó R, la herramienta máquina. perforadora puede empezar a girar cuando el motor alcanza la velocidad de conexión del embrague. Esto podría causar un accidente o lesiones personales debido a la pérdida del control de la máquina. BT 45... - Page 57 Con la mano derecha tire arranque. Esta es la posición de lentamente del mango de arranque arranque del acelerador. hasta que sienta una resistencia definitiva y en seguida dele un tirón BT 45...
-
Page 58: Instrucciones Para El Uso
Vacíe el tanque de combustible y Quite la bujía – vea "Bujía". guarde la máquina en un lugar seco, Seque la bujía. alejada de fuentes de encendido, hasta que la vuelva a utilizar. Para los Abra el acelerador al máximo. BT 45... -
Page 59: Liberación De Una Barrena Atascada
Extraiga el filtro de aire (3) de la caja (4). Sustitúyalo por un filtro nuevo o, como medida temporal, golpéelo o límpielo con un chorro de aire – no lo lave. Sustituya las piezas dañadas. Instale el filtro en su caja. BT 45... -
Page 60: Gestión Del Motor
(H) en sentido contrahorario hasta su tope (no más que 3/4 de vuelta). Gire el tornillo de velocidad baja (L) cuidadosamente en sentido horario hasta que tope y luego gírelo 1 vuelta completa en sentido contrahorario. BT 45... - Page 61 Caliente el motor. el tornillo aproximadamente 1/2 a 1 Gire el tornillo de ajuste de vuelta en el mismo sentido. velocidad alta (H) en sentido horario (mezcla más pobre), pero no más allá del tope. BT 45...
-
Page 62: Bujía
Para reducir el riesgo de incendio y de Retiro de la bujía quemaduras, utilice solamente las demasiado aceite en la mezcla de – bujías autorizadas por STIHL. Siempre combustible, empuje el casquillo (1) de la bujía Mueva el interruptor de parada a 0 filtro de aire sucio, –... -
Page 63: Funcionamiento Del Motor
(coquización) en el No tire de la cuerda sobre el borde silenciador. del buje guía. STIHL recomienda que un No tire de la cuerda más de lo concesionario STIHL autorizado efectúe especificado. los trabajos de mantenimiento y No deje que el mango de arranque reparación. -
Page 64: Almacenamiento De La Máquina
Limpie la máquina a fondo - preste atención especial a las aletas del cilindro y al filtro de aire. Guarde la máquina en un lugar seco y elevado, o bajo llave, fuera del alcance de los niños y de otras personas no autorizadas. BT 45... -
Page 65: Información Para Mantenimiento
Sustituir después de 100 horas de uso Solicitar al concesionario de servicio Chispero en el silenciador su revisión Todos los tornillos y tuercas accesibles Volver a apretar (salvo los tornillos de ajuste) Revisar Elementos antivibración Solicitar al concesionario de servicio su sustitución BT 45... - Page 66 (zonas con demasiado polvo, etc.), acorte apropiadamente los intervalos indicados. Arbol de perforación Limpiar Inspeccionar Barrena Reemplazar Etiquetas de seguridad Reemplazar no se instala en todas las versiones, depende del mercado STIHL recomienda acudir a un concesionario STIHL autorizado para servicio. BT 45...
-
Page 67: Componentes Importantes
14 Palanca del estrangulador 15 Bomba de combustible manual 16 Barrena para plantar 17 Brida 18 Mango auxiliar 19 Silenciador con chispero 20 Casquillo de bujía 21 Árbol de perforación 22 Adaptador de barrena plantadora Dependiendo del modelo Accesorio especial BT 45... -
Page 68: Especificaciones
Motor parcialmente abierto durante el 20 Casquillo de bujía arranque. Conecta la bujía al alambre de Motor STIHL de un cilindro, dos tiempos encendido. 10 Mango de control Mango trasero para sujetar y utilizar 21 Árbol de perforación el taladro motorizado. -
Page 69: Información De Reparación
Bosch WSR 6 F, Largo: 235 mm (9,25 pulg) identifican por medio del número de resistencia): NGK BPMR 7 A pieza STIHL, el logotipo { y el Ancho: 235 mm (9,25 pulg) Distancia entre 0,5 mm símbolo de piezas STIHL K. El... -
Page 70: Desecho
En los EE.UU., los motores pequeños motor de su equipo. En los EE.UU., los No se debe botar los aparatos STIHL en para equipos de uso fuera de carretera nuevos motores pequeños para equipos el basurero. - Page 71 STIHL Incorporated reparará los carretera a un centro de servicio STIHL firma y remite la tarjeta de garantía a defectos amparados por la garantía en tan pronto surja el problema. Las STIHL.
- Page 72 Lleve el producto a cualquier centro de reemplazo programado. Filtro de aire – servicio autorizado por STIHL y presente la tarjeta de garantía firmada. Carburador (si corresponde) – Bomba de combustible – Requerimientos de mantenimiento Estrangulador (sistema de –...
-
Page 73: Marcas Comerciales
Ematic ™ ® uso de estas marcas comerciales sin el EASYSTART FixCut ™ consentimiento expreso por escrito de ® FARM BOSS ANDREAS STIHL AG & Co. KG, HT Plus ™ ® Waiblingen. iCademy IntelliCarb ™ ® MAGNUM Master Control Lever ™... - Page 74 / EE.UU BT 45...
- Page 76 California son considerados como causantes de of California to cause cancer, birth cáncer, defectos de nacimiento u otros efectos defects or other reproductive harm. nocivos para los órganos de la reproducción. 0458-421-8621-A englisch / spanisch USA englisch / spanisch USA www.stihl.com *04584218621A* 0458-421-8621-A...
Need help?
Do you have a question about the BT 45 and is the answer not in the manual?
Questions and answers