Stihl BT 45 Instruction Manual
Hide thumbs
Also See for BT 45:
- Instruction manual (76 pages) ,
- Manual (43 pages) ,
- Instruction manual (34 pages)
Table of Contents
Advertisement
Advertisement
Table of Contents

Related Manuals for Stihl BT 45


Summary of Contents for Stihl BT 45
- Page 1 STIHL BT 45 Instruction Manual...
-
Page 3: Table Of Contents
English Contents Dear Customer, Guide to Using this Manual Safety Precautions and Working Thank you for choosing a quality engineered STIHL product. Techniques Mounting the Handles It has been built using modern Using the Unit production techniques and comprehensive quality assurance. -
Page 4: Guide To Using This Manual
English Engineering improvements Guide to Using this Manual Safety Precautions and Working Techniques STIHL's philosophy is to continually improve all of its products. For this Special safety precau- Pictograms reason we may modify the design, tions must be observed engineering and appearance of our... - Page 5 (e.g. with a hair net, with your doctor before operating a tool by STIHL or are technically cap, hard hat, etc.). power tool. identical. If you have any questions in this respect, consult a servicing dealer.
- Page 6 Make sure you always have good grip down. balance and secure footing. Keep the handles dry and clean – – free from oil and dirt – for safe control of the power tool. BT 45...
- Page 7 Stay alert so as not to endanger / stop switch to 0 or STOP. others. Do not allow any other persons in the work area. To reduce the risk of injury, keep a sufficiently safe distance away from other persons. BT 45...
- Page 8 To reduce the risk of fire, do not smoke especially the muffler. while operating or standing near your Before leaving the power tool power tool. Note that combustible fuel unattended: Shut off the engine. vapor may escape from the fuel system. BT 45...
-
Page 9: Mounting The Handles
Maintenance and Repairs Use only a spark plug of the type Mounting the Handles approved by STIHL and make sure it is in good condition – see "Specifications". Service the machine regularly. Do not Inspect the ignition lead (insulation in... -
Page 10: Using The Unit
Insert the handle tube (5) in the flange. Move the handle to the required position and tighten down the two wing screws firmly. BT 45... - Page 11 1. The tool speed is too high for drilling planting holes when the gearbox See "Releasing a Trapped Auger". is set to poistion 2. BT 45...
-
Page 12: Fuel
Use only high-quality two-stroke engine STIHL MotoMix uses STIHL HP Ultra location protected from light and the sun. oil – preferably STIHL HP, HP Super or two-stroke engine oil for an extra long Fuel mix ages – only mix sufficient fuel HP Ultra, which are specially formulated engine life. -
Page 13: Fueling
Swing the grip to the upright no dirt falls into the tank. position. Position the machine so that the filler cap is facing up. Tank cap markings Tank caps and fuel tanks may be marked in different ways BT 45... - Page 14 Take care not to spill fuel while fueling and do not overfill the tank. Left: Bottom of cap twisted STIHL recommends you use the STIHL Right: Bottom of cap correctly Fold the grip flush with the top of the filler nozzle for fuel (special accessory).
- Page 15 Take care not to spill fuel while fueling and do not overfill the tank. The marks on the tank cap and fuel tank STIHL recommends you use the STIHL are then in alignment. filler nozzle for fuel (special accessory). Fill up with fuel.
-
Page 16: Gearbox
– the drilling position – see section on "Closing". spindle must be stationary. It may be necessary to turn the drilling spindle slightly before the rotary knob can be moved to the required position. BT 45... -
Page 17: Fitting The Auger
(2) and tighten it firmly. adapter. Use a 17mm open-end wrench to WARNING secure and release the planting !When using the geared rim drill chuck hole auger. (special accessory), make sure you remove the chuck key before starting up. BT 45... -
Page 18: Starting / Stopping The Engine
Pull the starter grip slowly with your right hand until you feel it engage and then give it a brisk strong pull. Do not pull out the starter rope to full length – it might otherwise break. BT 45... - Page 19 Install the spark plug – see "Spark Plug". Move the stop switch to 0. Move the stop switch to F and set choke lever to j – (warm start position) even if the engine is cold. Now start the engine. BT 45...
-
Page 20: Operating Instructions
– see "Storing the Replace with a new filter – or, as a Machine". temporary measure, knock it out or blow it clear – do not wash. Replace any damaged parts. Install the filter in the filter housing. BT 45... -
Page 21: Adjusting The Carburetor
WARNING carefully clockwise until it is against its seat, then turn it back 1 full turn If the drilling spindle continues rotating when the engine is idling, have your power drill checked and repaired by your servicing dealer. BT 45... -
Page 22: Spark Plug
Install setting of the idle speed screw (LA) after only suppressed spark plugs of the every correction to the low speed type approved by STIHL – see screw (L). "Specifications". Clean dirty spark plug. Check electrode gap (A) and... -
Page 23: Engine Running Behavior
Press the spark plug boot firmly environmental requirements. STIHL recommends that you have onto the spark plug Run the engine until the carburetor servicing and repair work carried out is dry – this helps prevent the... -
Page 24: Maintenance And Care
Readjust idle Readjust electrode gap Spark plug Replace after 100 operating hours Spark arrestor in muffler Have checked by dealer All accessible screws and nuts (not adjust- Retighten ing screws) Check Anti-vibration elements Have replaced by servicing dealer BT 45... - Page 25 (very dusty work area, etc.), shorten the specified intervals accordingly. Drilling spindle Clean Inspect Auger Replace Safety labels Replace not in all versions, market-specific STIHL recommends an authorized STIHL servicing dealer. BT 45...
-
Page 26: Minimize Wear And Avoid Damage
English servicing dealer. STIHL dealers are Minimize Wear and Avoid regularly given the opportunity to attend Damage training courses and are supplied with the necessary technical information. Observing the instructions in this manual helps reduce the risk of unnecessary If these maintenance operations are not wear and damage to the power tool. -
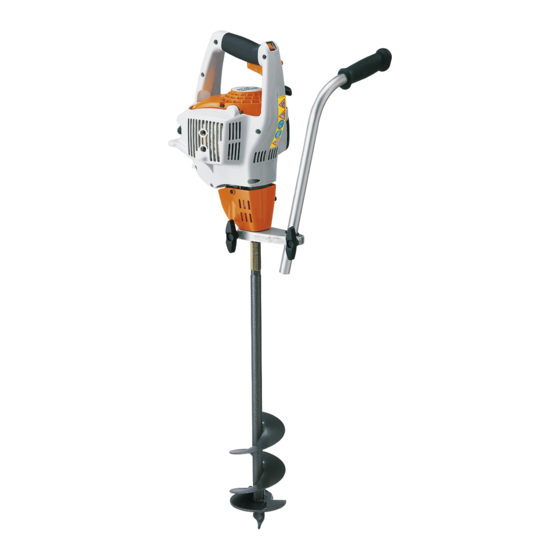
Page 27: Main Parts
17 Flange 18 Assist handle 19 Muffler with spark arresting screen (depending on market) 20 Spark plug boot 21 Drilling spindle 22 Adapter for planting hole auger 23 Adapter for ice auger Serial number Depending on model Special accessory BT 45... -
Page 28: Specifications
7.0 m/s Engine 4.8 kg The K-factor in accordance with Dimensions Directive 2006/42/EC is 2.5 dB(A) for STIHL single cylinder two-stroke engine the sound pressure level and sound power level; the K-factor in accordance Displacement: 27.2 cc without attachment and chuck with Directive 2006/42/EC is 2.0 m/s... -
Page 29: Maintenance And Repairs
Take the product, replacement parts which have been accessories and packaging to an conforms to the relevant requirements of approved by STIHL for this power tool or approved disposal site for environment- the Directives 2006/42/EC and are technically identical. Only use high- friendly recycling. - Page 30 English Done at Waiblingen, 10.03.2016 ANDREAS STIHL AG & Co. KG Thomas Elsner Director Product Management and Services BT 45...
- Page 32 0458-421-0121-A englisch www.stihl.com *04584210121A* 0458-421-0121-A...
Need help?
Do you have a question about the BT 45 and is the answer not in the manual?
Questions and answers