Table of Contents
Advertisement
Quick Links
Recall a recorded scene
1. Press the appropriate scene button.
2. Watch the scene smoothly transition from the previous lighting state.
You can recall the same scene from any house scene controller assigned to
the same set of house scenes (see More Scenes, below).
Modify the light levels of a house scene
1. Recall the recorded scene.
2. Change lighting levels as desired by pressing
3. Press and hold the scene button until the LED flashes once (approximately 2
seconds) to save the new settings.
Modify a previously recorded house scene
Use the Record a Whole-house Scene procedure to modify the devices assigned to
an existing house scene.
More Scenes
You can increase the number of house scenes to 10 by adding a second DRD5 to
the house, then changing the "scene set assignment" on one of them. The DRD5
scene set assignment is 1-5 when shipped. Changing the second DRD5 scene set
assignment to 6-10 allows you to record another 5 scenes that can be accessed by
any house scene controller (DRD5 and MRH5G) that has a scene set assignment
of 6-10.
All house scene controllers that have the same scene set
assignment operate the 5 scenes in the same way as all
other house scene controllers programmed for the same
set (1-5 or 6-10).
To assign the controller for scenes 6-10, simultaneously
press
and button B for 2 seconds.
To change the assignment back to scenes 1-5,
simultaneously press
A = scenes 1-5 (default)
B = scenes 6-10
Power Fail Memory
After a power failure, all Miro devices automatically return to the state they
were in immediately prior to loss of power. All house binding and scene control
information is preserved.
and button A for 2 seconds.
or
on individual devices.
Assigning the DRD5
for scene set 6-10
Advertisement
Table of Contents

Related Manuals for LEGRAND DRD5 v2


Summary of Contents for LEGRAND DRD5 v2
- Page 1 Recall a recorded scene 1. Press the appropriate scene button. 2. Watch the scene smoothly transition from the previous lighting state. You can recall the same scene from any house scene controller assigned to the same set of house scenes (see More Scenes, below). Modify the light levels of a house scene 1.
-
Page 2: Troubleshooting
Lock House Configuration The Lock Configuration function operates from a wireless Miro house scene controller, and prevents the Miro wireless devices in the system from being reprogrammed. Normal operations such as dimming, switching, scene recall and scene light level modifications are not affected. When the configuration is locked, if the rocker paddle on any Miro wireless device is pressed and held (- -), the selected device’s LED flashes red, and the command is ignored. -
Page 3: Warranty Information
Legrand Customers contact: Vantage Customers contact: Please Recycle... -
Page 4: Specifications
DRD5 v2 Wireless House Scene Controller Specifications Operating Voltage .....120/277VAC, 60Hz Operating Temperature ..32°F to 104°F (0°C to 40°C) -
Page 5: Unit Description
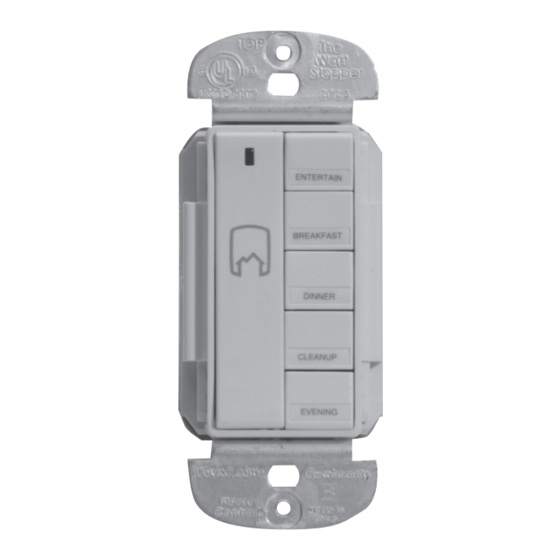
uniT DESCRiPTion The Miro Decorator DRD5 Wireless House Scene Controller provides instant recall of five user-recorded lighting scenes (or presets) across the entire house. The DRD5 is a whole-house controller. It is used in combination with any number of Miro Decorator wireless dimming or non-dimming devices. The DRD5 can be differentiated from a Wireless Room Scene Controller by the icon on its front, which resembles the outline of a house exterior. -
Page 6: Installation
CauTion TuRn THE PoWER oFF aT THE CiRCuiT BREakER BEFoRE inSTaLLing THE DEViCE. inSTaLLaTion For ease of installation, manufacturer recommends use of a deep wall box. The device is equipped with flying leads to simplify installation, however, if desired, they may be removed by loosening the screw terminals. 1. -
Page 7: New Installation
SET HouSE iD All Miro wireless devices installed in the same home must acquire the same unique House ID before use. This process is known as house binding. Each Miro wireless device is bound to all other Miro wireless devices in the house. new installation 1. With all devices installed and energized, make sure that every Miro wireless device LED is yellow. If any LED is off, be sure the circuit breaker is on and the device is correctly installed. When you see 2. -
Page 8: Operation
oPERaTion Button and Paddle Functions The rocker paddle has a house icon on it. Use it to begin and end binding and scene recording functions. It can also be programmed as an ON/OFF switch, using steps 1-3 of the Record a Whole-House Scene process described below. Once programmed: Tap to switch or fade included devices to on (dimming devices go to full bright). - Page 9 • Four (4) fold. • Final folded size: 4” (Wide) x 6” (High). IF YOU HAVE ANY QUESTIONS REGARDING SPECIFICATIONS OR REQUIRE ADDITIONAL FILE FORMATTING, PLEASE CONTACT Mary Jo Sowinski. Phone: 408-486-7511 Email: maryjo.sowinski@wattstopper.com All information in this drawing is the property of Watt Stopper/Legrand and cannot be copied or used without the written approval of Watt Stopper/Legrand. Drawn by SOWINSKI SANTA CLARA, CALIFORNIA MarCom Engineering...
Need help?
Do you have a question about the DRD5 v2 and is the answer not in the manual?
Questions and answers