Table of Contents
Advertisement
Quick Links
Advertisement
Table of Contents

Related Manuals for Vinten HDT Heavy-Duty


Summary of Contents for Vinten HDT Heavy-Duty
- Page 1 Heavy-Duty Vinten Camera Control Solutions...
- Page 2 All rights reserved throughout the world. No part of this document may be stored in a retrieval system. transmitted, copied or reproduced in any way including, but not limited to, photocopy, photograph, magnetic or other record without the prior agreement and permission in writing of Vinten Broadcast Limited. Vinten and Quickfix are registered trademarks of Vinten Broadcast Limited.
-
Page 3: Preface
Thank you and congratulations on your new HDT Heavy-Duty Tripod from Vinten We want you to get the most from your new HDT Heavy-Duty Tripod, and therefore encourage you to read this operators guide to familiarise yourself with its many features, some of which may be new to you. -
Page 4: Safety - Read This First
Safety - Read This First Warning Symbols in this Operators Guide Where there is a risk of personal injury, injury to others, or damage to the tripod or associated equipment, comments appear, highlighted by the word WARN- ING! and supported by the warning triangle symbol. Technical data Tripod HDT-1... -
Page 5: Further Information
Further information For full details on maintenance and spare parts, please refer to HDT Heavy-Duty Tripod - Mainte- nance Manual and Illustrated Parts List (Publication Part No. 3901-9) This is obtainable from Vint- en Broadcast Limited or your local Vinten distributor. For information on-line, visit our website at... -
Page 6: Table Of Contents
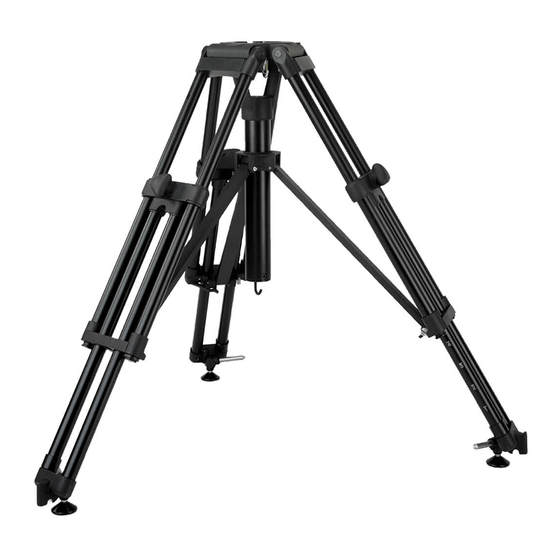
Parts list..............28 Associated publications HDT Heavy-Duty Tripods - Maintenance Manual Publication Part No. 3901-9... - Page 7 (12) (11) (10) (5.4) (5.1) (5.3) (5.2) HDT-1 Tripod...
- Page 8 HDT-1 Tripod Mitchell keyway Levelling bubble Carrying handle Leg retaining clip Swivel foot assembly Tie-down hooks Spreader release button Spreader support tube Mid-level spreader (10) Mid-level spreader clamp (11) Leg clamp knob (12) Head mounting bolt...
- Page 9 (14) (15) (16) Elevation unit (14) Four-bolt head fixing (15) Elevation handle (16) On-shot clamp...
- Page 10 (24) (17) (23) (22) (18) (19) (21) (23) (22) (20) (21.1) (21) (20.1) (20) Dolly (17) Centre casting (18) Fixed leg (19) Track lock pin (Studio version only) (20) Cable guard (Studio version only) (21) Foot brake (22) Foot clamp knob (23) Foot clamp wire (24)
- Page 11 (25) (26) (30) (29) (27) (28) (31) Tracking dolly (25) Folding legs (26) Foot securing strap (27) Twin 12.5 cm wheel assembly (28) Wheel slide (29) Fixed leg (30) Centre casting (31) Quad 6.2 cm wheel assembly...
-
Page 12: Introduction
Introduction ® The Vinten HDT Heavy-Duty Tripod Range includes single- and two-stage tripods with mid-level spreaders; OB, studio and tracking dollies and an elevation unit. Single-stage tripod (HDT-1) The single-stage tripod has a minimum height of 59 cm (23.2 in.). When used with a floor spread- er, maximum height is 123 cm (48.4 in.). -
Page 13: Dolly
Dolly The Vinten heavy-duty dolly is designed to provide a steering and castoring base for the two heavy-duty tripods. It comprises a centre casting with carrying handle (17), a fixed leg (18) two folding legs (24). The dolly will support a payload of 160 kg (325 lb). The heavy-duty dolly is available in studio, outside broadcast (OB) and tracking versions. -
Page 14: Operation
Mounting a head The head is mounted on the tripod with a either a standard Vinten four-bolt mounting or a Mitch- ell-type centre screw. Additionally, a heavy-duty Quickfix adaptor may be used for heads supplied with a Quickfix mounting and 100/150 mm bowl adaptors for heads with a ball base (see “Optional... - Page 15 Tighten the bolts using a suitable screwdriver or coin, or use a suitable box spanner (16 mm (5/8 in.) AF). To mount a head: Push up the red safety latch and unlock the adaptor by pulling the lever fully outwards and to the left.
-
Page 16: Elevation Unit
Elevation unit Installing or removing the elevation unit The elevation unit may be fitted to the single-stage tripod. To install the elevation unit it is neces- sary to remove the four captive head mounting bolts and the spreader support tube. WARNING! The elevation unit should not be fitted to the two-stage tripod, as stability is reduced when the elevation unit is fully extended To install the elevation unit:... - Page 17 (12) (12.1) (8.1) (13.1) (13.2) (12.2) (12.3) (13) (13.3) Installing or Removing the Elevation Unit...
- Page 18 Mounting a head The head is mounted on the elevation unit with a either a standard Vinten four-bolt mounting, a Mitchell-type centre screw, Quickfix adaptor or 100/150mm bowl adaptor. WARNING! Before installing a component on the elevation unit, hold a fix- ing bolt in position and check that the threaded end is not over- long for that component.
-
Page 19: Studio And Ob Dollies
Studio and OB dollies Assembling the dolly Turn the dolly upside-down, depress the leg locking plungers and pull each folding leg out until the plungers lock the legs in the open position. Set the dolly on the ground on its wheels and apply the wheel brakes. Brakes Each of the dolly wheels is fitted with a foot operated brake (21). -
Page 20: Tracking Dolly
Tighten the clamps fully. If a two-stage tripod is in use the bottom stage should be fully extended or fully retracted. Four-bolt adaptor A special four-bolt adaptor (Vinten Part No. 3368-24) enables a pan and tilt head (with flat base) to be mounted directly on the dolly. Tracking dolly... -
Page 21: Removing Or Refitting The Mid-Level Spreader
Removing or refitting the mid-level spreader The mid-level spreader may be removed when the tripod is being used with a dolly or floor spread- WARNING! Do not use the tripod without the mid-level spreader unless it is mounted on a dolly or floor spreader. (9.1) (10) Removing or Refitting the Mid-Level Spreader... - Page 22 To remove the mid-level spreader: Fully slacken the spreader clamp (10). At each spreader fixing point, unscrew and remove the spreader attachment screw (9.1). Depress the spreader release button and pull the spreader off the support tube (8). Refit the spreader attachment screws (9.1). To refit the spreader: At each spreader fixing point, unscrew and remove the spreader attachment screw (9.1).
-
Page 23: Servicing
Servicing General Vinten products are robustly made to high engineering standards and little attention is required to maintain serviceability save regular cleaning. Attention to the following points will ensure a long and useful service life with minimum need for repair. - Page 24 Refit the clamp sleeves by aligning the lugs on the sleeves (11.6) with the cut-outs in the clamp housing (11.5) and sliding them down the legs. Rotate the clamp sleeves outwards so that the lugs on the sleeves locate in the cut-outs in the clamp housing.
-
Page 25: Routine Maintenance
Routine maintenance Tripods During use, check for ageing and cracking of the rubber foot securing straps on the floor spreader (if used) and renew if necessary. No further routine maintenance, other than regular cleaning, is necessary on the tripods. The clamps should never require adjustment. -
Page 26: Adjustments
Adjustments Elevation unit on-shot clamp After considerable use the on-shot clamp may require adjustment. If the rotation between the ‘off' stop and the fully ‘on' position exceeds 120°, adjust the clamp as follows: Remove the hole plug (16.5). Remove the screw (16.4) and washer (16.3) - Page 27 Studio dolly tracking Adjustments to the tracking of studio dollies may become necessary after considerable use. Check the tracking as follows: With the track locks engaged and a payload fitted, the dolly should track in a straight line over a distance of 3.6 m (12 feet) with deviation not exceeding 5 cm (2 in.). If this cannot be achieved, the wheels should be re-aligned.
-
Page 28: Parts List
Parts list The following lists include main assemblies and optional accessories. For further information re- garding repair or spare parts, please contact Vinten Broadcast Ltd or your local distributor. For information on-line, visit our website at www.vinten.com. Main assemblies HDT-1 single-stage tripod...
Need help?
Do you have a question about the HDT Heavy-Duty and is the answer not in the manual?
Questions and answers