Table of Contents
Advertisement
Quick Links
Advertisement
Table of Contents

Subscribe to Our Youtube Channel
Related Manuals for Carel compactSteam CH002V1000


Summary of Contents for Carel compactSteam CH002V1000
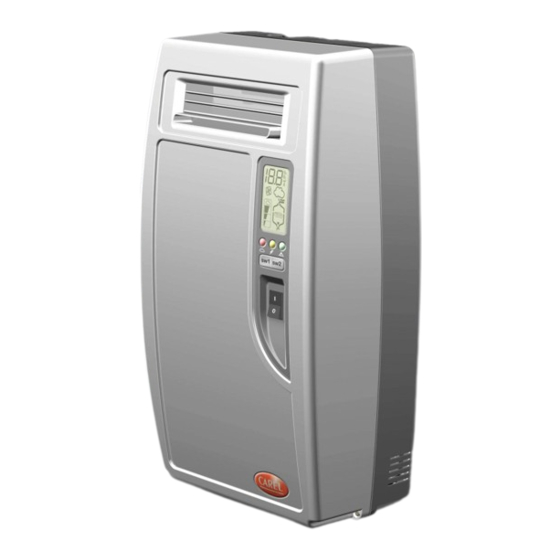
- Page 1 compactSteam – residential/light commercial steam humidifiers User manual...
- Page 3 The humidifier is made of metallic and plastic parts. All parts must be disposed of according to the local and national standards for waste disposal. Certification: the quality and safety of CAREL products are assured by CAREL's ISO 9001 certified design and production system, as well as listings from UL, cUL, CE, TUV, ETL, cETL and others.
-
Page 5: Table Of Contents
CONTENTS How The compactSteam Works ......................7 Models............................8 Installation ............................9 1.1 Positioning ..........................9 Mounting ............................10 Plumbing ............................11 Steam distribution .........................12 Power wiring..........................14 Control wiring ..........................15 Wiring Connections: ........................16 Start-Up ............................17 Startup Checklist...........................17 The compactSteam Controller ......................17 Starting compactSteam ........................18 Starting with a new cylinder ......................18 Operating compactSteam ........................19 3.1 Displaying Information .......................19... -
Page 7: How The Compactsteam Works
compactSteam 1. How The compactSteam Works compactSteam is an electrode humidifier. It produces steam for humidification by passing electric current through the water in the steam plastic generator cylinder between metal electrodes. There are no heating elements. Steam output is directly proportional to the conductivity of the water, and the amount of electrode immersed in the water. -
Page 8: Models
compactSteam 2. Models There are two basic models for steam distribution: Duct Injection Direct Room Discharge Fig. 2.a Fig. 2.b compactSteam comes in two voltages and five capacities: CH m ss c v xx r CH means CompactSteam Humidifier and is a fixed field m = model: 0 for Duct Injection, F for Direct Room Discharge ss = nominal steam flow in kg/h (read table on page 14 for the complete list of nominal steam flow) c = control type... -
Page 9: Installation
compactSteam 3. Installation 3.1 Positioning The compactSteam has been designed for wall mounting and, since it is an atmospheric steam humidifier, should be placed close to the point where the steam will be used, to minimize the steam hose length (and the amount of condensate). Certain clearances must be maintained around the unit for safety and maintenance. -
Page 10: Mounting
compactSteam 3.2 Mounting 3.2.1 Removing the front cover The front cover is secured by four screws located at the four corners of the unit. Use a phillips head screwdriver to remove the four cover screws. Then simply pull the front cover away from the back part of the unit. -
Page 11: Plumbing
compactSteam 3.3 Plumbing 3.3.1 Water supply The compactSteam must be supplied with water (not softened or demineralized) having the following characteristics: Instant flow rate: 0.12 gpm / 0.45 L/min Connection: 1/4” O.D. Compression Temperature limits: 34 to 104°F / 1 to 40 °C Pressure limits: 15 to 116 psi / 1 to 8 bar Hardness limits:... -
Page 12: Steam Distribution
compactSteam 3.4 Steam distribution 3.4.1 Duct steam injection The maximum allowed duct counterpressure is 39.37 in WC / 980 Pa. The compactSteam duct injection models include a plastic duct injection nozzle: 1.24” (31.5 mm) 1.96” (50 mm) 2.20” (56 mm) 2.26”... - Page 13 compactSteam 3.4.2 Steam Hoses NINETY PERCENT (90%) OF ALL OPERATION PROBLEMS ARE CREATED BY IMPROPER STEAM PIPING FROM THE HUMIDIFIER UNIT TO THE DUCT DISTRIBUTOR PIPES. To avoid these problems, remember one simple fact when running the steam hose: steam naturally flows up hill, and condensate naturally flows down hill.
-
Page 14: Power Wiring
compactSteam 3.5 Power wiring Check that the power supply voltage to be connected matches the value indicated on the rating plate inside the electrical panel. Insert the power and ground connection cables into the electrical panel compartment using the strain reliefs supplied, and connect to the terminals. An external fused disconnect must be installed. -
Page 15: Control Wiring
compactSteam 3.6 Control wiring compactSteam allows connection of any simple humidistat, and safety devices such as high-limit humidistat, air flow proving switch, and remote on/off. REMARK: we suggest to select the proper type of control signal by the keyboard before connecting the control wiring. -
Page 16: Wiring Connections
compactSteam 3.7 Wiring Connections: Terminals Input/Output Type Description N1-GND-N2 NTC air proving sensor AB-AB 24 V Bridge Remote On/Off IN-GND 24 V Bridge Humidistat NC-C-NO Dry contact Alarm relay NO-C Dry contact External fan relay 24-GND 24 VAC Power for external humidistat 3.7.1 Wiring diagram of controller PROGRAMMING PORT... -
Page 17: Start-Up
compactSteam 4. Start-Up IMPORTANT WARNINGS: Before starting, check that the humidifier is in perfect condition, that there are no water leaks and that the electrical parts are dry; Do not connect power if the humidifier is damaged or even partially wet! When installation is completed, flush the supply pipe for around 10 minutes by piping water directly into the drain, without sending it into the humidifier;... -
Page 18: Starting Compactsteam
compactSteam 4.3 Starting compactSteam • Insure that the external power is turned on. The yellow Power LED will be lit. • Push the top part of the On/Off button so that the I part is in. The compactSteam is now ready to operate. •... -
Page 19: Operating Compactsteam
compactSteam 5. Operating compactSteam 5.1 3.1 Displaying Information By pressing the “reset/sel” button for 2 seconds, the display will loop from amperage to production in % of the maximum production to the hour counter and back to amperage: ⇒ ⇒ ⇒... -
Page 20: Alarms
compactSteam 5.5 Alarms In the event of an alarm, the red alarm LED will flash, the alarm relay will close, and the alarm code will flash in the display. Multiple alarms will flash in sequence, alternating with the main display. Pressing the sel button for 2 seconds will reset the alarms, although still active alarms will continue to display. Display Description Action... -
Page 21: Trouble-Shooting
compactSteam 6. Trouble-Shooting problem causes solutions The humidifier does not turn on 1. no electrical power 1. check the safety devices upstream from the humidifier and the 2. on/off switch of the humidifier in position 0 (open) presence of power 3. -
Page 22: Maintenance
compactSteam 7. Maintenance 7.1 Periodic checks • After one hour of operation: Check that there are no significant water leaks. • Every fifteen days or no more than 300 operating hours: Check operation, that there are no significant water leaks and the general condition of the cylinder. -
Page 23: Replacement Parts
compactSteam 7.3 Replacement Parts Item Part No. Description Read the table below Steam generator cylinder CHMCONT10 Control module 110 VAC 1-phase CHMCONT20 Control module 230 VAC 1-phase CHKCABLE00 Internal cables kit 0504349AXX On/off switch 1312557AXX Room blower assembly 110 VAC 1-phase 1312558AXX Room blower assembly 230 VAC 1-phase 13C564A044... -
Page 24: Technical Specifications
Invoice. Warranty replacement parts are warranted for remainder of original unit warranty or 90 days, whichever is longer, so long as the product has been installed and operated in accordance with all appropriate manuals and wiring diagrams, and started up by a qualified Carel USA technician. Any product or part that is found to be defective will, at the option of Carel USA, LLC be replaced or repaired. - Page 25 NOTE ________________________________________________________________________ _______________________________________________________________________________________________________________________ _______________________________________________________________________________________________________________________ _______________________________________________________________________________________________________________________ _______________________________________________________________________________________________________________________ _______________________________________________________________________________________________________________________ _______________________________________________________________________________________________________________________ _______________________________________________________________________________________________________________________ _______________________________________________________________________________________________________________________ _______________________________________________________________________________________________________________________ _______________________________________________________________________________________________________________________ _______________________________________________________________________________________________________________________ _______________________________________________________________________________________________________________________ _______________________________________________________________________________________________________________________ _______________________________________________________________________________________________________________________ _______________________________________________________________________________________________________________________ _______________________________________________________________________________________________________________________ _______________________________________________________________________________________________________________________ _______________________________________________________________________________________________________________________ _______________________________________________________________________________________________________________________ _______________________________________________________________________________________________________________________ _______________________________________________________________________________________________________________________ _______________________________________________________________________________________________________________________ _______________________________________________________________________________________________________________________ _______________________________________________________________________________________________________________________ _______________________________________________________________________________________________________________________ _______________________________________________________________________________________________________________________ _______________________________________________________________________________________________________________________ _______________________________________________________________________________________________________________________ _______________________________________________________________________________________________________________________ _______________________________________________________________________________________________________________________ _______________________________________________________________________________________________________________________...
- Page 26 NOTE ________________________________________________________________________ _______________________________________________________________________________________________________________________ _______________________________________________________________________________________________________________________ _______________________________________________________________________________________________________________________ _______________________________________________________________________________________________________________________ _______________________________________________________________________________________________________________________ _______________________________________________________________________________________________________________________ _______________________________________________________________________________________________________________________ _______________________________________________________________________________________________________________________ _______________________________________________________________________________________________________________________ _______________________________________________________________________________________________________________________ _______________________________________________________________________________________________________________________ _______________________________________________________________________________________________________________________ _______________________________________________________________________________________________________________________ _______________________________________________________________________________________________________________________ _______________________________________________________________________________________________________________________ _______________________________________________________________________________________________________________________ _______________________________________________________________________________________________________________________ _______________________________________________________________________________________________________________________ _______________________________________________________________________________________________________________________ _______________________________________________________________________________________________________________________ _______________________________________________________________________________________________________________________ _______________________________________________________________________________________________________________________ _______________________________________________________________________________________________________________________ _______________________________________________________________________________________________________________________ _______________________________________________________________________________________________________________________ _______________________________________________________________________________________________________________________ _______________________________________________________________________________________________________________________ _______________________________________________________________________________________________________________________ _______________________________________________________________________________________________________________________ _______________________________________________________________________________________________________________________ _______________________________________________________________________________________________________________________...
- Page 28 Agenzia / Agency: CAREL S.p.A. Via dell’Industria, 11 - 35020 Brugine - Padova (Italy) Tel. (+39) 049.9716611 Fax (+39) 049.9716600 http://www.carel.com - e-mail: carel@carel.com...
Need help?
Do you have a question about the compactSteam CH002V1000 and is the answer not in the manual?
Questions and answers