
Related Manuals for RCF ES 3323-II -


Summary of Contents for RCF ES 3323-II -
-
Page 1: User Manual
USER MANUAL MANUALE D’USO ES 3323-II - 3-ZONE MIXER-AMPLIFIER WITH TUNER AND CD/USB – MP3 PLAYER - MIXER-AMPLIFICATORE CON SELEZIONE DI 3 ZONE E SINTONIZZATORE RADIO / LETTORE CD/USB – MP3... -
Page 3: Table Of Contents
DUAL AMPLIFICATION ‘A’ DUAL AMPLIFICATION ‘B’ ADDITIONAL EXTERNAL AMPLIFIER CONNECTION FURTHER INFORMATION RCF BM 3001 / BM 3003 PAGING MICROPHONES CD/USB – MP3/WMA PLAYER AND TUNER LOUDSPEAKER CONNECTION ZONE OUTPUT 100 V / 70 V (COMMON) VOLTAGE SELECTION POWER SUPPLY VOLTAGE CHANGE... -
Page 4: Safety Precautions
RCF S.p.A. will not assume any responsibility for the incorrect installation and / or use of this product. - Page 5 Also check the suitability of the support surface to which the product is anchored (wall, ceiling, structure, etc.), and the components used for attachment (screw anchors, screws, brackets not supplied by RCF etc.), which must guarantee the security of the system / installation over time, also considering, for example, the mechanical vibrations normally generated by transducers.
-
Page 6: Description
(connected to the removable connector). The inputs 2 and 3 also have an RJ 45 socket for quick connection (through CAT5 cable) of either a RCF BM 3001 or BM 3003 paging microphone or a line (daisy-chain) of BM 3003 (made of max. 12 microphones, by using an additional power supply unit). -
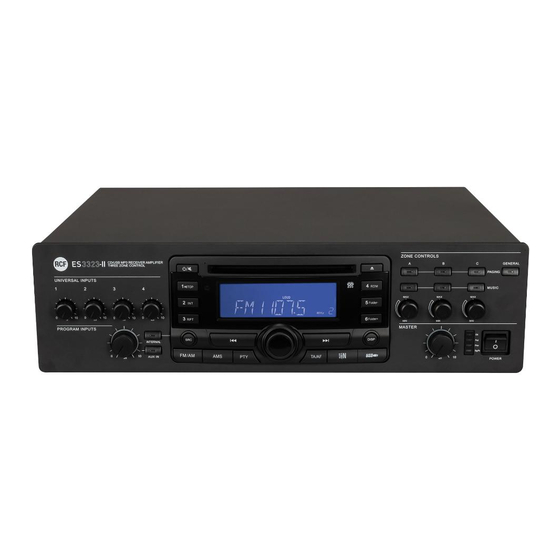
Page 7: Front Panel
FRONT PANEL IMPORTANT: after pressing a button (AUX IN , INTERNAL , GENERAL , PAGING , MUSIC ), the implementation of the new configuration will take about 10 seconds. Volume controls for each universal input (1, 2, 3, 4) uNused chaNNels should always be turNed fully couNterclockwise AUX INPUT volume control turN fully couNterclockwise... -
Page 8: Direct Outputs
LEDs ON green: the device is switched on PROT red: overload protection orange: thermal protection PRIOR yellow: priority event in progress (VOX function, command, SEQ. COMMAND.) SIG/PK green: the signal level is higher than – 15 dB green + red: the signal level is in the 0 ÷... -
Page 9: Rear Panel
REAR PANEL 30 31 15 13 2 RJ 45 sockets (channels 2 and 3) to connect either: - A single BM 3001 paging microphone only - Or a single BM 3003 (3-zone) paging microphone - Or a daisy-chain made of max. 12 BM 3003, by using an additional power supply unit. bM 3001, ote about the settiNg of the dip switches... - Page 10 Dip-switch 3 and 4 settings: DIP 3 DIP 4 MODE INPUT SENSITIVITY USE (EXAMPLES) BM 3003 paging microphones, LINE 0 dBu CD/MP3 players, tuners, message players, phone systems LINE with – 20 dBu BM 3001 paging microphones PHANTOM MIC. – 50 dBu Dynamic microphones MIC.
- Page 11 PAGING OUT audio output (with RCA connector) It sends either the mix of the channels 1, 2, 3, 4 (with no priority events in progress) or the only input (1 ÷ 4) with priority or the chime (triggered by any priority command, if enabled) or the tone set for the SEQUENTIAL COMMAND Use this output to connect the additional amplifier (if this is assigned for paging and/or the mix of inputs 1÷4).
- Page 12 SHORT – SHORT: short chime. CHIME LONG: long chime. CHIME LONG CHIME: the chime (selected by the SIREN ON SEQ.CMD: an alarm CHIME – dip-switch no.7) is continuously tone is continuously played when SIREN ON SEQ. played when the ‘SEQUENTIAL the ‘SEQUENTIAL COMMAND’...
- Page 13 CHIME LEVEL (a trimmer adjustable by using a small screwdriver). SEQUENTIAL COMMAND with removable connector (activated when the 2 pins are short-circuited) to send continuously (with max. volume) either the chime (selected through the dip-switch 7 PRESET ) or an alarm tone (selected through the dip-switch 8 PRESET Internal relay contacts (3 pole removable connector) The internal relays switches when a priority command is present.
-
Page 14: Operation Modes
2. DUAL AMPLIFICATION ‘A’: ES 3323 is linked to an additional external amplifier (i.e. RCF UP 2321) for paging only (while the internal one amplifies the music only). 3. DUAL AMPLIFICATION ‘B’: ES 3323 is linked to an additional external amplifier (i.e. -
Page 15: Priority
PROCEED AS FOLLOWS: a. Ensure the dip-switches 9 and 10 PRESET are both set to OFF (or both set to ON). b. Ensure the dip-switches 11 and 12 PRESET are both set to ON. c. Adjust (momentarily) the MASTER control at (circa) half volume. d. - Page 16 THE PRIORITY MODE (INCLUDING THE VOX FUNCTION) IS SET BY THE DIP- SWITCH 3 PRESET DIP 3 MODE Only the first priority command of channels 1 ÷ 4 is accepted (also channel 1 VOX, if enabled through the dip-switch 4 PRESET ).
- Page 17 THE 3-ZONE SELECTIVE PAGING IS CONTROLLED ACCORDING TO THE FOLLOWING RULES: 1. If the GENERAL button is on, when the priority is got by one of the channels 1 ÷ 4 or a BM3001 paging microphone, paging will be general (‘all call’) in the OVERRIDE mode (regardless of any other setting).
-
Page 18: Dual Amplification 'A
SEQUENTIAL override COMMAND DUAL AMPLIFICATION ‘A’ In this mode, ES 3323 is linked to an additional external amplifier (i.e. RCF UP 2321) for paging only (while the internal one amplifies the music only). ES 3323: MUSIC EXTERNAL AMPLIFIER: PAGING See the manual section ‘Additional external amplifier connection’, paragraph ‘A’. -
Page 19: Dual Amplification 'B
DUAL AMPLIFICATION ‘B’ In this mode, ES 3323 is linked to an additional external amplifier (i.e. RCF UP 2321) for music only (while the internal one is for paging only). ES 3323: PAGING EXTERNAL AMPLIFIER: MUSIC See the manual section ‘Additional external amplifier connection’, paragraph ‘B’. - Page 20 EXAMPLE OF CONNECTION TO AN RCF UP 2321: - Connect PAGING OUT to UP 2321 AUX INPUT - Connect the UP 2321 (100 V / 70 V) constant voltage output to EXT AMP INPUT B) ES 3323: PAGING EXTERNAL AMPLIFIER: MUSIC...
-
Page 21: Further Information
FURTHER INFORMATION SEQUENTIAL COMMAND The SEQUENTIAL COMMAND has the highest priority and starts (and keeps) playing to all zones either the chime (short or long, set through the dip-switch 7 of the PRESET group ) or the alarm tone (set through the dip-switch 8 of the PRESET group ) in the OVERRIDE mode. -
Page 22: Rcf Bm 3001 / Bm 3003 Paging Microphones
RCF BM 3001 / BM 3003 PAGING MICROPHONES RCF BM 3001 / BM 3003 PAGING MICROPHONES Channels 2 and 3 have an input with RJ 45 socket, to which it is possible to connect 2 models of RCF paging microphones (not included): - BM 3001 (for all calls only) - BM 3003 (for 3-zone selective calls and ‘daisy-chain’... -
Page 23: Cd/Usb - Mp3/Wma Player And Tuner
CD/USB – MP3/WMA PLAYER AND TUNER NOTE SUI COMPACT DISC - Use 12 cm audio CD, CD-R and CD-RW only. Never insert 8 cm (3-inch) CDs ! - Do not use damaged CDs (or having an irregular shape). - Keep CDs clean and hold them always on their edges (without touching their unlabeled surface). - Page 24 Volume control (encoder) and push button to select parameters. Turn it clockwise to turn the volume up of the player (only). Turn it counterclockwise to turn the volume down. When pushed, it changes the parameter to edit (by turning the control): volume (VOL 0 ÷...
- Page 25 RPT (repeat) button (audio CD and MP3 / WMA files only) Audio CD: it turns on RPT TRK / off RPT OFF the continuous repeat of the selected track. MP3 / WMA files: RPT TRK continuous repeat of the selected track → RPT FOLD sequential continuous repeat of all folder tracks →...
- Page 26 TA/AF (traffic announcements / alternative frequency) button (FM tuner only) Some radio stations with RDS (‘Radio Data System’) service periodically provide traffic information. These stations can be identified by the TP indication on the display. If this button is pushed and immediately released: - When tuned to a radio station that provides traffic information, it will enable (TA is displayed) or disable the traffic information reception mode that has a particular preset volume (read the ‘FUNCTION MENU’...
-
Page 27: Function Menu
Tuner main information: selected group (FM1, FM2, FM3, MW1, MW2), frequency and if it corresponds to a stored preset (indicated in the bottom right hand corner). POP – CLAS – ROCK – JAZZ: DSP current selection (music equalisation). INT: track intro function enabled WMA: WMA file AF: alternative frequency search RDM: random playback... - Page 28 TA VOL: traffic announcement preset forced volume (values: 12 ÷ 45). RETUNE: interval time from an automatic search of a radio station providing traffic announcement information (TA SEEK) to the next one. If set to S: TA SEEK retune interval time is 45 seconds. If set to L: TA SEEK retune interval time is 3 minutes.
-
Page 29: Remote Control
To connect your device to the player: 1. Activate Bluetooth on your device. 2. On your device, search for Bluetooth devices, then ‘RCF’ should be displayed. 3. Match your device to ‘RCF’ by inserting the code (/ password) ‘1234’. 4. Start the playback of an audio file on your device, which now should be included in the player source list (use the SRC button to change sources). - Page 30 When using the remote control, hold it in the proper way and point it at the player. ON-OFF It turns on / off the player / tuner (only). Same function of the volume control when pushed. ▲(+)▼(–) Same function of the volume control when turned.
-
Page 31: Loudspeaker Connection
LOUDSPEAKER CONNECTION DIRECT OUTPUTS Use 1 output only - DO NOT MIX 100 / 70 V CONNECTIONS 70 / 100 V CONSTANT VOLTAGE OUTPUTS - Each loudspeaker shall have a line transformer with the input voltage equal to the line voltage (70 / 100 V). -
Page 32: Zone Output 100 V / 70 V (Common) Voltage Selection
ZONE OUTPUTS Each zone has a separate 100 V / 70 V constant voltage output. The factory setting (common for all the 3 zones) is 100 V. Contact an authorised service centre to select 70 V. - Each loudspeaker shall have a line transformer with the input voltage equal to the line voltage (70 / 100 V). -
Page 33: Power Supply Voltage Change
POWER SUPPLY VOLTAGE CHANGE iMportaNt: t his MaNual sectioN coNcerNs Qualified persoNNel oNly he followiNg iNstructioNs are to be igNored by the user Make sure the device is not connected to the mains (unplug the power cord). Remove the lid. The power supply circuit is under the ventilation screen (see picture 1), which can be removed by unscrewing the 2 screws. -
Page 34: Specifications
SPECIFICATIONS AMPLIFIER OUTPUT POWER 320 W (RMS) DISTORTION (@ 1 KHZ, NOMINAL POWER) < 0.3 % PRESENCE CONTROL (INPUTS 1 ÷ 4) + 9.5 dB @ 2.2 kHz HIGH-PASS FILTER (INPUTS 1 ÷ 4) 150 Hz INPUTS 1 ÷ 4, LINE Input nominal sensitivity –... - Page 35 RADIO 87.5 ÷ 108 MHz FM range 30 Hz ÷ 15 kHz FM frequency response ≥ 30 dB FM channel separation (1 khz) FM intermediate rejection ≥ 70 dB FM image rejection ≥ 50 dB FM signal / noise ratio ≥...
-
Page 36: Examples Of Connections
EXAMPLES OF CONNECTIONS A. 3-zone paging system by using the internal amplifier only (the music is not held in non-paged zones). An emergency microphone (with highest priority) is connected to the input 1, a BM 3001 paging microphone to the input 2 and a line made of BM 3003 to the input 3. 70 - 100 V 70 - 100 V BM 3003... - Page 37 C. Mix of 4 microphones (with separated volume controls). Only the DIRECT OUT (70 - 100 V) is connected to loudspeakers. The 4 Ω output (max. 2 W) allows the connection of a monitor loudspeaker. 70 - 100 V 4 ohm monitor (2 W)
-
Page 38: Avvertenze Per La Sicurezza
L’installazione e l’utilizzo errati del prodotto esimono la RCF S.p.A. da ogni responsabilità. ATTENZIONE: Per prevenire i rischi di fiamme o scosse elettriche, non esporre mai questo prodotto alla pioggia o all’umidità. - Page 39 Verificare inoltre l’idoneità del supporto (parete, soffitto, struttura ecc., al quale è ancorato il prodotto) e dei componenti utilizzati per il fissaggio (tasselli, viti, staffe non fornite da RCF ecc.) che devono garantire la sicurezza dell’impianto / installazione nel tempo, anche considerando, ad esempio, vibrazioni meccaniche normalmente generate da un trasduttore.
-
Page 40: Descrizione
(min. 4 Ω, potenza max.: 2 W). Come espansione (opzionale) del sistema, è prevista la connessione di un secondo amplificatore generico (di potenza adeguata al carico dei diffusori, ad esempio RCF UP 2321) per il mantenimento della musica di sottofondo nelle zone non interessate dagli annunci microfonici;... -
Page 41: Pannello Frontale
PANNELLO FRONTALE IMPORTANTE: dopo aver premuto un tasto tra AUX IN , INTERNAL GENERAL , PAGING , MUSIC , occorre attendere circa 10 secondi affinché le modifiche alla configurazione siano attuate. Controlli del volume di ciascun ingresso universale 1, 2, 3, 4 Nel caso uNo o più... - Page 42 Indicatori luminosi (LED) ON verde: l’apparecchio è acceso PROT rosso: l’apparecchio è in protezione per sovraccarico arancio: l’apparecchio è in protezione per riscaldamento eccessivo PRIOR giallo: indica l’inserimento di qualsiasi priorità (VOX, ingressi univ., SEQ. CMD.). SIG/PK verde: il livello del segnale audio è superiore ad almeno –15 dB verde + rosso: il livello del segnale audio è...
-
Page 43: Pannello Posteriore
PANNELLO POSTERIORE 30 31 15 13 2 ingressi relativi ai canali 2 e 3 con prese RJ 45. A ciascun ingresso si può collegare: una sola base microfonica dedicata BM 3001 oppure una sola base microfonica BM 3003 (3 zone) oppure una catena di max. - Page 44 Impostazione dei microinterruttori 3 e 4: SENSIBILITA’ ESEMPI DI POSSIBILI DIP 3 DIP 4 MODO D’INGRESSO COLLEGAMENTI Base microfonica BM 3003, lettore LINEA 0 dBu CD/MP3, radio, riproduttore di messaggi, centrale telefonica LINEA con – 20 dBu Base microfonica BM 3001 PHANTOM MIC.
- Page 45 Uscita audio (con connettore RCA) PAGING OUT All’uscita PAGING OUT, è presente la miscelazione dei canali 1,2,3,4 (senza eventi di priorità in corso) o il singolo ingresso (1 ÷ 4) attivato da priorità o la melodia di preavviso “CHIME” (attivata da qualunque priorità, se abilitata) o il suono impostato per il comando SEQUENTIAL COMMAND L’uscita è...
- Page 46 OFF: La priorità del canale 3 rimane SMART INPUT 3: la priorità del attiva solo quando il relativo canale 3 è controllata da un OFF – comando è presente. interruttore elettronico interno SMART INPUT 3 Nota: impostare su OFF se bi-stabile (on / off) che commuta ad all’ingresso 3 sono collegate 1 o ogni comando ad impulso.
- Page 47 Controllo (trimmer regolabile tramite un piccolo cacciavite) CHIME LEVEL del volume della melodia di preavviso “chime”. Comando SEQUENTIAL COMMAND con connettore rimovibile (attivo quando i due contatti sono cortocircuitati) per l’invio ripetitivo ed al massimo del volume della melodia di preavviso “chime” (selezionabile tramite il dip-switch nr.7, vedere la tabella al punto ) oppure di un segnale d’allarme (selezionabile tramite il dip-switch nr.8, vedere la tabella al punto Contatti di un relè...
-
Page 48: Modalità Di Funzionamento
2. DOPPIA AMPLIFICAZIONE “A”: è previsto il collegamento ad un amplificatore esterno addizionale (es. RCF UP 2321) dedicato per i soli annunci (mentre quello interno è utilizzato per la diffusione della sola musica);... -
Page 49: Priorità
a sorgeNte Musicale iNterNa o esterNa può essere attivata disattivata traMite i pulsaNti posti sul paNNello froNtale PROCEDERE SECONDO QUEST’ORDINE: a. assicurarsi che i “dip-switch” PRESET 9 e 10 siano entrambi su OFF (o entrambi su ON); b. assicurarsi che i “dip-switch” PRESET 11 e 12 siano entrambi su ON;... - Page 50 LA MODALITÀ DI ATTUAZIONE DELLA PRIORITÀ (INCLUSA LA FUNZIONE VOX) È IMPOSTATA TRAMITE IL DIP-SWITCH 3 DEL GRUPPO PRESET DIP 3 MODO È accettato solo il comando di priorità attivato per primo in uno dei 4 canali (eventualmente anche la funzione VOX, se abilitata mediante il dip-switch 4 PRESET ).
- Page 51 LA DIFFUSIONE DEGLI ANNUNCI SULLE 3 ZONE È SOGGETTA ALLE SEGUENTI REGOLE: Se il tasto GENERAL è attivo, quando l’attivazione della priorità avviene da uno dei canali 1 ÷ 4 oppure da una base microfonica BM3001, la diffusione dell’annuncio è generale (su tutte le 3 zone) in modo OVERRIDE (a prescindere da qualunque altra impostazione).
-
Page 52: Funzionamento Con Doppia Amplificazione ("A")
FUNZIONAMENTO CON DOPPIA AMPLIFICAZIONE (“A”) In questa modalità, è previsto il collegamento ad un amplificatore esterno addizionale (es. RCF UP 2321) dedicato per i soli annunci (mentre quello interno è utilizzato per la diffusione della sola musica). ES 3323: MUSICA AMPLIFICATORE ESTERNO: ANNUNCI Per i collegamenti e le impostazioni necessari: vedere la sezione “Collegamento... -
Page 53: Funzionamento Con Doppia Amplificazione ("B")
FUNZIONAMENTO CON DOPPIA AMPLIFICAZIONE (“B”) In questa modalità, è previsto il collegamento ad un amplificatore esterno addizionale (es. RCF UP 2321) dedicato per la sola musica (mentre quello interno è utilizzato per la diffusione dei soli annunci). ES 3323: ANNUNCI AMPLIFICATORE ESTERNO: MUSICA Per i collegamenti e le impostazioni necessari: vedere la sezione “Collegamento... - Page 54 - DIP 11 su ON (abilita i segnali dei canali 1÷4 verso l’amplificatore interno); - DIP 12 su OFF (musica disattivata verso l’amplificatore interno). ESEMPIO DI COLLEGAMENTO AD UN AMPLIFICATORE RCF UP 2321: - collegare l’uscita MUSIC OUT all’ingresso audio AUX INPUT dell’amplificatore addizionale UP 2321;...
-
Page 55: Ulteriori Informazioni
ULTERIORI INFORMAZIONI “SEQUENTIAL COMMAND” Il comando SEQUENTIAL COMMAND ha la priorità massima ed attiva la riproduzione continua (verso tutte le zone) della melodia di preavviso “chime” (corta o lunga, a seconda dell’impostazione del dip-switch 7 del gruppo PRESET ) oppure del segnale d’allarme (configurabile tramite il dip-switch 8 del gruppo PRESET ) in modo OVERRIDE. -
Page 56: Basi Microfoniche Rcf Bm 3001 E Bm 3003
BASI MICROFONICHE RCF BM 3001 E BM 3003 I canali 2 e 3 hanno ciascuno un ingresso con connettore RJ 45, al quale è possibile collegare 2 tipi di basi microfoniche RCF (non incluse): - BM 3001 (per soli annunci generali);... - Page 57 USO DEL LETTORE CD/USB – MP3/WMA E SINTONIZZATORE RADIO NOTE SUI COMPACT DISC - Usare solo CD audio, CD-R e CD-RW da 12 cm; quelli da 8 cm non possono essere utilizzati. - Non usare CD danneggiati o con forma irregolare. - Tenere i CD puliti ed afferrarli sempre dal bordo (senza toccarne la superficie con le dita).
- Page 58 Pulsante FM/AM: selezione della banda del sintonizzatore tra modulazione di frequenza FM (3 gruppi: FM1, FM2, FM3) ed onde medie in modulazione d'ampiezza AM (2 gruppi: MW1, MW2). Controllo (di tipo “encoder”) di volume e pulsante per la selezione dei parametri. Se ruotato in senso orario, aumenta il volume del (solo) lettore CD/USB –...
- Page 59 Pulsante RPT “ripetizione” (solo CD audio e file MP3 / WMA) CD audio: attiva RPT TRK / disattiva RPT OFF la (continua) ripetizione della traccia selezionata. File MP3 / WMA: RPT TRK (ripetizione continua della traccia selezionata) → RPT FOLD (ripetizione continua, in sequenza, delle tracce della sola cartella “folder”...
- Page 60 Pulsante TA/AF “traffic announcements / alternative frequency” (annunci sul traffico e frequenza alternativa, solo radio FM) Alcune emittenti radiofoniche con servizio RDS (“Radio Data System”) forniscono periodicamente anche informazioni sul traffico; tali stazioni sono identificabili tramite l'indicazione TP sul display. Se il pulsante è...
- Page 61 Display (LCD) Informazioni radio: il gruppo selezionato (FM1, FM2, FM3, MW1, MW2), la frequenza e se questa corrisponde ad un locazione di memoria (indicata nell’angolo in basso a destra). POP – CLAS – ROCK – JAZZ: selezione corrente DSP (equalizzazione della musica).
- Page 62 TA VOL : imposta il volume prefissato (tra i valori 12 e 45) per gli annunci sul traffico. RETUNE : impostazione del tempo d’intervallo tra una ricerca automatica (TA SEEK) e quella successiva di una stazione radio che fornice informazioni sul traffico. Se impostato su S: il tempo d’intervallo tra due ricerche è...
- Page 63 2. sempre sul dispositivo esterno, avviare la ricerca di apparecchi con “Bluetooth” attivo; dovrebbe apparire la scritta “RCF”; 3. abbinare il dispositivo esterno ad “RCF” inserendo il codice (/ password) “1234”; 4. avviare la riproduzione di un file audio sul dispositivo esterno, il quale dovrebbe ora essere incluso tra le sorgenti del lettore (usare il tasto SRC per cambiare sorgente).
- Page 64 Durante l’uso, puntare il telecomando (tenendolo per il verso giusto) in direzione dell’apparecchio. ON-OFF Accensione o spegnimento del (solo) lettore / radio. Stessa funzione del controllo di volume quando premuto. ▲(+)▼(–) Stessa funzione del controllo di volume quando ruotato. │◄◄ (back) Stessa funzione del rispettivo tasto sul pannello frontale.
-
Page 65: Collegamento Dei Diffusori Acustici
COLLEGAMENTO DEI DIFFUSORI ACUSTICI USCITE DIRETTE “DIRECT OUTPUTS” Utilizzare una sola uscita tra le 2 disponibili: 100 V, 70 V USCITE A TENSIONE COSTANTE 70 / 100 V - Ogni diffusore deve avere un trasformatore di linea con tensione d’ingresso uguale a quella della linea (70 / 100 V). - Page 66 USCITE DI ZONA “ZONE OUTPUTS” Ciascuna zona dispone di un’uscita separata a tensione costante 100 V / 70 V. L’apparecchio è normalmente predisposto in modo che la tensione (comune) alle 3 uscite di zona sia 100 V; per selezionare 70 V, contattare un centro d’assistenza autorizzato. - Ogni diffusore deve avere un trasformatore di linea con tensione d’ingresso uguale a quella della linea (70 / 100 V).
-
Page 67: Cambio Tensione Di Funzionamento Dell'apparecchio
CAMBIO TENSIONE DI FUNZIONAMENTO DELL’APPARECCHIO ’ e segueNti operazioNi devoNo essere effettuate direttaMeNte dall uteNte Togliere la tensione dall’apparecchio (staccando il cavo d’alimentazione dalla presa di rete). Rimuovere il coperchio superiore dell’apparecchio. Il circuito di alimentazione si trova sotto lo schermo metallico forato (vedere la foto 1), il quale va rimosso svitando le 2 viti. -
Page 68: Specifiche Tecniche
SPECIFICHE TECNICHE AMPLIFICATORE POTENZA D’USCITA 320 W (RMS) DISTORSIONE (A 1 KHZ, POTENZA NOMINALE) < 0,3 % CONTROLLO PRESENCE (INGRESSI 1 ÷ 4) + 9,5 dB @ 2,2 kHz FILTRO PASSA-ALTO (INGRESSI 1 ÷ 4) 150 Hz INGRESSI 1 ÷ 4, LINEA Sensibilità... - Page 69 RADIO 87,5 ÷ 108 MHz Banda FM 30 Hz ÷ 15 kHz Risposta in frequenza FM ≥ 30 dB Separazione tra canali FM (1 kHz) Reiezione intermedia FM ≥ 70 dB Reiezione immagine FM ≥ 50 dB Rapporto segnale / rumore FM ≥...
-
Page 70: Esempio Collegamenti
ESEMPIO COLLEGAMENTI A. Sistema per annunci su 3 zone utilizzando il solo amplificatore interno (la musica non è mantenuta nelle zone non selezionate durante un annuncio). Sono previsti: un microfono di emergenza prioritario collegato all’ingresso 1, una base microfonica BM 3001 (ingresso 2) ed una catena di BM 3003 per gli annunci (ingresso 3). - Page 71 C. Miscelazione di 4 microfoni (con controlli di livello separati) ed utilizzo della sola uscita diretta (70 - 100 V) per i diffusori acustici. L’uscita 4 Ω (max. 2 W) permette l’ascolto del programma diffuso tramite un diffusore monitor dedicato. 70 - 100 V 4 ohm monitor (2 W)
- Page 72 Except possible errors and omissions. RCF S.p.A. reserves the right to make modifications without prior notice. Salvo eventuali errori ed omissioni. RCF S.p.A. si riserva il diritto di apportare modifiche senza preavviso. HEADQUARTERS: RCF S.p.A. Italy tel. +39 0522 274 411 e-mail: info@rcf.it...
Need help?
Do you have a question about the ES 3323-II - and is the answer not in the manual?
Questions and answers