Table of Contents
Advertisement
Quick Links
model g0705
mill/drill w/stand
oWner's manual
Copyright © MarCh, 2010 By grizzly industrial, inC. revised april, 2013 (tr)
Warning: no portion of this manual may be reproduced in any shape
or form Without the Written approval of grizzly industrial, inc.
(For Models ManuFaCtured sinCe 09/09) #JB12469 printed in China
Advertisement
Table of Contents

Related Manuals for Grizzly G0705


Summary of Contents for Grizzly G0705
- Page 1 Copyright © MarCh, 2010 By grizzly industrial, inC. revised april, 2013 (tr) Warning: no portion of this manual may be reproduced in any shape or form Without the Written approval of grizzly industrial, inc.
- Page 2 This manual provides critical safety instructions on the proper setup, operation, maintenance, and service of this machine/tool. Save this document, refer to it often, and use it to instruct other operators. Failure to read, understand and follow the instructions in this manual may result in fire or serious personal injury—including amputation, electrocution, or death.
-
Page 3: Table Of Contents
8: Wiring ........45 Circuit information ..........10 Wiring safety instructions ......45 Circuit requirements for 220v ......10 g0705 Wiring diagram ........ 46 Circuit requirements for 110v ......10 grounding requirements ........11 section 9: parts ........48 extension Cords .......... -
Page 4: Introduction
Any updates to your model tionary on the table while the cutting tool is fed of machine will be reflected in these documents vertically into the workpiece with the movement of as soon as they are complete. -
Page 5: Identification
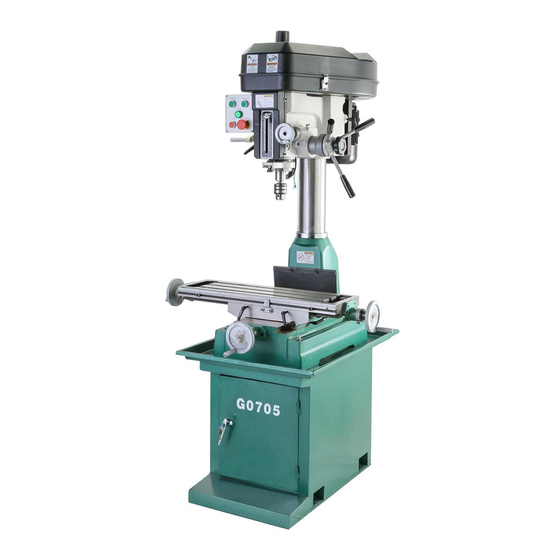
1. Model g0705 identification. a. Control panel m. longitudinal travel lock b. drawbar & Cap n. Cabinet stand c. Belt Cover o. Mounting Bolt hole d. Motor p. Cabinet door e. Coarse downfeed lever Q. -
Page 6: Machine Data Sheet
MACHINE DATA SHEET Customer Service #: (570) 546-9663 · To Order Call: (800) 523-4777 · Fax #: (800) 438-5901 MODEL G0705 DRILL/MILL WITH STAND 29 INCH X 8 INCH TABLE Product Dimensions: Weight................................617 lbs. Width (side-to-side) x Depth (front-to-back) x Height............41-5/8 x 40-1/2 x 43-1/4 in. - Page 7 The information contained herein is deemed accurate as of 7/7/2014 and represents our most recent product specifications. Model G0705 PAGE 2 OF 3 Due to our ongoing improvement efforts, this information may not accurately describe items previously purchased. Model G0705 (Mfg. since 09/09)
- Page 8 The information contained herein is deemed accurate as of 7/7/2014 and represents our most recent product specifications. Model G0705 PAGE 3 OF 3 Due to our ongoing improvement efforts, this information may not accurately describe items previously purchased. Model G0705 (Mfg. since 09/09)
-
Page 9: Section 1: Safety
Model G0705 (Mfg. since 09/09) - Page 10 Contact our debris. Make sure they are properly installed, technical support at (570) 546-9663. undamaged, and working correctly. Model G0705 (Mfg. since 09/09)
-
Page 11: Additional Safety For Mill/Drills
injury. -
Page 12: Section 2: Power Supply
....... 110v/120v meets the requirements in the following section. cycle ............60 hz phase ........... single-phase circuit rating ........20 amps plug/receptacle ......nema 5-20 -10- Model G0705 (Mfg. since 09/09) -
Page 13: Grounding Requirements
3. typical 5-20 plug and receptacle. page. If the diagram included on the motor con- flicts with the one in this manual, the motor may have changed since the manual was printed. Use the diagram provided on the motor. -11- Model G0705 (Mfg. since 09/09) -
Page 14: Conversion
For 110V, Contactor Type 3TB41 22-OX, Coil Voltage 110V/60Hz/1PH, SIEMENS (Contactor is wired the same for 110V/220V) 110v conversion 13NO 14NO 21NC the Model g0705 can be converted for 110v 22NC 31NC operation. this conversion job consists of dis- 32NC To Motor... - Page 15 8. Jumper positions on terminal block. Cord Rewired for 110V Ground install the two 110v contactors from the Neutral Model g0705 110v Conversion Kit in place of the contactors you removed in step 4. 110 VAC 5-20 Plug Ground...
- Page 16 11, making sure all wires are secured in the same positions they were originally in, as shown in figure 8. refer to section 8: Wiring starting on page 45 for detailed wir- ing diagrams. -14- Model G0705 (Mfg. since 09/09)
-
Page 17: Section 3: Setup
(rated for at least 750 lbs.) ......1 cess! • another person .......... 1 unpacking the model g0705 is a heavy machine. serious personal injury may occur Your machine was carefully packaged for safe if safe moving meth- transportation. Remove the packaging materials ods are not used. -
Page 18: Inventory
M12-1.75 ........4 lost in packaging materials while unpack- • Cap screws M6-1 x 16 ....... 3 ing or they are pre-installed at the factory. • Flat Washers 6mm ........3 • drawbar ............1 -16- Model G0705 (Mfg. since 09/09) -
Page 19: Cleanup
13. t23692 orange power degreaser. off the rest with the rag. repeat steps 2–3 as necessary until clean, then coat all unpainted surfaces with a quality metal protectant to prevent rust. -17- Model G0705 (Mfg. since 09/09) -
Page 20: Site Considerations
Shadows, glare, or strobe effects that may distract access restricted location. or impede the operator must be eliminated. Wall 30" 39" 44" 42" 61.5" figure 14. space required for full machine range of motion and maintenance. -18- Model G0705 (Mfg. since 09/09) -
Page 21: Mounting Options
-19- Model G0705 (Mfg. since 09/09) -
Page 22: Using Machine Mounts
Must follow the anchoring methodology specified by the code. Lag Screw Flat Washer Machine Base Lag Shield Anchor Concrete Drilled Hole figure 17. popular method for anchoring machinery to a concrete floor. -20- Model G0705 (Mfg. since 09/09) -
Page 23: Mounting To A Workbench
Model g0705 consists of attach- ing the three handwheel handles to the machine. the base of this machine has mounting holes... -
Page 24: Moving & Placing Machine
-22- Model G0705 (Mfg. since 09/09) -
Page 25: Test Run
Make sure all tools and objects used during setup are cleared away from the machine. Connect the machine to the power source. -23- Model G0705 (Mfg. since 09/09) -
Page 26: Break-In
29. turn the spindle ON and let it run for a mini- mum of 10 minutes. repeat this step for each rpM setting. refer to speed changes on page 29. -24- Model G0705 (Mfg. since 09/09) -
Page 27: Section 4: Operations
Wears safety glasses or a face shield. regardless of the content in this section, grizzly industrial will not be held liable for accidents caused by lack of training. -25- Model G0705 (Mfg. since 09/09) -
Page 28: Basic Controls
Knob: engages/disengages the micro- adjustment handwheel. Quill downfeed levers: provide coarse control over vertical spindle travel. Fine downfeed handwheel locking Knob Quill downfeed levers figure 24. spindle controls. -26- Model G0705 (Mfg. since 09/09) - Page 29 Button Forward Button headstock Motor power lock nuts locking indicator lever stop Button figure 26. Headstock controls. emergency stop Button figure 28. Control panel. -27- Model G0705 (Mfg. since 09/09)
-
Page 30: Calculating Spindle Speed For Milling
29. Cutting speed table for hss cutting undue strain on moving parts, shorten tool tools. life, and create poor workpiece results. -28- Model G0705 (Mfg. since 09/09) -
Page 31: Speed Changes
(figure 31) that hold the idler pul- ley in place so it can move freely. the Model g0705 is capable of twelve different speed settings. different types of cuts and materi- als require varying speeds. refer to the chart in figure 29 for appropriate cutting speeds. -
Page 32: Calculating Spindle Speed For Drilling
Aluminum Mild Steel Carbide Insert Type One-Piece Type 1800 Tenon/Plug Cutters Soft Wood Hard Wood Plastic Brass Aluminum Mild Steel 3/8" – 1/2" 1200 1000 5/8" – 1" figure 33. drill bit speed chart. -30- Model G0705 (Mfg. since 09/09) -
Page 33: Spindle Height
"0" lines up with the index line. tighten the thumb screw. the Model g0705 has coarse downfeed levers and a micro-adjustment handwheel. to operate turn the handwheel according to the distance the downfeed levers, simply pull forward and you want to move the quill downward. -
Page 34: Loading Tooling
Be sure to protect your hands from the cutter with leather gloves or a shop rag. the Model g0705 features an r-8 spindle that accepts r-8 collets and arbors. Continue to tighten the drawbar until both the collet and cutter or arbor are tightly in place. -
Page 35: Drill Chuck Arbor
Model g0705 includes two adapters that will and Mt#3 drill chuck. Before use, the drill chuck allow the use of Mt#3 and Mt#2 tooling. a drift must be installed onto the arbor. -
Page 36: Headstock Position
Model ward movement by the drill bit or cutter. Maximum g0705 can be adjusted for various applications. depth is 4 ⁄ ". -
Page 37: Graduated Dials
Cross handwheel thumb graduated dial figure 42. table X- and y-axis controls. screw X-axis table lock levers X-axis scale handwheel figure 44. graduated dial. y-axis table lock lever figure 43. table locks and scales. -35- Model G0705 (Mfg. since 09/09) -
Page 38: Section 5: Accessories
10 second vernier scales, gear drives with oil immersion and satin chrome dials. see the current grizzly catalog for full specifica- tions. Features: 4.330" overall height (horizontal), 6.750" height to center hole (vertical), #3 Morse taper, 0.465"... - Page 39 Features 2 flute ball nose end mills. includes the following sizes: ", ", ", ", ", ", ", " ". figure 53. h8370 power Feed. figure 51. g9765 9 pC. Ball end Mill set. -37- Model G0705 (Mfg. since 09/09)
-
Page 40: Section 6: Maintenance
® • Check for worn or damaged wires. grizzly catalog or website). • Check for any other unsafe condition. monthly check: • Check that gibs are adjusted properly. biannual check: • lubricate table leadscrews. -38- Model G0705 (Mfg. since 09/09) -
Page 41: Lubrication
54. Ball oiler locations. -39- Model G0705 (Mfg. since 09/09) - Page 42 Pulley figure 57. Belt tension. -40- Model G0705 (Mfg. since 09/09)
-
Page 43: Section 7: Service
7. Machine is incorrectly mounted or sits 7. tighten/replace mounting bolts in bench; relocate/ unevenly. shim machine. 8. Motor bearings are at fault. 8. test by rotating shaft; rotational grinding/loose shaft requires bearing replacement. -41- Model G0705 (Mfg. since 09/09) - Page 44 3. Check for proper direction of cutting rotation for tool. cutting tool. 4. Workpiece not securely clamped. 4. secure properly to the table. 5. spindle extended too far down. 5. Fully retract spindle and lower headstock. this increases rigidity. -42- Model G0705 (Mfg. since 09/09)
-
Page 45: Gibs
Knob gib using the longitudinal gib screws on the left and right sides of the table base. figure 59. spring cover. -43- Model G0705 (Mfg. since 09/09) -
Page 46: Leadscrew Backlash
0.003" is impractical and will add unneces- the X-axis leadscrew. sary wear to both the leadscrews and the adjust- ers. -44- Model G0705 (Mfg. since 09/09) -
Page 47: Section 8: Wiring
Technical source. Support at (570) 546-9663. The photos and diagrams included in this section are best viewed in color. You can view these pages in color at www.grizzly.com. -45- Model G0705 (Mfg. since 09/09) -
Page 48: G0705 Wiring Diagram
110V/220V) Start Capacitor Capacitor 20 MFD 150 MFD 450 VAC 250 VAC Ground To Electrical Box Cord Rewired for 110V Ground Neutral 110 VAC 5-20 Plug Ground 6-15 Plug (As Recommended) (As Recommended) -46- Model G0705 (Mfg. since 09/09) -
Page 49: Electrical Box
Indicator Light Type XDJ2(J) 220V AC Indicator Light Type XDJ2(J) 110V AC To Plug (Indicator is wired the same for 110V/220V) Motor electrical Box POWER INDICATOR LAMP EMERGENCY STOP STOP BUTTON BUTTON figure 62. Electrical component locations. -47- Model G0705 (Mfg. since 09/09) -
Page 50: Section 9: Parts
9: parts headstock parts breakdown -48- Model G0705 (Mfg. since 09/09) -
Page 51: Headstock Parts List
DEPTH STOP ASSEMBLY P0705043 LOCK WASHER 1/4 P0705016 DEPTH STOP ADJUSTER P0705044 KNOB BOLT M8-1.25 X 12 P0705017 CAP SCREW 1/4-20 x 2 P0705045 WORM SHAFT P0705018 HEX NUT 1/4-20 P0705046 WORM SHAFT BUSHING -49- Model G0705 (Mfg. since 09/09) - Page 52 CAP SCREW M6-1 X 12 P0705076 FLAT WASHER 5/16 P0705102 PROTECTIVE PLATE P0705077 HEX BOLT 5/16-18 X 5/8 P0705113 CHUCK B16 1-13MM P0705078 CAP SCREW 1/4-20 X 1/2 113-1 P0705113-1 DRL CHK KEY 7.92MM STD 11T SD-15.93MM -50- Model G0705 (Mfg. since 09/09)
-
Page 53: Base Parts Breakdown
-51- Model G0705 (Mfg. since 09/09) -
Page 54: Base Parts List
CAP SCREW 5/16-18 X 3/4 P0705221 DUST COVER PLATE P0705244 LOCK WASHER 5/16 P0705222 DUST COVER P0705245 DRAIN PLUG P0705223 LONGITUDINAL GIB P0705246 HEX BOLT M10-1.5 X 140 P0705224 CROSS GIB P0705247 CABINET ASSEMBLY P0705225 TABLE CENTER STOP -52- Model G0705 (Mfg. since 09/09) -
Page 55: Electrical Components Breakdown & List
EMERGENCY STOP BUTTON P0705302 TERMINAL BLOCK ASSEMBLY P0705308 REVERSE BUTTON P0705303 CONTACTOR SIEMENS 3TB41 220V P0705309 GROUNDING BLOCK P0705304 FORWARD BUTTON P0705310 FUSE 12A P0705305 POWER INDICATOR LAMP 220V P0705311 CONVERSION KIT 110V P0705306 STOP BUTTON -53- Model G0705 (Mfg. since 09/09) -
Page 56: Labels Breakdown And List
(800) 523-4777 or www.grizzly.com to order new labels. -54-... -
Page 57: Warranty Card
Would you recommend Grizzly Industrial to a friend? _____ Yes _____No Would you allow us to use your name as a reference for Grizzly customers in your area? Note: We never use names more than 3 times. _____ Yes _____No 10. - Page 58 FOLD ALONG DOTTED LINE Place Stamp Here GRIZZLY INDUSTRIAL, INC. P.O. BOX 2069 BELLINGHAM, WA 98227-2069 FOLD ALONG DOTTED LINE Send a Grizzly Catalog to a friend: Name_______________________________ Street_______________________________ City______________State______Zip______ TAPE ALONG EDGES--PLEASE DO NOT STAPLE...
-
Page 59: Warranty And Returns
WARRANTY AND RETURNS Grizzly Industrial, Inc. warrants every product it sells for a period of 1 year to the original purchaser from the date of purchase. This warranty does not apply to defects due directly or indirectly to misuse, abuse, negligence, accidents, repairs or alterations or lack of maintenance.
Need help?
Do you have a question about the G0705 and is the answer not in the manual?
Questions and answers