Heatmiser TM1-TS WiFi RF User Manual
Hide thumbs
Also See for TM1-TS WiFi RF:
- Operating instructions manual (24 pages) ,
- Instruction manual (13 pages)
Table of Contents
Advertisement
Quick Links
Advertisement
Table of Contents

Related Manuals for Heatmiser TM1-TS WiFi RF


Summary of Contents for Heatmiser TM1-TS WiFi RF
- Page 1 Model: TM1-TS WiFi RF Model: TM1-TS WiFi RF...
-
Page 2: Table Of Contents
Model: TM1-TS WiFi RF Table of Contents Product Image Operating Modes Table of Contents Setting the Operating Mode Installation Procedure Clean Screen LCD Display Locking the Time Clock WiFi Setup Holiday Programming Security Types and Compatibility 9-10 Programming 5/2 Day &... -
Page 3: Model: Tm1-Ts Wifi Rf
Terminate the time clock as shown in the diagrams on pages 28-30 of this booklet. Step 3 Screw the time clock back plate securely into the back box. Step 4 Clip the front of the time clock back onto the time clock back plate. Time Clock Series Model: TM1-TS WiFi RF... -
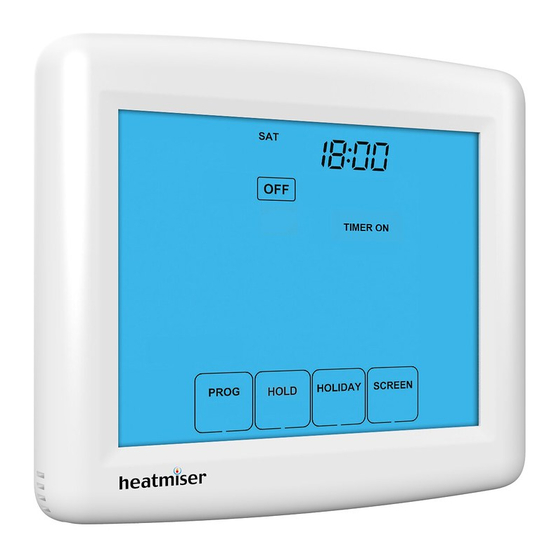
Page 4: Lcd Display
Cancel - Used to exit setup/program operations. Setup/Programming Keys - Used to navigate setup options. Timer Status - Displays the current status of the timed output. Comfort Level Selection Keys - Used in comfort level setup (see page 17). Time Clock Series Model: TM1-TS WiFi RF... - Page 5 IP address of the Multi-Link. Log into your wireless router and navigate to the LAN settings page. Time Clock Series Model: TM1-TS WiFi RF...
-
Page 6: Security Types And Compatibility
These restrictions are common to most routers but you should refer to the router G model routers. manual for specific restrictions that apply to your model. Time Clock Series Model: TM1-TS WiFi RF... -
Page 7: Remote Access Via Web App
You will be asked to enter a password and username. These are both set to “admin” as default. We recommend you change these settings to ensure the security of your system. For further information, click the help link within the browser. Time Clock Series Model: TM1-TS WiFi RF... -
Page 8: Pairing With The Rc1-W Receiver
Use the Up key to select 08 (Zone Number) ..............• You are able to connect two TM1-TS WiFi RF time clocks to one RC1-W receiver. Use the Up/Down keys to select the zone this time clock controls (01 or 02) ...................... -
Page 9: Pairing With The Uh1-W
Use the Up/Down keys to select the zone this time clock • controls (01 - 08) ......................• Press the Up key at the top of the screen to select feature 09 ........Time Clock Series Model: TM1-TS WiFi RF... -
Page 10: Operating Modes
Mode Refer to the manufacturer instructions for wiring to these devices. Common time clock wiring requirements are shown in the diagrams on pages 28-30. Time Clock Series Model: TM1-TS WiFi RF... -
Page 11: Clean Screen
To cancel, press the bottom right corner of the display again for 10 secs. Holiday Icon Holiday Days Keypad Lock Indicator To cancel a Holiday setting, reduce the holiday time to 00 days. Time Clock Series Model: TM1-TS WiFi RF... -
Page 12: Programming 5/2 Day
• Use the Up/Down keys to set the ON time for TIME 1 ........• When complete, press DONE to confirm settings and exit .... • Press OFF ..........................Time Clock Series Model: TM1-TS WiFi RF... -
Page 13: Countdown Mode
Hold Time Hold Left Icon ON/OFF keys Timer Status (Flashes in Override) To cancel the Countdown, follow the same steps but reduce the time to 00:00. To cancel the Override, repeat the steps above. Time Clock Series Model: TM1-TS WiFi RF... -
Page 14: Optional Features Explained
Feature 16 - Programming Mode: This function allows you to select between 5/2 Mode, 7 number (shown above) and then use the Up/Down keys in the center to Day mode or Countdown timer. adjust the setting ......................• Press DONE to confirm settings and exit ..............Time Clock Series Model: TM1-TS WiFi RF... - Page 15 Neutral • Press the ON key once to turn the thermostat display back ON ......N.B. The TM1-TS WiFi RF is designed to work All icons displayed simultaneously. Factory reset is complete. with the RC1-W and the UH1-W. Please refer to the appropriate diagram for connections to your heating system.
-
Page 16: Wiring Diagram
Wiring Diagram - TM-TS WiFi RF with Wiring Diagram RC1-W Receiver, Combination Boiler System 2x TM1-TS WiFi RF with RC1-W Receiver Two Zone Heating System Heating Zone 1 Valve To Boiler P/L and S/L connections will vary To Boiler S/L P/L... - Page 17 Heating Professionals: Request a copy of our product installation guide containing detailed technical specifications for our complete product range: www.heatmiser.com/guide Want More Information? Call our support team on: +44 (0)1254 669090 Or view technical specifications directly on our website: www.heatmiser.com Twitter: heatmiseruk Facebook: facebook.com/thermostats...
Need help?
Do you have a question about the TM1-TS WiFi RF and is the answer not in the manual?
Questions and answers