Table of Contents
Advertisement
Quick Links
Advertisement
Table of Contents

Related Manuals for Heatmiser Touchpad (TFT)


Summary of Contents for Heatmiser Touchpad (TFT)
- Page 1 Model: Touchpad (TFT) Model: TFT...
-
Page 2: Table Of Contents
Model: Touchpad TFT Table of Contents Set-Up 1-10 Programmable Zones 20-24 Product Image Temperature Hold Table of Contents History Installation Procedure Temperature Control Initial Setup Editing the Comfort Levels 23-24 Setting the Clock Programmable Zones With 25-26 LCD Display 9-10 Hot Water Output Editing the Switching Times 25-26... -
Page 3: Model: Touchpad Tft
Installation Procedure Mount the touchpad at eye level. Read the instructions fully so you get the best from our product. Don’t Do not push hard on the LCD screen as this may cause irreparable damage. This Touchpad is designed to be flush mounted and requires a back box of 35mm (minimum depth) to be sunk into the wall prior to installation. -
Page 4: Initial Setup
Initial Setup Adding thermostats to your system Up to 32 thermostats can be connected to the Touchpad and these are added by performing a network scan. Prior to performing the scan, a communication number needs to be entered in each of the thermostats on the system. -
Page 5: Setting The Clock
Initial Setup Setting the Clock Entering a Room Title To set the clock, follow these steps. A room title of 13 characters can be entered for each room on the system. Press the Options tab. To enter a room title follow these steps. Press the Clock icon ........................ -
Page 6: Lcd Display
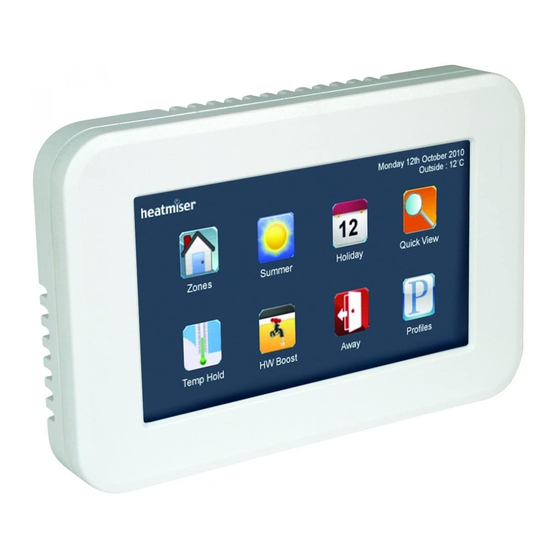
LCD Display My System: Provides access to view and control individual system zones. Summer: Disables the comfort levels when activated and defaults to frost protection. Holiday: Turns off the heating/hotwater for a set period. Quick View: Gives an overview of all stats on the system. Date and Time: Displays current date and time. -
Page 7: My System
My System My System Locking the Thermostat Pressing My System will show a list of all rooms on your system. This function allows you to lock the keypad on selected thermostats. To apply a keypad lock follow these steps. Rooms in blue indicate that the communication is working correctly. •... -
Page 8: Temperature Hold
My System My System Temperature Hold Set Back Mode (Frost Mode) The temperature hold function allows you to manually override the current operating The Set Back function allows you to place individual or multiple thermostats into program for a single or group of thermostats and set a different temperature for a Set Back Mode (also referred to as Frost Mode). -
Page 9: Timer Zones History
Timer Zones Timer Zones History Time clocks can be added to the network to provide control over many appliances, The history function enables you to see the hours run for the last 4 weeks. such as lighting, hot water and towel rails. This is displayed in a bar chart and gives you an indication of which zones are using the most energy. -
Page 10: Editing The Switching Times
Timer Zones Editing the Switching Times The Edit icon enables you to program the switching times for the selected time clock. Time clocks provide Weekday/Weekend or 7 Day Programming options. If the time clock shows Weekday/Weekend it is operating in 5/2 day mode, and if it shows each day of the week it is operating in 7 day mode. -
Page 11: Timer Override
Timer Zones Programmable Zones Override An override function is available on the time clock, enabling you to override the output Programmable zones show the actual room temperature, and if applicable a toggle for a number of hours. function to display the floor temperature. To apply an override follow these steps. -
Page 12: Temperature Hold
Programmable Zones Programmable Zones Temperature Hold (Individual Zone) History The temperature hold function allows you to manually override the current operating The history function on a programmable zone enables you to see the hours run as a program of a specific zone and set a different temperature for a desired period and temperature profile for the last 4 weeks. -
Page 13: Temperature Control
Programmable Zones To program the comfort levels follow these steps. Temperature Control • Press the Edit icon ....................... • Select a day or period ..................The set temperature can be adjusted by using the Up/Down keys. • Select a setting to program ..................•... - Page 14 To program the hot water switching times follow these steps. Programmable Zones with Hot Water Output • Press the Edit icon ....................... • Press the Hot Water key ....................These type of zones operate the same as Programmable Zones but have an For information on editing the comfort levels, see page 24 additional output for controlling a hot water cylinder.
-
Page 15: Holiday
Holiday Should you need to edit a scheduled holiday, follow these steps. • Press the Holiday icon ....................• Select the holiday you wish to edit. The holiday function reduces the set temperature in selected zones to the frost protection temperature setting. •... -
Page 16: Summer Mode
Temperature Hold (Multiple Zones) Summer Mode The Touchpad Summer mode offers a quick and easy way to place selected heating zones The temperature hold function allows you to manually override the current operating into set back without having to reprogram the comfort levels. The hot water times will program of multiple zones and set a different temperature for a desired period not be effected during summer operation. -
Page 17: Hot Water Boost
Hot Water Boost Home / Away Mode If you have thermostats with hot water function on your system, you can override Away mode places selected zones into setback mode indefinitely for use when you the hot water output. are unsure when the building will next be occupied. During an override, the thermostat will flash TIMER ON / HW ON depending on the The zones will control to the setback temperature during this time and the hot model of your thermostat. -
Page 18: Groups
Groups Using the Group function, zones can be assigned into groups allowing them to be collectively controlled. Using the Profiles function (see page 35), predefined settings can be quickly applied to all zones within a group. Up to 8 groups can be setup in the Touchpad. To create a group, follow these steps. •... -
Page 19: Profiles
Profiles Hot Water/Timer Profile (5/2 Day Mode): This type of profile allows you to program switching times for the weekday/weekend. See pages 17-18 (time clock) and 25-26 (hot water) for programming instructions. At least 1 Group must be created (see page 33) before the Profile can be accessed. Hot Water/Timer Profile (7 Day Mode): This type of profile allows you to program Profiles are predefined comfort levels and switching time settings that can be switching times for each day of the week. - Page 20 Profiles Continued Editing a Profile Running a Profile To edit a profile, follow these steps. To run a profile , follow these steps. • Press Profiles icon and press the profile icon again .......... • Press Profiles icon and press the profile icon again ......•...
-
Page 21: Touchpad Settings
Touchpad Settings Touchpad Settings Master Timer Security Setup The Touchpad has a security function that allows you to limit access, so for example The master timer function can only be used with non-programmable thermostats. zone settings cannot be altered without entering a code. During setup, you can select which zones should follow these times. - Page 22 The Touchpad firmware can be updated as and when new features are introduced. The set back temperature range is 07-17°C and is set to 12°C as default. Check the latest version by visiting the Support Section on www.heatmiser.com The set back temperature function enables you to set this for individual or all To perform the update the Touchpad has to remain powered up.
- Page 23 Notes Wiring Diagram - Touchpad to UH1 ....................................................................................................................................................................................................................................................................................................................................................................................TOUCHPAD CONNECTIONS TO UH1 ..................................This product must only be installed by a qualified electrician ..................................and comply with local installation regulations. Touchpad Model: TFT...
- Page 24 Notes Notes ................................................................................................................................................................................................................................................................................................................................................................................................................................................................................................................................................................................................................................................................................................................................................................................................................................................................................................................Touchpad Model: TFT...
- Page 25 Heating Professionals: Request a copy of our product installation guide containing detailed technical specifications for our complete product range: www.heatmiser.com/guide Want More Information? Call our support team on: +44 (0)1254 669090 Or view technical specifications directly on our website: www.heatmiser.com...
Need help?
Do you have a question about the Touchpad (TFT) and is the answer not in the manual?
Questions and answers