Table of Contents
Advertisement
Quick Links
Advertisement
Table of Contents

Related Manuals for Heatmiser TouchScreen Series


Summary of Contents for Heatmiser TouchScreen Series
- Page 1 Model: DT-TS / DT-NTS Model: DT-TS / DT-NTS...
-
Page 2: Table Of Contents
Installation Procedure Adjusting the Optional Settings LCD Display Optional Settings - Features Table Temperature Display Re-calibrating the Thermostat Clean Screen Factory Reset Wiring Diagrams 19-22 Locking the Keypad Temperature Control TouchScreen Series Model: DT-TS / DT-NTS Model: DT-TS / DT-NTS... -
Page 3: Model: Dt-Ts / Dt-Nts
– say 18°C , and then turn it up by 1°C each day until you are comfortable with the temperature. You won’t have to adjust the thermostat further. Any adjustment above this setting will waste energy and cost you more money. TouchScreen Series Model: DT-TS / DT-NTS... -
Page 4: Installation Procedure
Do not push hard on the LCD screen as this may cause irreparable damage. This Touchscreen Series thermostat is designed to be flush mounted and requires a back box of 35mm (minimum depth) to be sunk into the wall prior to installation. -
Page 5: Lcd Display
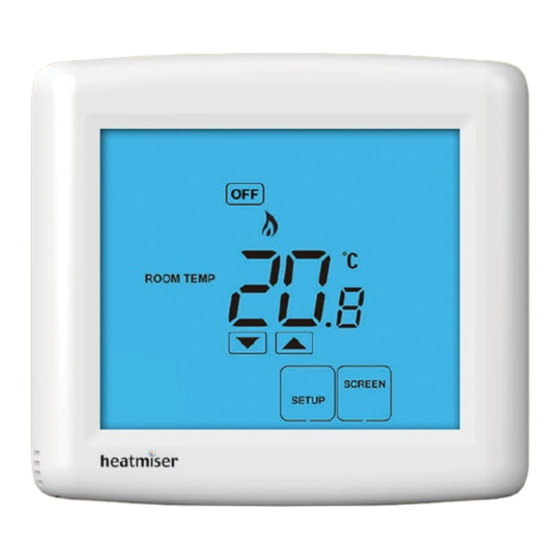
Setup/Programming Keys - Used to navigate setup options. Up/Down Keys - Increase or decrease values shown on bottom digit group. Current Temp - Indicates the current sensor temperature. Units of Temperature - Degrees Celsius or Fahrenheit. TouchScreen Series Model: DT-TS / DT-NTS... -
Page 6: Temperature Display
• To cancel, press the bottom right corner of the display again for 10 secs. Keypad Lock Indicator This is the current room temperature. This is the temperature you are trying to achieve in your home. TouchScreen Series Model: DT-TS / DT-NTS... -
Page 7: Temperature Control
Should the heating be turned on whilst in frost mode, the flame symbol will be displayed. Select the desired temperature and press to confirm and exit. To cancel the frost protect mode, press the key once. Frost Protection Mode Enabled Set Temperature Set Icon TouchScreen Series Model: DT-TS / DT-NTS... -
Page 8: Heating On/Off
Feature 05 – Output Delay: To prevent rapid switching, an output delay can be entered. This can be set from 00 - 15 minutes. The default is 00 which means there is no delay. *See Feature 3 on page 14 TouchScreen Series Model: DT-TS / DT-NTS... -
Page 9: Adjusting The Optional Settings
Use the Up/Down keys at the top of the screen to select the feature number (shown on page 17) and then use the Up/Down keys in the center to adjust the setting ..................• Press DONE to confirm settings and exit ............TouchScreen Series Model: DT-TS / DT-NTS... -
Page 10: Optional Settings - Features Table
Press and hold the bottom left corner of the LCD for 10 seconds ....... • All of the screen icons will appear for 2 seconds and then disappear. • Press the ON key once to turn the thermostat back ON ......... TouchScreen Series Model: DT-TS / DT-NTS... - Page 11 DT-TS to the boiler To connect boiler, consult DT-TS boiler makers wiring diagram LS & LR are normally the room thermostat connections For 230V Switched Live to Boiler on A2, link L to A1 TouchScreen Series Model: DT-TS / DT-NTS...
- Page 12 Connect the screen to Earth at the UH1. Back Box Depth - 35MM Max Load - 3 Amps 12VDC Network 12VDC Network DT-NTS DT-NTS For 230V switched live output, link mains L to C TouchScreen Series Model: DT-TS / DT-NTS...
- Page 13 Request a copy of our product installation guide containing detailed technical specifications for our complete product range: www.heatmiser.com/guide Want More Information? Call our support team on: +44 (0)1254 669090 Or view technical specifications directly on our website: www.heatmiser.com Twitter: heatmiseruk Facebook: facebook.com/thermostats TouchScreen Series...
Need help?
Do you have a question about the TouchScreen Series and is the answer not in the manual?
Questions and answers