Paradox Magellan MG5000 User Manual
Hide thumbs
Also See for Magellan MG5000:
- Programming manual (72 pages) ,
- User manual (32 pages) ,
- Reference & installation manual (69 pages)

Subscribe to Our Youtube Channel
Related Manuals for Paradox Magellan MG5000


Summary of Contents for Paradox Magellan MG5000
-
Page 1: User Guide
MG5000 MG5050 SP65 SP4000 SP5500 SP6000 SP7000 Always Armed, Never Disarmed User Guide... -
Page 2: Warning For Connections To Non-Traditional Telephony (E.g. Voip)
Paradox alarm equipment was designed to work effectively around traditional telephone systems. For those customers who are using a Paradox alarm panel connected to a non-traditional telephone system, such as "Voice Over Internet Protocol" (VoIP) that converts the voice signal from your telephone to a digital signal travel- ing over the Internet, you should be aware that your alarm system may not function as effectively as with tradi- tional telephone systems. -
Page 3: Table Of Contents
Table of Contents Warranty ..............0 Arming & Disarming............. 14 Limitations of Alarm Systems........0 Regular Arming ............14 Warning for Connections to Non-Traditional Sleep Arming ............14 Telephony (e.g. VoIP)......... 0 Stay Arming ............. 14 WARNINGS: Information to User....... 0 Bypassing a Zone ............ -
Page 4: User Settings
User Settings For security reasons, write only the user’s name and not their user code. 4-Digit Codes l 6-Digit Codes l Partition Partition Stay* Force* Arm* PGM* User # and Name Byp* Duress* only only 01: Master Mas- 02: Master 1 Mas- 03: Master 2 Mas- 04:________________________________________ 05:________________________________________... -
Page 5: Zone Settings
Zone Settings Write the device type (motion detector, door contact etc.) and location. Partition Entry Fire Fire Zone Number and Description Stay Sleep Force 24Hr 1 or 2 delay zone Delay 001:______________________________ _____ 002:______________________________ _____ 003:______________________________ _____ 004:______________________________ _____ 005:______________________________ _____ 006:______________________________ _____ 007:______________________________ _____ 008:______________________________ _____... -
Page 6: User Codes
User Codes User codes are personal identification numbers for each user that allow you to enter certain programming modes, arm or disarm your system, as well as activate or deactivate PGMs. The system supports the following: • 1 System Master Code •... -
Page 7: Setting The Time & Date
Setting the Time & Date How do I set the time & date? Press the [ ] key. Enter your [ MASTER CODE Press [ Press [5]. Enter time* in the [ ] format. If HH = 13 or more, skip to step 7. Select time format. -
Page 8: Trouble Display
Trouble Display Your alarm system continuously monitors several trouble conditions that can be reported directly to your moni- toring station. When a trouble condition occurs, the [ ] key will illuminate. Press the [ ] key, and the keypad will illuminate a number corresponding to the trouble the system is experiencing. Except for the Timer Loss trou- ble, contact your monitoring station or installer to resolve the trouble condition. -
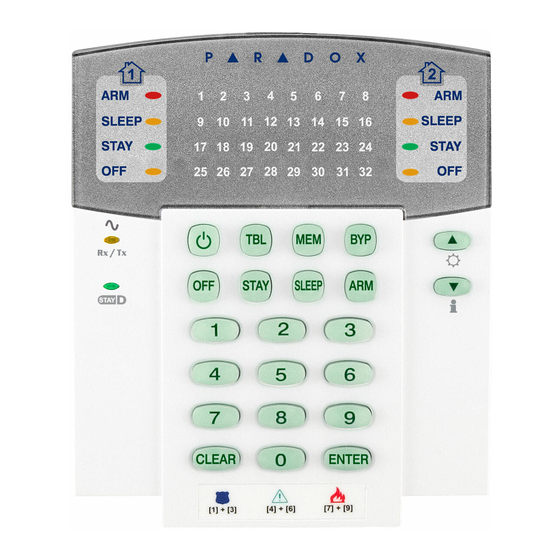
Page 9: Keypads
Keypads Auditory Feedback When you enter information on the keypad, it will guide you with beep tones that communicate confirmation or rejection of your entries. You should be familiar with these two keypad beep tones: Confirmation Beep: When an operation (e.g. arming/disarming) is successfully entered on the keypad or when the system switches to a new status/mode, the keypad produces an intermittent beep tone (“... -
Page 10: Keypad Backlight
Keypad Backlight The illumination level behind the keys can be modified to suit your needs. How do I modify the backlight? • For K32, K32+ and K32RF: Press and hold the [ ] key. Press the [ ] key to set the desired backlight level. Press [ ] or [ ] to exit. -
Page 11: Keypad Overviews
Keypad Overviews K636 Keypad Overview Trouble display (page 14) ON = Trouble(s) occurring (page 6) (page 14) SLEEP Alarm memory display (page 14) STAY ON = Alarm(s) occurred (page 17) ON = System armed Bypass programming OFF = Zone disarmed ON = Zone(s) bypassed (page 17) Flash = Exit Delay Fast Flash = Exit Delay (final 10 sec.) / zone in... - Page 12 K35 and K37 Keypad Overview = Press once + [ ] for MASTER CODE Quick Menu programming (see Master Quick Menus on page 24) = Press & hold for keypad settings = Press & hold for chime programming (see Setting Chime Zones on page 5) K35 and K37 Icon Display and Description Icon Description...
-
Page 13: K32/K32+ And K32Rf/K32Lcd+/K32Lcd Keypad Overview
K32, K32+ and K32RF Keypad Overview Partition 1 Status Partition 2 Status Partition 1 Status Partition 2 Status Partition 1 Status Partition 2 Status Zone Display: Off Key: StayD Light: Trouble display The keys [1] to [0(10)] correspond ON= Disarmed ON= StayD on ON = Trouble(s) occurring (page 6) to zones 1 to 10 respectively:... -
Page 14: Remote Controls
Remote Controls Your security system supports three types of remote controls; the REM1, REM2, REM3 and REM15. The REM1 and REM15 are the most basic remote controls, with the ability to perform five actions (e.g. arming, disarming, activating a PGM, etc.). The REM2 is more advanced, as it performs up to six different actions, as well as pro- vides visual and auditory feedback (see table below). -
Page 15: To Change Arm Mode
To turn off StayD mode: ] Off light on ] + [C ] + [O Press the [ ] key followed by a valid code, then press the [ ] key again within ten seconds. The StayD light will turn off and the Off light will light up to confirm StayD deactivation. With StayD disabled, the system will func- tion as a standard security system. -
Page 16: Arming & Disarming
Arming & Disarming Take full advantage of your system by familiarizing yourself with all the arming methods. If your system is not partitioned (see Partitioning on page 22), everything is considered as belonging to Partition 1. If you cannot arm because a zone is open, the system will enter in Bypass Programming. Enter the two NOTE: digit zone you wish to bypass and press [ ], or press [... -
Page 17: Bypassing A Zone
Bypassing a Zone Bypassing a zone allows you to ignore (deactivate) specified zones the next time the system is armed. For example, you may wish to bypass certain zones when workers are renovating part of your home. Once the sys- tem is disarmed, the bypass entries are erased. -
Page 18: Auto-Arming
Figure 1: Arming / Disarming Auto-Arming Timed Auto Arming The alarm system can automatically arm itself at a specified time every day. As with Regular arming (see Regu- lar Arming on page 14), the system will bypass any open zones. How do I program the Auto-Arm Timer? Press the [ ] key. -
Page 19: Alarms
Alarms Alarm Display If an alarm has occurred on a zone, the respective zone key will flash, the [ ] key will light up, and the zones will be stored in memory. These respective keys will continue to flash until disarming even if the zones are restored. -
Page 20: Testing & Maintenance
Fire Safety Tips In the event of a fire, escape first, then call for help. Develop a home fire escape plan and designate a meeting place outside. Make sure everyone in the family knows two ways to escape from every room. Practice feeling your way out with your eyes closed. - Page 21 Using the [] / [ ] and [] / [ ] keys or by entering [01] to [08], select one of the eight telephone SLEEP STAY numbers you wish to program and press [ ENTER Enter the telephone number and press [ ENTER Select the which group of events will send a text message to the phone number set in step 5 (see Event Call options below).
-
Page 22: Communicating By Phone
Partition It is possible to arm or disarm specific partitions. The partitions must be prefaced by the letter A, and separated by commas for individual partitions. It is also possible to affect a series of partitions by writing TO between the start and end partitions of that series. -
Page 23: Vdmp3 Instructions Diagram
VDMP3 Instructions Diagram Magellan / Spectra SP... -
Page 24: Advanced System Features
Advanced System Features Programmable Outputs (PGMs) Your system may include one or more PGMs. When a specific event or condition occurs in the system, The PGM can be used to reset smoke detectors, activate light switches in your home or office, open/close garage doors and much more. - Page 25 [4] & [6] Aux. or_______________ Audible Report only [7] & [9] Fire or_______________ Audible Report only PGMs PGM 1 ______________ PGM 2 ______________ PGM 3 ______________ PGM 4 ______________ PGM 5 ______________ PGM 6 ______________ PGM 7 ______________ PGM 8 ______________ PGM 9 ______________ PGM 10 ______________ PGM 11 ______________ PGM 12 ______________...
-
Page 26: Quick Programming
Quick Programming Master Quick Menus User Step Action Details The [ ] key will flash. LED/key on = programmed user. [ ] + [ MASTER CODE ] may also be used. PARTITION MASTER CODE 2 digits: 01 to 32. USER NUMBER Enter a 4 or 6-digit code. -
Page 27: Test Report
Assigning a REM3 Hand-Held 2-Way Remote Keypad to the Panel Step Action Details [ ] + [ The [ ] key will flash. MASTER CODE LED/Key on = programmed user may also be used. PARTITION MASTER CODE 2 digits: 01 to 32 USER NUMBER Enter 4- or 6-digit code. -
Page 28: Index
Index Internet ................ 18 IP100 ................18 Access Code Length ............. 4 Adding a User ..............4 Advanced StayD ............13 Advanced System Features ........22 K10LEDV/H ..............9 Alarm Display .............. 17 K32 ................11 Alarms ................. 17 K32I ................10 Arming ................. - Page 29 Receiving Text Messages ........... 18 Regular ................ 14 Regular Arming ............14 REM3 ................25 Sample Text Messages ..........19 Sending Text Messages to Arm/Disarm ...... 19 Settings ................2 Sleep Arming ............... 14 SMS Event Call Options ..........19 Special Keys ..............
- Page 30 We hope this product performs to your complete satisfaction. Should you have any questions or comments, please visit us at www.paradox.com. PARADOX.COM Printed in Canada - 12/2014 MGSP-EU15...
Need help?
Do you have a question about the Magellan MG5000 and is the answer not in the manual?
Questions and answers
Need setup for alarm system
What does the code RVP mean