Table of Contents
Advertisement
Available languages
Available languages
Quick Links
Advertisement
Table of Contents

Subscribe to Our Youtube Channel
Related Manuals for Sachtler SOOM


Summary of Contents for Sachtler SOOM
- Page 1 SOOM Manual Benutzerinformation...
- Page 2 © by sachtler ® . All rights reserved / Alle Rechte vorbehalten Original Manual / Originalbetriebsanleitung Version: 1.9/02/12 Issue date / Ausgabedatum: 02/12 Order no / Bestellnr. S2003-4980 We want you to receive Wir wollen, daß Ihre Sachtler Sachtler products that are Produkte immer auf dem always state of the art.
-
Page 3: Table Of Contents
3.4 Height adjustment of the TriPod........4 3.5 Mounting and dismantling of the SOOM clamping bowl..........5 3.6 Mounting and removal of the fluid head....6 3.7 Use of the SOOM TriSpread as a baby-tripod .............6 3.8 SOOM TriPod carrying handle........8 SOOM Tube ..............9 4.1 Operating Elements ...........9... - Page 4 SOOM Inhaltsverzeichnis Sicherheitshinweise / Grundlegende Hinweise....16 Bestimmungsgemäße Verwendung ........17 SOOM TriPod und SOOM TriSpread......18 3.1 Bedienelemente ..............18 3.2 Montage und Demontage der Gummifüße....19 3.3 Montage und Demontage des TriSpread ..............19 3.4 Höhenverstellung des TriPods.........20 3.5 Montage und Demontage der SOOM Klemmschale ..........21 3.6 Montage und Demontage eines Fluidkopfes...22...
- Page 5 Manual SOOM - III -...
-
Page 6: Safety Instructions / General Information
The maximum payload is specified in chapter 5. The SOOM products allow - as single product or as a system - almost continuous adjustment of the camera´s lens height from approx. 45 cm (18 “) to 2.5 m (99”); just by simple arrangements of the system´s components. -
Page 7: Soom Tripod And Soom Trispread
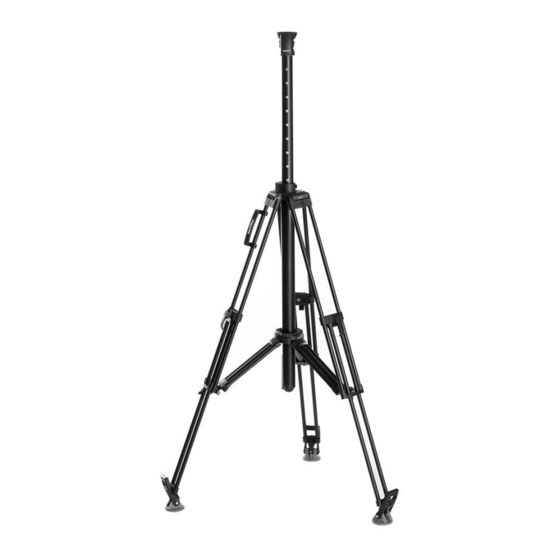
Manual SOOM SOOM TriPod and SOOM TriSpread 3.1 Operating Elements Ring bowl Safety lever TriSpread Carrying handle Bungee cord Clamping lever for leg extension Rubber pull-loop Rubber feet picture 1 - 2 -... -
Page 8: Mounting And Dismantling Of The Tripod´s Rubber Feet
SOOM Manual 3.2 Mounting and dismantling of the tripod´s rubber feet Á Place a rubber foot on the floor, with the textured side of the rubber pull-loop facing out. Á Position a foot of the tripod on top of the roller in the center of the rubber foot unit. -
Page 9: Height Adjustment Of The Tripod
Manual SOOM Á Pull the locking bolt out to its end stop (1) and turn it 90° (2). The bolt will turn easily in either direc- tion. Á Once in this position, the locking bolt is effectively blocked (bayonet lock). -
Page 10: Mounting And Dismantling Of The Soom Clamping Bowl
(see also chapter 3.7). Á Typically the flat position is used for regular use of the spreader; the stepped position is only recom- mended if narrow footprints are needed. 3.5 Mounting and dismantling of the SOOM clamping bowl Level bubble Indication for... -
Page 11: Mounting And Removal Of The Fluid Head
Á Level the fluid head and anchor it tightly by tur- ning the locking knob at the bottom of the SOOM clamping bowl. Á To remove the fluid head, first turn the locking knob counterclockwise. - Page 12 Manual Á Dismantle the TriSpread from the TriPod, as described in chapter 3.3. Á Mount the SOOM clamping bowl into the ring bowl from bottom until it snap in place, as described in chapter 3.5. Á The height range can be adjusted via extension of the arms and by adjusting the arm angles.
-
Page 13: Soom Tripod Carrying Handle
Bungee Cord. Therefore pull the Bungee Cord out (picture 1) and hook it to the leg after next leg. To mount the SOOM TriPod carrying handle, simply slide the handle over the outside tripod pipe. To ensure a good balance while carrying, the handle can be adjusted by moving it along the pipe. -
Page 14: Soom Tube
SOOM Manual SOOM Tube 4.1 Operating Elements Ring bowl Clamping lever for extension tube Extension tube Index Foot stabilizer picture 6 - 9 -... -
Page 15: Use As A Tube
Manual SOOM 4.2 Use as a Tube Tube Safety lever TriSpread TriPod picture 7 - 10 -... - Page 16 Á When using the Tube, choose the wider arm angle of the TriSpread to reach the big footprint of the TriPod. Á Check, that there are no SOOM clamping bowls mounted to the ring bowls of TriPod nor TriSpread. Á Make sure the Tube´s foot stabilizer is folded up against the base.
- Page 17 Á Close the clamping lever of the extension tube. The SOOM XL System is now ready to use. Á To dismantle, open the clamping lever of the extension tube once more and lower the extension tube slowly.
-
Page 18: Use As A Monopod
SOOM Manual Á Press the safety lever in the ring bowl of the TriPod and pull the Tube upwards out of the TriPod. Once again, be sure that the folded foot stabilizer at the base of the Tube is in alignment with the notches of both ring bowls. -
Page 19: Technical Data
Height range 68.5 – 142 cm / 27 – 60“ Transport length 82.5 cm / 32.5“ Extension Fluid head fitting 75 mm (with SOOM clamping bowl) TriSpread Weight 1.2 kg / 2.6 lb Payload (incl. fluid head) 9 kg / 20 lb Height range 21.5 –... -
Page 20: Accessories
For heavier dirt you can use a soft brush and a mild detergent. If SOOM products had contact with salt water, it should be washed off with fresh water at the earliest opportunity and be dried carefully. -
Page 21: Sicherheitshinweise / Grundlegende Hinweise
Vor Lösen der Klemmschale muß das Stativ bei auf- gesetzter Kamera gegen Umkippen gesichert werden. Warnung: Besondere Achtsamkeit ist geboten, wenn das SOOM XLSystem in voller Höhe benutzt wird. Mit zunehmen- der Arbeitshöhe reduziert sich die Stabilität. Eine nochmalige Überprüfung auf festen Sitz von Kamera, Fluidkopf und zusätz- lichem Equipment wird empfohlen, wenn die Arbeits- höhe... -
Page 22: Bestimmungsgemäße Verwendung
Kameras durchgeführt werden können. Die maximalen Traglasten sind in Kapitel 5 spezifiziert. Die SOOM Produkte ermöglichen - einzeln oder im System - annähernd durchgängige Einstellungen der Kamera- Objektivhöhen von ca. 45 cm bis ca. 2,5 m, allein durch sim- ple Konfiguration der Systemkomponenten. -
Page 23: Soom Tripod Und Soom Trispread
Benutzerinformation SOOM SOOM TriPod und SOOM TriSpread 3.1 Bedienelemente Ringschale Sicherungshebel TriSpread Tragegriff Bungee Cord Klemmhebel für Beinauszug Gummiziehhebel Gummifüße Bild 1 - 18 -... -
Page 24: Montage Und Demontage Der Gummifüße
SOOM Benutzerinformation 3.2 Montage und Demontage der Gummifüße Á Stellen Sie einen Gummifuß auf den Boden. Die profilierte Seite des Gummiziehhebels zeigt dabei nach außen. Á Plazieren Sie einen Stativfuß auf die Rolle des Gummifußes. Á Ziehen Sie den Gummiziehhebel über die Rastnase des Stativfußes. -
Page 25: Höhenverstellung Des Tripods
Benutzerinformation SOOM Á Das drehbare Fußstück des TriSpreads gerade ausrichten. Á Setzen Sie das Fußstück in die Aufnahme des Verbindungsstückes am TriPod (2). Á Drehen Sie den Verriegelungsbolzen zurück, bis dieser einschnappt. Kontrollieren Sie, ob er kom- plett zurückgeschnappt ist. Falls die Verriegelungsbohrung verschmutzt ist, müssen... -
Page 26: Montage Und Demontage Der Soom Klemmschale
SOOM Benutzerinformation 3.5 Montage und Demontage der SOOM Klemmschale Markierung für Libelle Tube Montage Ringschale Klemmschale Bild 3 Á Die SOOM Klemmschale findet Verwendung im TriPod, im TriSpread und im Tube. Á Sie wird von unten in die Ringschale gedrückt bis sie einrastet. -
Page 27: Montage Und Demontage Eines Fluidkopfes
Á Nivellieren Sie den Fluidkopf und schrauben ihn mit dem Drehgriff der Klemmschale fest. Á Zur Demontage drehen Sie den Drehgriff gegen den Uhrzeigersinn und heben den Fluidkopf etwas 3.7 Verwendung des SOOM TriSpreads als Baby-Stativ Bild 4 - 22 -... - Page 28 SOOM Benutzerinformation Á Demontieren Sie das TriSpread vom TriPod, wie im Kapitel 3.3 beschrieben. Á Montieren Sie die Klemmschale in die Ringschale des TriSpreads, wie im Kapitel 3.5 beschrieben. Á Der Höhenbereich kann über den Armauszug und die Einstellung von zwei unterschiedlichen...
-
Page 29: Soom Tripod Tragegriff
Stativrohren befestigt werden. Um eine gute Balance beim Tragen zu gewährleisten, ist der Tragegriff auf diesen Rohren verschiebbar. Achtung: Entfernen Sie die Kamera, bevor Sie das SOOM System zusammenklappen. Achtung: Der Tragegriff ist nicht zum Tragen des SOOM Systems mit montierter Kamera konzipiert. -
Page 30: Soom Tube
SOOM Benutzerinformation SOOM Tube 4.1 Bedienelemente Ringschale Klemmhebel für Auszugsrohr Auszugsrohr Markierung Klappfuß Bild 6 - 25 -... -
Page 31: Verwendung Als Tube
Benutzerinformation SOOM 4.2 Verwendung als Tube Tube Sicherungshebel TriSpread TriPod Bild 7 - 26 -... - Page 32 SOOM Benutzerinformation Á Stellen Sie das TriPod incl. TriSpread auf, wie in Kapitel 3 beschrieben. Á Wählen Sie bei Verwendung des Tubes die größere der beiden möglichen Spreizungen des TriSpreads um eine mögliche große Stativgrundfläche des TriPods zu erhalten. Á Stellen Sie sicher, daß sich in den Ringschalen von TriPod und TriSpread keine Klemmschalen befinden.
- Page 33 Benutzerinformation SOOM Á Fixieren Sie das Tube mit dem Druck-Drehstift in der Ringschale des TriSpreads. Drücken Sie dazu zuerst den Stift bis zum Anschlag (1) und drehen Sie ihn dann im Uhrzeigersinn bis das Tube geklemmt ist (2). Á Prüfen Sie, ob eine Klemmschale in der Ringschale des Tubes montiert ist.
-
Page 34: Verwendung Als Monopod
SOOM Benutzerinformation Á Betätigen Sie den Sicherungshebel in der Ringschale des TriPods und ziehen Sie das Tube nach oben aus dem TriPod. Achten Sie darauf, daß der Klappfuß durch die Aussparungen der Ringschalen geführt wird. 4.3 Verwendung als Monopod Á Montieren Sie die Klemmschale, wie in Kapitel 3.5 beschrieben. -
Page 35: Technische Daten
Kopfanschluß 75 mm (mit SOOM Klemmschale) Tube Gewicht 1,0 kg Traglast (inkl. Fluidkopf) 9 kg Höhenbereich 88 – 225 cm (im SOOM XL System) Höhenbereich 87 – 157 cm (in Monopod- Funktion) Auszug 1-fach Kopfanschluß 75 mm (mit SOOM Klemmschale) -
Page 36: Zubehör
Spinne SP 100 (Code 7002) und Spinne SP 100/150 (Code 7007) betrieben werden. Dabei ist jedoch die Verwendung des Tubes ausgeschlossen. Inspektion und Pflege Eine Inspektion nach Intervallen ist für die SOOM Produkte nicht vorgesehen. Die SOOM Produkte sollten gelegentlich mit fusselfreien Tüchern abgewischt werden, um Staubablagerungen zu ent- fernen. - Page 37 Benutzerinformation SOOM - 32 -...
- Page 38 SOOM Benutzerinformation...
Need help?
Do you have a question about the SOOM and is the answer not in the manual?
Questions and answers