
Related Manuals for Telstra Bigpond


Summary of Contents for Telstra Bigpond
- Page 1 CaLL 13 pond (13 7663) ViSit bigpond.Com ViSit a teLStra Store or partner...
-
Page 2: Getting To Know Your
® uSb 4g... - Page 3 Let’S get tHiS SHow on tHe road You must be excited about your brand new USB 4G. This guide will help you get started as quickly and easily as possible. It’ll guide you through installation, show you how to set up your modem and help you out with any tricky bits.
- Page 4 wHat’S inSide Let’s get started Getting connected Using the Connection Manager Problem solving Answering those niggling questions Things you need to know...
-
Page 5: Operating Systems
• E xternal antenna – improves performance in areas with low signal strength. See your local Telstra store or partner for assistance with picking the best antenna option for you as well as help with installation. • MicroSD™ card – for external data storage (available at consumer electronics stores) You can use your Telstra USB 4G with these operating systems: • Windows 8 (Windows RT is not compatible) ® • Windows 7 ( 32/64-bit) ®... - Page 6 Your username and password have been emailed to you, however you may want to note these details below for easy reference. emaiL addreSS Remember, your email address is your username@bigpond.com paSSword It’s a good idea to protect yourself by writing down a reminder, rather than your actual password.
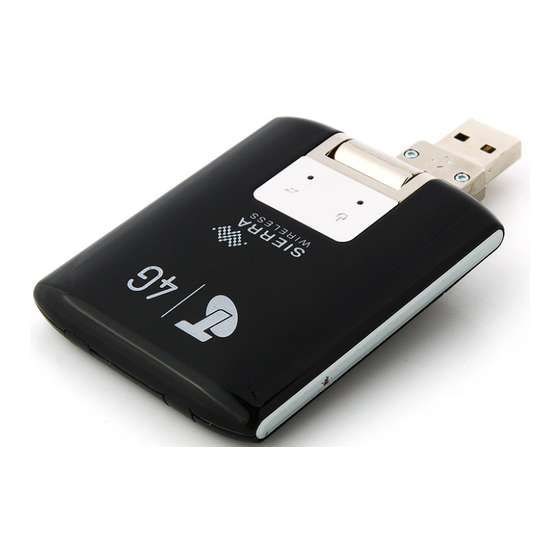
- Page 7 4g External antenna connectors Power LED Data LED USB Connector...
-
Page 8: Led Indicators
LED INDICATORS The LED indicators shows the status of the device and indicates when you are sending or receiving data by a solid indicator. Power LED Indicator Status Solid Blue Working normal Blinking Blue Updates in progress. Do not remove USB Blinking Amber Searching for network Solid Amber Error. Could not initialise. Offline Mode Data LED Indicator Status Could not find network Blinking Green Found 4G network. Ready to connect Solid Green Connected to 4G network Blinking Blue... - Page 9 getting ConneCted 1. inSert uSb Remove the back cover and insert the SIM card as shown in the illustrations. microSD slot SIM card slot Insert the device into the USB port.
- Page 10 2. foLLow tHe promptS to CompLete inStaLLation The computer will detect the new hardware and start the installation process. Click Install to start installation. Handy Hint If nothing happens your security settings may be preventing Autorun. The Mobile Broadband Manager software will need to be manually installed. Windows Users From your Desktop or Start Menu select Computer or My Computer (XP). Double click on the file named “setup.exe” to begin the installation. Mac Users Double click the CD drive icon that appears on your desktop. When the BigPond Connection Manager icon appears, click it to begin the installation.
- Page 11 •Click next to continue • Once you have reviewed Our Customer Terms, click on I confirm that I wish to proceed and click Next.
- Page 12 •Click Next to accept the default location to save the connection manager software, or click on Browse to specify a different location. The wizard takes a few minutes to complete.
- Page 13 Once installation is complete, click Finish to exit the setup. 3. LaunCH ConneCtion manager (bigpond mobiLe broadband manager Software) Once installation is complete a shortcut will be created on your desktop. Double click on the shortcut to open the Mobile Broadband Manager. Click Connect Now to start using your device. Handy Hint Windows 8 users can also connect and disconnect from Tile view by selecting Settings> Networks.
- Page 14 For more information on using the Connection Manager and monitoring your usage see pages 11-12. 4. regiSter your aCCount • You will need your BigPond username and ® password or your billing details if you haven’t signed up yet .
- Page 15 No Username • If you bought your device from a Telstra store or partner and you did not sign up to an account in store, you will need to register your billing details and create a user name and password.
- Page 16 Existing Username • If you ordered your device online or over the phone, or if you signed up to an account in a Telstra or partner store, you’ll have already provided your credentials during the sign up process and created a username and password. • Select I have an e-mail address and password for my new Mobile Broadband account. Note: Your Bigpond username and password have been emailed to you. You can access your password online at http://myacct.bigpond.com...
- Page 17 5. Setup your emaiL Once you’ve completed the registration process, you will be provided with the option to set up your BigPond® email.
- Page 18 6. CompLete inStaLLation If you have followed all the previous steps, the following page will be displayed. Please read this page carefully.
-
Page 19: Using The Connection Manager
uSing tHe ConneCtion manager getting onLine Once the Connection Manager has loaded up you will be able to click Connect Now. Whenever the USB device is plugged into your computer the Connection Manager will automatically launch. Alternatively double click the shortcut on your desktop called Mobile Broadband Manager. - Page 20 ConneCtion manager iConS Connect to the internet Connect Now Settings Connection Information Network signal strength ConneCtion manager updateS The Connection Manager will automatically check for software updates. To manually download the latest software, you can click on Tools and select Check for Updates. Alternatively, visit telstra.com and select Business and Enterprise > Help & Support > Software Downloads. Select either Windows ® or Mac Installation.
-
Page 21: Problem Solving
probLem SoLVing wHy Can’t i ConneCt? If you are having an issue accessing the internet try the below. 1. Ensure the USB is plugged in correctly. 2. Unplug the USB and plug it into a different USB port. 3. Restart your computer. 4. Turn off or temporarily disable any Security Programs or Firewalls. 5. Uninstall the Mobile Broadband Manager and restart the computer, plug the USB in and reinstall the Mobile Broadband Manager. 6. If possible try the USB in another computer. - Page 22 Problem/Error State Ensure the following: The device has no power: • The device is properly inserted. The Power LED • The computer is turned on and indicator is off not in standby mode (Windows) or sleep mode (Mac). No Service is Try the following: available: • Reorient your computer. The Data LED • If you are inside a building or indicator is off. near a structure that may be blocking the signal, change the position or location of your computer. • Contact Telstra regarding the status of the network or your account.
- Page 23 anSwering tHoSe niggLing queStionS wHen do i uSe tHe extenSion CabLe and CLip? If the orientation of your computer’s USB slot or the thickness of your computer are such that pressure is applied to the end or side of the modem, you may damage the modem or your computer. In such cases, do not insert the modem directly into your computer’s USB slot. Use the USB extension cable and laptop screen clip instead. How do i inSert a miCroSd Card? The microSD slot is located beneath the back cover. See the illustration below.
-
Page 24: Connecting An External Antenna
ConneCting an externaL antenna 1. Remove the back cover. 2. Pull back the antenna connector cover. 3. Replace the back cover. See next page for more details. Handy Hint Your device has two antenna connectors. If only connecting a single antenna, please make sure to use connector “1”. Dual port antennas are available for separate purchase. -
Page 26: Things You Need To Know
Network unlocking fee applies. Telstra Mobile Network coverage depends on your location, device and whether your device has an external antenna attached. Actual speeds vary due to factors such as location, distance from the base station, local terrain, user numbers, hardware &...
Need help?
Do you have a question about the Bigpond and is the answer not in the manual?
Questions and answers