Table of Contents
Advertisement
Advertisement
Chapters
Table of Contents
Troubleshooting

Subscribe to Our Youtube Channel
Related Manuals for Lexicon RT-10

Summary of Contents for Lexicon RT-10
- Page 1 RT-10 Universal Disc Player User Guide...
-
Page 2: Important Safety Instructions
IMPORTANT SAFETY INSTRUCTIONS READ INSTRUCTIONS – All the safety and operating instructions should be read before the product is operated. RETAIN INSTRUCTIONS – The safety and operating instructions should be retained for future reference. HEED WARNINGS – All warnings on the product and in the operating instructions should be adhered to. -
Page 3: For Canadian Model
TO REDUCE THE RISK OF FIRE OR ELECTRIC SHOCK, WARNING DO NOT EXPOSE THIS UNIT TO RAIN OR MOISTURE. • Do not remove the cover from the unit. • Do not insert anything into the unit through the ventilation holes. •... -
Page 4: Outdoor Antenna Grounding
This product satisfies FCC regulations when shielded cables CAUTION and connectors are used to connect the unit to other equipment. To prevent electromagnetic interference with electric appliances such as radios and televisions, use shielded cables and connectors for connections. This equipment has been tested and found to comply with the limits for a Class B digital device, pursuant to Part 15 of the FCC Rules. -
Page 5: Documentation Conventions
DOCUMENTATION CONVENTIONS This document contains general safety, installation, and operation instructions for the RT-10 Universal Disc Player. It is important to read this user guide before operating this product. Pay particular attention to safety instructions. The following symbols are used in this document: Appears on your component to alert you to the presence of uninsulated, dangerous voltage inside the enclosure…voltage... -
Page 6: Table Of Contents
Section 1: Getting Started About the RT-10 ........1-2 Highlights •... - Page 7 Miscellaneous Issues RT-10 Maintenance ....... 5-15 Disc Maintenance ....... . 5-16 Restoring Factory-Default Settings .
-
Page 8: Us Important Safety Instructions
Vorhandensein nicht isolierter gef hrlicher Spannung im Ger t. Diese Spannung kann so hoch sein, dass das Risiko eines Stromschlags besteht. Dieses Dreieck, welches auf Ihrem Bauteil angebracht ist, macht Sie auf wichtige Betriebs- und Wartungshinweise in diesen Hinweisen aufmerksam. Lexicon DEUTSCH... -
Page 9: Es Instrucciones De Seguridad Importantes
RT-10 ESPAÑOL INSTRUCCIONES DE SEGURIDAD IMPORTANTES • Guarde estas instrucciones para futuras referencias. • Siga todas las instrucciones y tenga en cuenta las advertencias que aparecen en la unidad y en las instrucciones de funcionamiento. • Utilice siempre la tensión de línea correcta. Consulte las instrucciones del fabricante, donde se especifican los requisitos de alimentación. -
Page 10: It Importanti Norme Di Sicurezza
Esse triângulo que aparece no seu console, alerta para a presença de voltagem perigosa e não isolada no recinto – voltagem que pode ser suficiente para constituir um risco de choque. Esse triângulo ques aparece no seu console alerta para instruções importantes de operação e manutenção neste manual. Lexicon PORTUGUESE... -
Page 11: Dk Vigtig Information Om Sikkerhed
RT-10 DANSK VIGTIG INFORMATION OM SIKKERHED • Gem denne vejledning til senere brug. • Følg alle anvisninger og advarsler på apparatet. • Apparatet skal altid tilsluttes den korrekte spænding. Der henvises til brugsanvisningen, der indeholder specifikationer for strømforsyning. Der gøres opmærksom på, at ved varierende driftsspændinger kan det blive nødvendigt at bruge andre lednings- og/eller... -
Page 12: No Viktig Informasjon Om Sikkerhet
Denna triangel, som visas på din komponent, varnar dig om en oisolerad farlig spänning inne i enheten. Denna spänning är eventuellt så hög att fara för elstöt föreligger. Denna triangel, som visas på din komponent, anger att viktiga bruksanvisningar och serviceanvisningar ingår i dokumentationen i fråga. Lexicon SVENSKA... -
Page 13: Us Unpacking And Inspection
RT-10 Unpacking and Inspection After unpacking the unit, save all packing materials in case the unit ever needs to be shipped. Thoroughly inspect the modules and packing materials for signs of damage. Report any damage to the carrier at once; report equipment malfunction to the dealer. -
Page 14: Getting Started
About the RT-10 ........ -
Page 15: About The Rt
In addition, the RT-10 allows the creation of up to five shortcuts, which provide convenient access to frequently adjusted controls without navigating through the entire Setup menu. -
Page 16: Product Registration
DO . . . • Install the RT-10 on a solid, flat, level surface such as a table or shelf or in a standard 19-inch equipment rack. An optional rack-mount kit is available from authorized Lexicon dealers. -
Page 17: Dvd-V Regions
• Obstruct the front panel display remote control sensor when the RT-10 is not using the IR input connector. If the RT-10 is not using the IR IN connector, the remote control must be in line- of-sight with the front panel display remote control sensor. -
Page 18: Disc Compatibility
RT-10 DISC COMPATIBILITY The RT-10 is compatible with disc formats that meet the requirements listed in the tables that begin below. Refer to the Disc Care & Handling section (1-8), the Loading Discs section (4-2), and the Disc Maintenance section (5-16) for more information. - Page 19 * When a copy-once protected disc is loaded, the message "COPY PROTECT PROGRAM. UNPLAYABLE." appears on the on-screen and front panel displays. Additional Information • The RT-10 might not allow playback of DVD-RW/Rs recorded with a personal computer if incorrect software application settings were used during the recording process –...
- Page 20 • Discs are divided into tracks. • Discs are divided into tracks. • The RT-10 supports MP3 tracks encoded at less than 128kBps. However, sound quality will be impaired when playback of these tracks is in progress. • The RT-10 recognizes a maximum of 250 folders per disc and 250 tracks per folder.
-
Page 21: Discs To Avoid
The RT-10 is a single-disc player. Do not attempt to insert more CAUTION than one disc in the disc drawer at one time. This might cause damage to the RT-10, the discs, or both. -
Page 22: Remote Control Battery Installation
RT-10 REMOTE CONTROL BATTERY INSTALLATION Figure A The remote control requires two AA batteries that should be replaced as needed. It is strongly recommended to use Alkaline batteries, which last longer without leaking. To replace the remote control batteries: 1. Locate the battery compartment on the back of the remote control. -
Page 23: Section 2: Basic Operation
Front Panel Overview ........2-2 Front Panel Display Indicators Rear Panel Overview . -
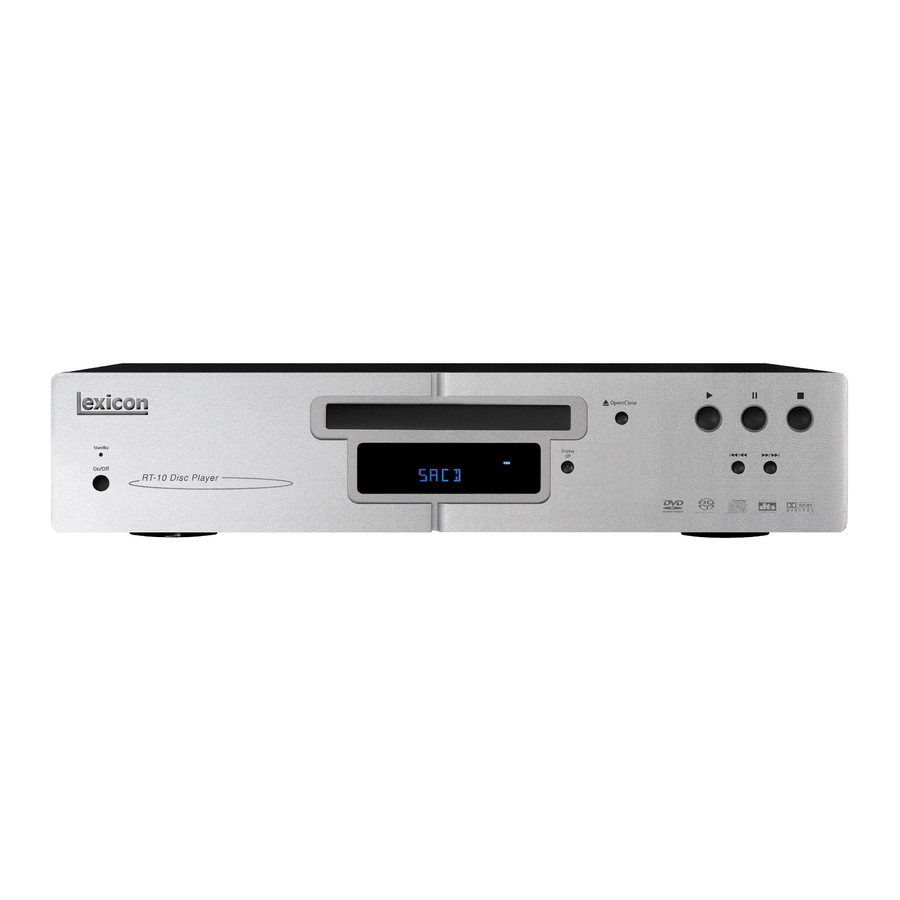
Page 24: Front Panel Overview
Standby On/Off RT-10 Disc Player The numbers in the RT-10 front panel illustration shown above correspond to the numbered items that begin below. 1. On/Off Button Connects power from the AC input connector to the RT-10. When the RT-10 is powered on, pressing the On/Off button powers the RT-10 off and automatically deactivates standby mode. -
Page 25: Front Panel Display
When the RT-10 is powered off, standby mode is automatically deactivated, although the Standby LED remains lit for a few seconds after the RT-10 is powered off. When the RT-10 is powered on, standby mode is also deactivated, even if standby mode was activated when the RT-10 was powered off. -
Page 26: Play Button
Basic Operation Front Panel Overview (continued from page 2-3) The numbers in the RT-10 front panel illustration shown on page 2-2 correspond to the numbered items that continue below. 5. Display Off Button (continued) The DISP_MODE parameter (3-52) can be used to select the front panel display mode for SACD, CD, and MP3 playback. - Page 27 Pressing and releasing the beginning of the current chapter or track. Subsequent presses skip to the beginning of the previous chapter or track. When the RT-10 loads the selection, playback or pause mode reactivates from the beginning of the selected chapter or track.
-
Page 28: Front Panel Display Indicators
FRONT PANEL DISPLAY INDICATORS V - PART TITLE D OFF The numbers in the RT-10 front panel display illustration shown above correspond to the numbered items that begin below. (Character Display) Provides at-a-glance viewing of status information about the RT-10 and the loaded disc. - Page 29 (4-13) is activated. COND Indicates that preferred disc settings have been stored for the loaded disc. Refer to page 4-10 for more information. Indicates that the RT-10 video output connectors are deactivated. The remote control VIDEO ON/OFF button can be used to activate and deactivate all RT-10 video output connectors.
-
Page 30: Rear Panel Overview
Basic Operation Front Panel Display Indicators (continued from page 2-7) The numbers in the RT-10 front panel display illustration shown on page 2-6 correspond to the numbered items that continue below. 27.Channels Indicator Indicates all audio channels available on the loaded disc. - Page 31 VIDEO OUTPUTS double-D symbol are trademarks of Dolby Laboratories. The numbers in the RT-10 rear panel illustration shown above correspond to the numbered items that begin on the previous page. Damaged power cords can cause fire or electric shock. Please...
- Page 32 When the trigger input connector on the RT-10 is connected to the trigger output connector on an associated component and the trigger input switch is set to ON, the RT-10 responds when standby mode is activated or deactivated for the connected component.
-
Page 33: Trigger Input Connector
TRIGGER INPUT, which is available on a removable terminal block. To configure the RT-10 for trigger control: 1. Connect the trigger input connector on the RT-10 to a 12V DC trigger output connector on an associated component component. - Page 34 21-pin male-to-male SCART cable with a SCART plug on both ends. The Video Out parameter (3-27) controls video output format when the RT-10 is using the Euro or Peritel (TV A/V) connector. Refer to the table and illustration at the top of the next page for more information.
-
Page 35: Digital Audio Connections
RT-10 Euro or Peritel (TV A/V) Connector Description Audio Out Right Audio Out Left + Mono Audio Ground RGB Blue Ground RGB Blue Out Audio/RGB Switch/16:9 RGB Green Ground RGB Green Out Digital Audio Connections All versions offer digital audio output on S/PDIF coaxial, S/PDIF optical, and XLR (AES/EBU) connectors. -
Page 36: Remote Control Overview
1-9 before operating the remote control. Note the following: • If the RT-10 is not using the IR IN connector, the remote control must be in line-of-sight with the front panel display remote control sensor. Eliminate obstructions between the remote control and the remote control sensor. - Page 37 The Standby LED is not lit when standby mode is deactivated. Note the following: • Power is still supplied to the RT-10 when standby mode is activated. Controls the brightness of front panel display characters. Pressing this button cycles through 100%, DIMMER 75%, and off settings.
- Page 38 Stop button activates resume or stop mode. In some cases, the Stop button must be pressed twice in succession to activate stop mode. When resume mode is activated, pressing the Stop button activates stop mode. Lexicon...
- Page 39 Skips to the beginning of the next chapter or track. Subsequent presses also skip to the beginning of NEXT the next chapter or track. When the RT-10 loads the selection, playback or pause mode reactivates from the beginning of the selected chapter or track.
- Page 40 LAST MEMO Activates condition memory mode (4-10), which stores preferred disc settings for up to 15 DVD-Vs. Once stored, these settings will be automatically recalled whenever the disc is loaded. CONDITION MEMO Lexicon...
- Page 41 Setup Menus Control Bar..........3-2 Setup Navigator .
-
Page 42: Section 3: Setup Menus
Setup Navigator prompts, along with their possible settings and associated Setup menu parameters. When the RT-10 is first powered on, the Setup Navigator opens on the on-screen display whenever the remote control SETUP button is pressed while the RT-10 is in stop mode. Otherwise, the Setup arrows can be used to Navigator can be opened from the Setup menu General tab (3-42). - Page 43 Note: Setup Navigator prompts should be configured while the disc drawer is empty. ` This setting is recommended when the RT-10 is connected to an MC-12 or MC-8 Digital Controller. When no setting is indicated, any setting can be selected.
- Page 44 General tab, the Auto Start Off option is not available. OSD Language English, français, Deutsch, Italiano, Español Determines the language in which RT-10 on-screen display menus appear. The OSD Language prompt is associated with the Language tab OSD Language parameter (3-36). Lexicon...
- Page 45 Analog Jacks 2 Channel, 5.1 Channel, Not Connected Controls analog audio output format when the RT-10 is using the analog audio output connectors. Select Not Connected if the RT-10 is not using the analog audio output connectors. When 2 Channel is selected, the RT-10 passes analog audio sources to the Front L/R analog audio output connectors.
-
Page 46: Center Speaker
The Analog Jacks prompt is associated with the Audio2 tab Audio Out parameter (3-16). The Analog Jacks prompt and Audio Out parameter settings have no effect when the RT-10 is not using the analog audio output connectors. Note the following: •... - Page 47 Dolby Digital/DTS setting. The RT-10 will pass Dolby Digital, DTS, and PCM signals directly to the MC-12 or MC-8. The RT-10 will convert all other digital audio signals (i.e. MPEG) to PCM before passing them to the MC-12 or MC-8.
- Page 48 Each parameter can be independently set for compatibility with the respective digital audio source. The Digital Jack prompt Dolby Digital Out, DTS Out, and MPEG Out parameter settings have no effect when the RT-10 is not using the digital audio output connector. Note:...
-
Page 49: Setup Menu
SETUP MENU The Setup menu can be used to configure audio, video, language, and other general RT-10 settings. Available in expert and basic display modes, the Setup menu can be configured for the desired level of control. The Setup Menu Mode parameter (3-42) can be used to select the mode in which the Setup menu is displayed. - Page 50 Setup Menus Setup Menu (Expert Mode) Setup Menu (Basic Mode) 3-10 Lexicon...
- Page 51 * These parameters only appear when the Setup menu is displayed in expert mode (3-9 and 3-42). ` These settings are recommended when the RT-10 is connected to an MC-12 or MC-8 Digital Controller. When no setting is indicated, any setting can be selected.
-
Page 52: Dolby Digital Out
Dolby Digital Out Off, On Controls Dolby Digital audio output format when a Dolby Digital source is present and the RT-10 is using the digital audio output connector. Select Dolby Digital if the associated component is compatible with Dolby Digital sources. The RT-10 will pass Dolby Digital signals directly to the associated component. -
Page 53: Linear Pcm Out
The DTS Out parameter is associated with the Setup Navigator DTS, DTS PCM Digital Jack prompt (3-7). The DTS Out parameter and Digital Jack prompt settings have no effect when the RT-10 is not using the digital audio output connector. Linear PCM Out... -
Page 54: Digital Out
The MPEG Out parameter is associated with the Setup Navigator Digital Jack prompt (3-7). The MPEG Out parameter and Digital Jack prompt settings have no effect when the RT-10 is not using the digital audio output connector. Digital Out Activates and deactivates the RT-10 digital audio output connector. -
Page 55: Sacd Playback
Select CD Area to select the standard CD track for playback. If the selected track is not available on the loaded SACD, the RT-10 will automatically select an alternate track. For instance, if the SACD Playback parameter is set to CD Area and a non-hybrid SACD is loaded, the RT-10 will automatically select the stereo track. -
Page 56: Audio Out
* These parameters only appear when the Setup menu is displayed in expert mode (3-9 and 3-42). ` These settings are recommended when the RT-10 is connected to an MC-12 or MC-8 Digital Controller. When no setting is indicated, any setting can be selected. - Page 57 RT-10 Audio Out Source Parameter Front L/R 2-channel 2 Channel Dolby downmix Digital- encoded 5.1 Channel Front L/R Dolby 2 Channel Digital- Front L/R encoded 5.1 Channel (Karaoke) 2-channel 2 Channel downmix dts-encoded 5.1 Channel Front L/R 2 Channel MPEG-...
-
Page 58: Speaker Setting
Large Large ` These settings are recommended when the RT-10 is connected to an MC-12 or MC-8 Digital Controller. When no setting is indicated, any setting can be selected. * These Speaker Setting parameters are associated with the Setup Navigator Center Speaker (3-6), Surround Speakers (3-6), and Sub-woofer (3-7) prompts. - Page 59 Note: Speaker size settings have no effect when: • A DVD-A is loaded. • The RT-10 is using the 2-channel analog audio output connectors. • The RT-10 is using the digital audio output connector. To set speaker sizes and crossover points: 1.
-
Page 60: Setting Speaker Distances
• The SW parameter determines the presence or absence of a subwoofer. Select On if a subwoofer is present. The RT-10 will pass subwoofer signals and LFE signals for which the corresponding Speaker Size parameter is set to Small to the Sub analog audio output connector. -
Page 61: Gain Setting
Gain Setting Controls front, center, surround, and subwoofer channel output levels when the RT-10 is using the 5.1-channel analog audio output connectors. This parameter setting has no effect when the RT-10 is using the 2-channel analog audio output connectors or digital audio output connector. -
Page 62: Tone Setting
0.0dB ` 0.0dB ` 0.0dB ` ` These settings are recommended when the RT-10 is connected to an MC-12 or MC-8 Digital Controller. When no setting is indicated, any setting can be selected. Note: RT-10 variable output levels do not need to be... - Page 63 Audio Out parameter or Setup Navigator Analog Jacks prompt is set to 2 Channel, or the RT-10 is in playback, pause, or resume mode. (The RT-10 must be in stop mode.) 3. When the desired parameter is highlighted, press the arrows to cycle through the Auto, On, and Off settings.
-
Page 64: Cd Digital Direct
When On is selected, the RT-10 prevents DTS-encoded CDs from outputting digital noise. When Off is selected, the RT-10 might not prevent DTS-encoded CDs from outputting digital noise. Note:... - Page 65 RT-10 TV Screen Refer to the table on the previous page Controls the appearance of the picture on the associated display device screen, formatting the aspect ratio of the video output format to match the aspect ratio of the display device. Aspect ratios, which refer to width relative to height, differ among video output formats and display devices.
- Page 66 Full (16:9) Some discs do not allow video output format adjustments. Neither the TV Screen parameter nor the TV Type prompt can be adjusted when the RT-10 is in playback mode. Appearance Images appear in widescreen (16:9) format. Images appear between black bars at either side of the screen.
-
Page 67: Component Video
The picture might appear stretched on the associated display device screen if a video source recorded in 4:3 format is present and the RT-10 or the display device is configured for a 16:9 aspect ratio. To correct this, configure the RT-10 or the display device for a 4:3 aspect ratio. -
Page 68: Frame Search
Lexicon screen saver appears on the on-screen display when a still frame image has appeared on the display device screen for more than 5 minutes. When Off is selected, the Lexicon screen saver does not appear on the on-screen display. -
Page 69: Video Adjust
RT-10 VIDEO2 Includes parameters that control video output format and on-screen display appearance. Parameter Default Setting Background Gray Video Adjust Still Picture* Auto On-Screen Display* Angle Indicator* * These parameters only appear when the Setup menu is displayed in expert mode (3-9 and 3-42). - Page 70 30 frames-per-second (NTSC) rate, and sources recorded on film have a 24 frames-per-second rate. When the Component parameter is set to Progressive, the RT-10 converts sources recorded on film to 60 frames-per-second to create a more natural picture.
-
Page 71: Default Setting
Gamma Chroma Level Chroma Delay Memory Prog. Motion The RT-10 is manufactured for sale in several different countries. The default Video Adjust parameter settings listed in the table shown above might differ among versions. Default Setting TV (CRT) Professional Auto1 Auto1 7.5 IRE... - Page 72 + to – Memory Determines the memory bank in which user-defined Video Adjust green to red settings are stored. The RT-10 includes three memory banks called 1, 2, and 3. min to max To configure and store memory banks: 1. Press the remote control VIDEO ADJ button to open the Video Adjust bar shown above (first column, first row).
- Page 73 When Off is selected, the selected settings are applied to the picture on the display device screen until a Video Adjust bank is selected, factory-default settings are restored, or the RT-10 is powered off with the front panel On/Off button..Video2 continues on page 3-34...
- Page 74 Selecting Video Adjust Banks The Video Memory Select bar shown above can be used to select the desired Video Adjust bank. The RT-10 offers six banks of Video Adjust settings, including three preset banks for CRT, plasma, and professional display devices and three memory banks for storage of user-defined Video Adjust settings.
-
Page 75: Still Picture
Controls the appearance of still frame images. When Field is selected, the RT-10 produces tight, stable, and generally shake-free still frame images. When Frame is selected, the RT-10 produces sharper, but shakier still frame images. When Auto is selected, the RT-10 automatically selects the best viewing method for still frame images. -
Page 76: Osd Language
Setup Menus LANGUAGE Includes parameters that can be used to determine RT-10 on-screen display menu, disc menu, subtitle, and audio language. Parameter Default Setting OSD Language English Audio Language English Subtitle Language English Auto Language DVD Language* Subtitle Display* Subtitle Off*... -
Page 77: Audio Language
DVD, the RT-10 selects the audio track that includes that language. If the selected audio language is not included on the loaded DVD, the RT-10 selects the default disc audio language. Select Other to choose a language other than English, French, German, Italian, or Spanish. -
Page 78: Subtitle Language
Refer to the table on pages A-14 and A-15 Determines the language in which subtitles appear. If the selected subtitle language is available on the loaded DVD, the RT-10 selects that language. If the selected subtitle language is not included on the loaded DVD, the RT-10 selects the default disc subtitle language. -
Page 79: Auto Language
RT-10 automatically selects the default disc audio track and subtitle language, regardless of the Audio Language (3-37) and Subtitle Language (previous page) parameter settings. When Off is selected, the RT-10 selects audio track and subtitle language based on the Audio Language and Subtitle Language parameter settings. -
Page 80: Subtitle Display
Subtitle Display parameter is set to Off, regardless of the Subtitle Language (3-38) and Auto Language (3-39) parameter settings. Note: Some DVDs allow menu language to be selected from the disc menu. Refer to page 4-3 for more information. On, Off, Assist Subtitle Lexicon... -
Page 81: Subtitle Off
If the loaded disc does not include the selected subtitle language, the RT-10 selects the default disc subtitle language. GENERAL Includes parameters that can be used to configure general RT-10 settings, such as Setup menu display mode, parental lock controls, and DVD-A playback. -
Page 82: Setup Menu Mode
Opens the Password, Level, and Country Code controls, which can be used to assign a user-defined password that must be entered before the RT-10 will activate playback mode when a disc encoded with a user-defined security level is loaded. These controls have no effect when a disc that is not encoded with a security level or country code is loaded. - Page 83 Password Assigns a user-defined password that must be entered before the RT-10 will activate playback mode when a disc encoded with a user-defined security level or country code is loaded. A user-defined password must be assigned before the Level and Country Code controls can be adjusted.
- Page 84 To confirm the user-defined password: When a user-defined password is assigned, that password must be entered before the RT-10 will activate playback mode when a disc encoded with a user-defined security level is loaded. The user-defined password must also be entered before the Level and Country Code controls can be adjusted.
- Page 85 Level Assigns a user-defined security level, requiring the password before the RT-10 will activate playback mode when a disc encoded with a user-defined security level is loaded. The Level control has no effect when a disc that is not encoded with a security level is loaded.
- Page 86 (continued) Select off to use the Country Code control to determine security level. When off is selected, the RT-10 requires the user-defined password before activating playback mode when a disc encoded with an incompatible country code is loaded. The Country Code parameter has no effect on discs that are not encoded with a country code, regardless of the Level control setting.
-
Page 87: Country Code
Refer to the table on page A-16 Assigns a security level based on country code, requiring the password before the RT-10 will activate playback mode when a disc encoded with an incompatible country code is loaded. The Country Code control has no effect when the Level control is set within its 1 to 8 range or when a disc that is not encoded with a country code is loaded. -
Page 88: Bonus Group
Bonus Group: Key Number Input screen automatically opens if the access code has not been entered since the disc was loaded, factory-default settings were restored, or the RT-10 was powered on. 3-48 ENTER To enter DVD-A bonus group access codes: Start 1. -
Page 89: Auto Disc Menu
RT-10 Auto Disc Menu Enables and disables automatic opening of DVD menus and top menus. This parameter has no effect on other disc formats or on DVDs that do not include menus or top menus. When On is selected, DVD menus and top menus automatically open on the on-screen display when a DVD that includes menus or top menus is loaded. -
Page 90: Setup Menu Shortcuts
3. When the Function Memory tab opens, press the remote control arrows to highlight the desired shortcut. Then, press the remote control ENTER button to select that shortcut. The Setup menu will open on the on-screen display, highlighting the corresponding parameter. Lexicon... -
Page 91: Advanced Setup Menu
REMOT_CODE The Advanced Setup menu can be used to configure advanced RT-10 mode settings for CD, SACD, and MP3 display mode, standby mode, and remote control command mode. Unlike the Setup menu, the Advanced Setup menu opens on the front panel display, which provides one-line viewing of parameters and settings as shown above. - Page 92 Enables and disables automatic standby mode activation. When ON_30MIN is selected, the RT-10 automatically activates standby mode after 30 minutes of non-use. When OFF is selected, the RT-10 does not automatically activate standby mode after 30 minutes of non-use.
- Page 93 DVD_1 command mode is assigned to one RT-10 and the DVD_2 command mode is assigned to the other RT-10. These command modes can also be assigned to the remote control, allowing the remote control to operate an RT-10 to which the same command mode is assigned.
-
Page 94: Playback Controls
Playback Icons ......... . . 4-2 Loading Discs . -
Page 95: Playback Icons
Disc Compatibility (1-5), Disc Care & Handling (1-8), and Disc Maintenance (5-16) sections for more information. The RT-10 is a single-disc player. Do not attempt to load more CAUTION than one disc in the disc drawer at one time. This might cause damage to the RT-10, the discs, or both. -
Page 96: Navigating Disc Menus
RT-10 • The RT-10 will attempt to load a disc whenever the disc drawer is closed, even when the disc drawer is empty. To load a disc: 1. Review the bulleted items that begin on the previous page. 2. Press the Open/Close button to open the disc drawer. - Page 97 Indicates the number of the selected folder and the number of folders included on the loaded disc. The RT-10 recognizes a maximum of 250 folders per disc. It ignores all folders that exceed this number. Indicates the number and name assigned to each folder on the loaded disc.
- Page 98 RT-10 Disc Menu Command Matrix Button DVD-V & DVD-A MENU & When a DVD-V is loaded, pressing the MENU button TOP MENU opens and closes the disc menu, provided the loaded disc includes a menu. In some cases, pressing the TOP MENU button also opens and closes the menu.
- Page 99 Perform no function. Toggle between the folder and track lists. Same as DVD-V & DVD-A. Perform no function. Same as DVD-V & DVD-A. Perform no function. Perform no function. Perform no function. Lexicon arrows...
-
Page 100: Selecting Disc Settings
RT-10 SELECTING DISC SETTINGS Some disc menus can be used to select disc settings such as audio track (audio language and output format), subtitle language, and camera angle. In some cases, certain remote control buttons can also be used to select these settings without navigating through the disc menu. -
Page 101: Subtitle Languages
If this occurs, playback will automatically activate using the selected subtitle language. 3. When the desired subtitle language is selected, press the Play button or the remote control ENTER button to activate playback using the selected subtitle language. Lexicon... -
Page 102: Camera Angles
RT-10 CAMERA ANGLES ANGLE • Pressing the remote control ANGLE button opens the Angle bar shown below, which can be used to select the desired camera angle. • Camera angle selection is available for DVD-V scenes recorded from multiple camera angles. Camera angle selection is not available for other disc formats or for DVD-V scenes recorded from one camera angle. - Page 103 The Condition Memory bar shown below will open at the top of the on-screen display to indicate that preferred disc settings have been stored for the loaded disc. Once stored, these settings will be automatically recalled whenever the disc is loaded. Lexicon...
-
Page 104: Playback Modes
CLEAR button to delete preferred disc settings. PLAYBACK MODES The RT-10 offers a range of playback modes that can be used to control playback of the loaded disc. The table on the next page indicates the playback modes available for each disc format. -
Page 105: Playback Mode
Not Available Available Available Available Available Available Not Available Available Available Not Available Available Available Not Available Available** Available** Track Track, Folder, Available** Available** Disc, Program Available** Available** Not Available Track Track Track Track Track Track, Folder Available Available Available Lexicon... - Page 106 • Video CD bookmarks are automatically deleted when the disc drawer is opened or the RT-10 is powered off with the front panel On/Off button. All bookmarks are automatically deleted when factory-default settings are restored. To create a bookmark at the current playback time: When playback is activated, press the LAST MEMO button.
-
Page 107: Stop Mode
To deactivate resume mode: • Press the Play button to reactivate playback at the current playback time. • Press the Stop button to activate stop mode. When stop mode is activated, playback cannot be reactivated at the current playback time. Lexicon... -
Page 108: Pause Mode
• The Still Picture parameter (3-35) controls the appearance of still frame images. When set to Field, the RT-10 produces tight, stable, and generally shake-free still frame images. When set to Frame, the RT-10 produces sharper, but shakier still frame images. -
Page 109: Frame-By-Frame Playback
When stop mode is activated, playback cannot be reactivated at the current playback time. , and buttons can be used Video CDs are not compatible with reverse slow playback. button again to cycle through all Lexicon... -
Page 110: Random Playback
RT-10 • Press the Pause button or the opposite skip/scan button (i.e. button if forward slow playback is activated) to pause playback at the current disc location. RANDOM PLAYBACK RANDOM • The remote control RANDOM button can be used to activate random playback, which plays the loaded disc in a random order of titles, chapters, groups, or tracks. - Page 111 Press the Stop button to activate stop or resume mode. In some cases, the Stop button must be pressed twice in succession to activate stop mode. When stop mode is activated, playback cannot be reactivated at the current playback time. Lexicon...
-
Page 112: Repeat Playback
RT-10 REPEAT PLAYBACK REPEAT • The remote control REPEAT button can be used to activate repeat playback, which repeats playback of the currently playing title, chapter, group, track, folder, or program list. The table on page 4-12 indicates the repeat playback modes available for each disc format. - Page 113 Press the Stop button to activate stop or resume mode. In some cases, the Stop button must be pressed twice in succession to activate stop mode. When stop mode is activated, playback cannot be reactivated at the current playback time. Lexicon...
-
Page 114: A-B Repeat Playback
RT-10 A-B REPEAT PLAYBACK • The remote control A-B button can be used to activate A-B repeat playback from a user-defined start time (point A) to a user-defined end time (point B). A-B repeat playback can be configured to repeat playback of the user-defined playback loop once or continuously. -
Page 115: Program Mode
• When playback of a program chapter or program track list is activated, playback of a non-programmed chapter or track might activate while the RT-10 searches for the next programmed chapter or track. 4-22 To navigate Program tabs:... - Page 116 Program lists are automatically deleted when: • the disc drawer is opened • standby mode is activated • the RT-10 is powered off with the front panel On/Off button • factory-default settings are restored Program lists are automatically deleted when: •...
-
Page 117: Program Memory
When Off is selected, program lists for the loaded disc are automatically deleted when the disc drawer is opened, standby mode is activated, the RT-10 is powered off, or factory-default settings are restored. The Program Memory parameter setting applies to all program lists that have been created for the loaded disc. -
Page 118: Program Tabs
RT-10 Program Tabs 4. When the Program Memory parameter is selected, press the arrows to move the cursor to the parameter settings menu that appears to the right of the parameter label. Then, press the arrows to highlight the desired setting. - Page 119 2. Press the Stop button to activate stop mode. In some cases, the Stop button must be pressed twice in succession to activate stop mode. 3. When stop mode is activated, press the remote control CLEAR button to delete the oldest non-stored program list. Lexicon...
- Page 120 All program lists that have been created for the loaded disc will be automatically deleted when the disc drawer is opened, standby mode is activated, the RT-10 is powered off, or factory- default settings are restored. To create an MP3 program list with the MP3 Navigator: 1.
-
Page 121: Search Mode
Activates playback of the first track in the selected folder. Time Activates playback at the selected playback time (minutes: seconds) in the currently playing title, chapter, group, track, or folder. This search mode is not available unless playback or pause mode is activated. Lexicon... -
Page 122: Frame + Time
RT-10 Frame + Time Activates playback at the selected playback time (minutes:seconds) in the currently playing frame. This search mode is not available unless playback or pause mode is activated. Page Activates playback at the selected browsable picture on the loaded disc. -
Page 123: Display Mode
Indicates the total playback time of the loaded disc and the total playback time of each track included on the loaded disc. Display Screen F Indicates the number of tracks included in each folder on the loaded disc. Lexicon DVD-V DVD-A DVD-RW/R SACD... - Page 124 RT-10 Display Screens To open a display screen: 1. Make sure stop or resume mode is activated. 2. When stop or resume mode is activated, press the remote control DISPLAY button to open one of the display screens shown above. The display screen descriptions on the previous page indicate the display screens available for each disc format.
- Page 125 Indicates the numbers of the currently playing title and chapter. Indicates the elapsed playback time of the currently playing title (minutes.seconds). Indicates the display bar format. Indicates the elapsed and total playback time of the currently playing chapter. Lexicon DVD-V...
- Page 126 RT-10 Display Bar C Description Indicates whether playback or pause mode is activated. Indicates the numbers of the currently playing title and chapter. Indicates the elapsed playback time of the currently playing title (minutes.seconds). Indicates the display bar format. Indicates the remaining and total playback time of the currently playing chapter.
- Page 127 Indicates whether playback or pause mode is activated. Indicates the numbers of the currently playing track. Indicates the elapsed playback time of the currently playing track. DVD-A Indicates the display bar format. Indicates the total playback time of the currently playing track. Lexicon DVD-A SACD, CD, SVCD...
- Page 128 RT-10 Display Bar I Description Indicates whether playback or pause mode is activated. Indicates the numbers of the currently playing track and the total number of tracks on the loaded disc. Indicates the elapsed playback time of the currently playing track.
- Page 129 3. Press the DISPLAY button again to cycle through all display bars available for the loaded disc. 4-36 To deactivate display mode: Press the DISPLAY button until the display bar closes. Lexicon...
-
Page 130: Troubleshooting And Maintenance
RT-10 Maintenance ........ -
Page 131: Troubleshooting
Incorrect operation is sometimes mistaken for malfunction. If problems occur, refer to this section for troubleshooting information or visit www.lexicon.com for additional troubleshooting information and answers to frequently asked questions. If problems persist, contact Lexicon Customer Service at 781-280-0300 or www.lexicon.com. - Page 132 VIDEO reactivate the video output connectors. 4. If the RT-10 has a component video output connection and the associated display device is not progressive-scan compatible, set the Component Video parameter (3-27) to Interlace or reconnect the RT-10 to the associated display device with an S-video or composite video output connection.
- Page 133 RT-10 is connected to a VCR or A/V selector. RF interference is present in the video output. 1. Make sure the RT-10 is not positioned near unshielded TV or FM antennas, cable TV decoders, and other RF emitting devices that might cause interference. Replace unshielded cables with shielded cables whenever possible.
- Page 134 In particular, make sure volume is set to an audible level. 4. Make sure the RT-10 has a digital and an analog audio output connection (2-13). Some disc formats, such as DVD-As and SACDs, do not generate digital audio output signals.
- Page 135 RT-10. Dialog sounds muffled. 1. If the RT-10 has a stereo audio output connection, set the Audio Out parameter (3-16) to 2 Channel. 2. If the speaker setup does not include a center speaker, make sure a center speaker is not selected with the component that was used to configure speaker settings.
- Page 136 2. Make sure a compatible disc format is loaded (1-5). 3. If a DVD-V is loaded, make sure the RT-10 region code is compatible with the DVD-V region code. The map shown on page 1-4 indicates DVD-V region codes for all areas of the world.
- Page 137 PROTECT PROGRAM. UNPLAYABLE." appears on the on-screen display. Playback automatically stops when an DVD-A is loaded. 1. The disc might have been illegally copied. The RT-10 does not allow playback of DVD-As that have been illegally copied. Playback activates for the selected SACD track, but the output format is incorrect.
- Page 138 RT-10 Some MP3 tracks appear to be missing from the loaded disc. 1. The RT-10 recognizes a maximum of 250 folders per disc and 250 tracks per folder. It ignores all folders and tracks that exceed this number. Playback does not begin from a bookmarked playback time on the loaded disc.
- Page 139 (continued from page 5-9) Setup menu parameter settings are cancelled. 1. Parameter settings might not have been stored if the RT-10 was powered off or standby mode was activated before the Setup menu was closed. If this occurs, all parameters are reset to their previously stored setting.
- Page 140 5.1 Channel or None. 4. Set the Screen Saver parameter (3-28) to Off. Test Tones automatically mute when the Lexicon screen saver appears on the on-screen display. Video Adjust bars exceed the on-screen display margins.
- Page 141 1. Make sure playback of an SACD, CD, or MP3 is activated. When the DISP_MODE parameter is set to ON, the RT-10 deactivates the front panel display during SACD, CD, or MP3 playback. The front panel display is not deactivated when other disc formats are loaded or when stop, resume, or pause mode is activated.
- Page 142 RT-10 Preferred disc settings (4-10) are not recalled when a disc is loaded. 1. Make sure a DVD-V is loaded. Preferred disc settings cannot be stored (or recalled) for other disc formats. 2. The preferred disc settings might have been deleted. Preferred disc settings can be stored for up to 15 discs.
- Page 143 When set to Off, program lists for the loaded disc are automatically deleted when the disc drawer is opened, standby mode is activated, the RT-10 is powered off, or factory-default settings are restored. Program list modifications are not saved.
-
Page 144: Miscellaneous Issues
+ time search mode might not find the selected frame. MISCELLANEOUS ISSUES The RT-10 is exhibiting erratic behavior. 1. Press the front panel On/Off button to power the RT-10 off. Wait 10 seconds. Then, press the On/Off button again to power the RT-10 on. -
Page 145: Disc Maintenance
1. Record all user-defined settings on the installation worksheet that begins on page A-17. 2. If the RT-10 is powered off, proceed to step 3. If the RT-10 is powered on, press the front panel On/Off button to power the RT-10 off. - Page 146 Appendix Specifications ..........A-2 Declaration of Conformity .
-
Page 147: Specifications
Appendix SPECIFICATIONS Note the following: • The RT-10 is manufactured for sale in several different countries. Each version features a rear panel that includes connectors appropriate to that particular region. These specifications include all possible connectors. However, certain connectors are not included on some versions. These instances are noted in the rear panel connector descriptions that begin on page 2-8. -
Page 148: Declaration Of Conformity
Relative Humidity • 85% maximum (no condensation) Rack Mounting • Optional brackets are available for mounting the RT-10 in a standard 19-inch equipment rack Specifications are subject to change without notice. DECLARATION OF CONFORMITY Application of Council Directive(s): 89/336/EEC and 93/68/EEC Standard(s) to which Conformity is Declared: •... -
Page 149: Setup Menu Screens
Appendix Lexicon SETUP MENU SCREENS Setup Navigator Screens... -
Page 150: Setup Menu Screens
Appendix RT-10 Setup Menu Screens (Expert Mode) Setup Menu Screens (Basic Mode) - Page 151 Appendix Lexicon Audio 1 & 2 Tabs...
- Page 152 RT-10 Speaker Setting Screens Gain Setting Screens ENTER ENTER Appendix...
- Page 153 Appendix Lexicon Video 1 & 2 Tabs...
- Page 154 Appendix RT-10 Video Adjust Screens...
- Page 155 Appendix Lexicon Language Tab “Other” Language Screens A-10...
- Page 156 Appendix RT-10 General Tab Parental Lock: Password Screens A-11...
- Page 157 Appendix Parental Lock: Password Change Screens Parental Lock: Level Screens A-12 Lexicon...
- Page 158 Appendix RT-10 Parental Lock: Country Code Screens Bonus Group Screens Function Memory Menu A-13...
-
Page 159: Table Of Languages & Language Codes
Persian 0601 Finnish 0609 Fiji 0610 Faroese 0615 Frisian 0625 Irish 0701 Scots-Gaelic 0704 Galician 0712 Guarani 0714 Gujarati 0721 Lexicon Numeric Language Code Abb. Hausa 0801 Hindi 0809 Croatian 0818 Hungarian 0821 Armenian 0825 Interlingua 0901 Interlingue 0905 Inupiak... - Page 160 RT-10 Numeric Language Code Abb. Laothian 1215 Lithuanian 1220 Latvian 1222 Malagasy 1307 Maori 1309 Macedonian 1311 Malayalam 1312 Mongolian 1314 Moldavian 1315 Marathi 1318 Malay 1319 Maltese 1320 Burmese 1325 Nauru 1401 Nepali 1405 Norwegian 1415 Occitan 1503 Oromo...
-
Page 161: Table Of Country Codes
Italy 0920 Japan 1016 Korea, Republic of 1118 Malaysia 1325 Mexico 1324 Netherlands 1412 New Zealand 1426 Norway 1415 Pakistan 1611 Lexicon Numeric Country Code Abb. Philippines 1608 Portugal 1620 Russian Federation 1821 Singapore 1907 Spain 0519 Switzerland 0308 Sweden... -
Page 162: Installation Worksheet
RT-10 INSTALLATION WORKSHEET Setup Navigator Setting Setup Navigator OSD Language TV Type Analog Jacks Center Speaker Surround Speakers Sub-woofer Digital Jack 96kHz PCM Audio Exit Setup Navigator Speaker Setting & Gain Setting L/R (Front Left/Right) C (Center) LS (Surround Left) - Page 163 PureCinema Sharpness High Sharpness Mid Detail White Level Black Level Black Setup Gamma Chroma Level Chroma Delay Memory Prog. Motion Lexicon Language Setting OSD Language Audio Language Subtitle Language Auto Language DVD Language Subtitle Display Subtitle Off General Setting Setup Menu Mode...
- Page 164 96kHz Indicator, 2-7 PCM Audio Prompt, 3-3, 3-8, 3-14 Button, 2-18, 4-19, 4-21, 4-22 Repeat Playback, 2-18, 4-12, 4-19, 4-21 to 4-22 About the RT-10, 1-2 to 1-3 AC Input Connector, 2-8 Advanced Setup Menu, 2-3, 2-16, 3-51 to 3-53, 4-10, 5-12...
- Page 165 Indicator, 2-7 D/A Conversion Audio Signals, A-2 (continued) D/A Conversion Video Signals, A-3 Declaration of Conformity, RT-10, A-3 Detail Parameter, 3-30, 3-31 Digital Audio Output Connectors, 2-10, 2-13, 3-17, A-2 Jack Prompt, 3-3, 3-7 to 3-8 Out Parameter, 3-11, 3-14...
- Page 166 Number Buttons, Remote Control, 2-15, 4-5, 4-22, 3-53 On/Off Button, 2-2 On Screen Display Parameter, 3-29, 3-35 Open/Close Button, 2-3, 2-15 Operating Temperature, RT-10, A-3 Operation Considerations, Remote Control, 2-14 OSD Language Parameter, 3-3, 3-36 Prompt, 3-3, 3-4 Output Impedance, Video, A-3...
- Page 167 Playback, 2-18, 4-12, 4-19 to 4-20 Resume Mode, 2-4, 2-16, 4-14 RETURN Button, 2-16, 3-4, 3-9, 4-5 Reverse Skip/Scan Button, 2-5 RS Parameter, 3-18, 3-22 RT-10 About the, 1-2 to 1-3 Declaration of Conformity, A-3 Dimensions, A-3 Highlights, 1-3 Maintenance, 5-15...
- Page 168 Output, 2-9 to 2-10, 2-11 to 2-13, 5-3 to 5-4, A-2 Output Impedance, A-3 Performance Specifications, A-3 @@@@, i, iii WARNING Warranty, Limited, inside back cover White Level Parameter, 3-30, 3-31 Weight, RT-10, A-3 YNR (Luminance Noise Reduction) Parameter, 3-30, 3-31...
- Page 169 Notes...
- Page 170 Notes...
-
Page 171: Limited Warranty
What Expenses will Lexicon, Inc. Assume? Lexicon, Inc. will pay all labor and material expenses for covered items. Payment of shipping charges is discussed in the next section of the warranty. - Page 172 Lexicon, Inc. 3 Oak Park Bedford, MA 01730-1413 USA 781-280-0300 781-280-0490 www.lexicon.com Customer Support 781-280-0300 781-280-0495 (Sales) 781-280-0499 (Service) Lexicon Part No. 070-15658 | Rev 0 | 01/03...
Need help?
Do you have a question about the RT-10 and is the answer not in the manual?
Questions and answers