Table of Contents
Advertisement
1 of 12 2011-9-23
INSTRUCTION MANUAL
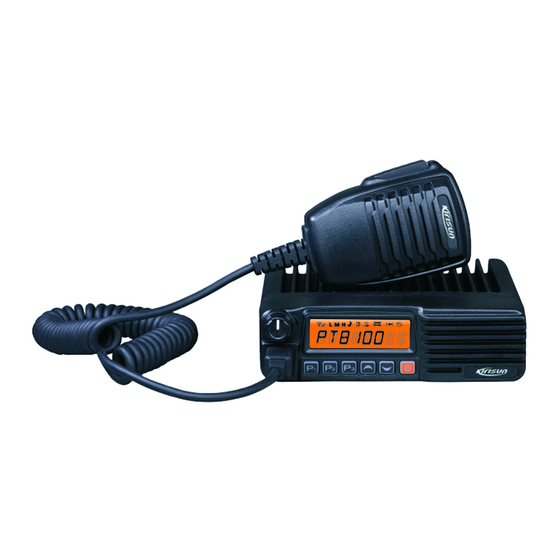
PT8100
VHF/UHF MOBILE RADIO
INSTRUCTION MANUAL
VHF/UHF MOBILE RADIO
MANDATORY SAFETY INSTRUCTIONS TO INSTALLERS AND USERS
Use Only manufacturer or dealer supplied antennas.
Antenna minimum safe distance: 108 cm.
Antennas used for this transmitter must not exceed an antenna gain of 3 dB.
The FCC (Federal Communications Commission) has adopted a safety standard for human exposure to RF
energy which is below the OSHA (Occupational Safety and Health Act) limits.
Antenna mounting: The antenna supplied by the manufacturer or radio dealer must not be mounted at a location
such that during radio transmission, any person can come closer than the above indicated minimum safe distance
to the antenna (i.e. 108cm).
To comply with current FCC RF Exposure limitations, the antenna must be installed at or exceeding the minimum
safe distance indicated above, and in accordance with the requirements to the antenna manufacturer or supplier.
Vehicle installation: The antenna can be mounted at the center of a vehicle metal roof or trunk lid if the minimum
safe distance is observed.
Antenna substitution: Don't substitute any antenna for the one supplied or recommended by the manufacturer
or radio dealer. You may be exposing person(s) to excessive radio frequency radiation. You may contact your radio
dealer or the manufacturer for further instructions.
Maintain a separation distance from the antenna to person(s) at least 108cm.
This transmitter is authorized to operate with a maximum duty factor of 50%, in a typical push-to-talk
mode, for satisfying FCC RF exposure compliance requirements.
Warning
Caution:
Changes or modifications not expressly approved
by the party responsible for compliance could void
the user's authority to operate the equipment.
Operating Instruction of PT8200
Contents
1. Package-opened Inspection and Installing................................................................................... 2
2. Radio Overview ............................................................................................................................ 3
3. Basic Operation............................................................................................................................ 5
4. Programmable Button Function.................................................................................................... 5
5. Radio Call..................................................................................................................................... 6
6. Select Zone .................................................................................................................................. 7
7. Talkaround.................................................................................................................................... 7
8. Utilities.......................................................................................................................................... 7
9. Scan ............................................................................................................................................. 8
Advertisement
Table of Contents

Related Manuals for Kirisun PT8100


Summary of Contents for Kirisun PT8100
-
Page 1: Table Of Contents
1 of 12 2011-9-23 INSTRUCTION MANUAL PT8100 VHF/UHF MOBILE RADIO INSTRUCTION MANUAL VHF/UHF MOBILE RADIO MANDATORY SAFETY INSTRUCTIONS TO INSTALLERS AND USERS Use Only manufacturer or dealer supplied antennas. Antenna minimum safe distance: 108 cm. Antennas used for this transmitter must not exceed an antenna gain of 3 dB. -
Page 2: Package-Opened Inspection And Installing
2 of 12 2011-9-23 9.1 Start/End Scan Function ....................8 9.2 Nuisance Delete........................8 9.3 Edit Scan List ........................8 9.4 Add or Delete the Channels in the Scan List................8 9.5 Set Priority Channel ........................8 10. FCS scan ..............................9 10.1 Enable FCS Scan function...................... -
Page 3: Radio Overview
3 of 12 2011-9-23 First of all, please check whether there is a hole for the power cable on the insulating board. If no, please bore the board with the suitable drill bit and fix a rubber grommet on it. Afterwards, please have the cable pass through the insulating board and lead from the car into the car engine. - Page 4 4 of 12 2011-9-23 (3)LCD display screen For details, see “LCD Display”. (4)Volume Control knob To be used to adjust volume. (5)Microphone/Programming Interface (6) button (programmable button) (7) button (programmable button) (8) button (programmable button) (9) button (programmable button) (10)PTT button (on the hand microphone) Press the PTT button first, and then speak to the microphone to transmit the voice to the other.
-
Page 5: Basic Operation
5 of 12 2011-9-23 3.Basic Operation 1. Startup: Press the red POWER button for a long time (programmable, default set 2 seconds) to switch the radio on/off 2. Volume Press the “MONITOR” or “Squelch” button to listen to the background noise first, and then adjust the volume by turning the volume control knob. -
Page 6: Radio Call
6 of 12 2011-9-23 temporary remove the channel from the current active scan. Start/end the public address function. Press this button and the function will be active. Press the PTT button and speak to the microphone so that you can hear 14. -
Page 7: Select Zone
7 of 12 2011-9-23 Press “PTT” button and speak to the microphone in normal voice. Please keep the microphone about 3 to 4 cm far from your mouth. After speaking, please loosen the “PTT”. G. Press button to return to the previous operation. 5.2 Receive Selective Call Receiving a selective call, you will hear the alert tone and the LED indicator will blink orange. -
Page 8: Scan
8 of 12 2011-9-23 Press button until “UTILITY”. Press button for selection. Press button until the items you require are showed. Press button for select. The radio will show the current setup. Press button to show all items that can be set with this item. Press button to select this setup Press... -
Page 9: Fcs Scan
9 of 12 2011-9-23 C. Press button to select “SCAN LIST”. D. Press button until “ADD LST?” or DEL LST?”. E. Press button for selection. F. Press button until the channel you want to add or delete. G. Press button to complete operation you will see “CHNSAVE” (If you added a channel)or “CHN DEL”. -
Page 10: Ost
10 of 12 2011-9-23 11. OST In a certain specific channel, you can revise the CTCSS/DCS encode/decode setup of current channel. The operating steps go as follows: Press the “OST” button to enter the OST menu mode. Press button until the CTCSS/DCS encode/decode you want. C. -
Page 11: Wired Clone Mode
11 of 12 2011-9-23 13. Wired Clone Mode If the wired clone function is enabled, the radio will not quit after entering the wired clone mode. To return to normal user mode, the user needs to restart the machine. The operating steps go as follows: Press [P1] and [P2] buttons for power-on until show “CLONE”... -
Page 12: Major Specifications
12 of 12 2011-9-23 receiving dictator replace B. The audio power amplifier TDA1519C is broken. Please lights but no sound is heard. 15. Major Specifications Frequency Range: 136MHz—174MHz 400MHz--450MHz 438MHz--490MHz 470MHz--512MHz Channel Number: 256 (divided into 16 zones and at most 16 channels per zone) Channel Spacing: 25 kHz (wide band)/ 20 kHz (medium band) /12.5 kHz (narrow band) Operating Voltage: 13.6V DC±10%...
Need help?
Do you have a question about the PT8100 and is the answer not in the manual?
Questions and answers