
Related Manuals for Abbott FreeStyle Navigator


Summary of Contents for Abbott FreeStyle Navigator
- Page 1 User’s Guide CAUTION: Federal law restricts this device to sale by or on the order of a physician.
-
Page 3: Indications For Use
The FreeStyle Navigator® Continuous Glucose Monitoring System provides real-time readings, graphs, trends, and glucose alarms directly to the user. The FreeStyle Navigator® Continuous Glucose Monitoring System is intended to be used in home settings to aid people with diabetes in predicting and detecting episodes of hypoglycemia and hyperglycemia and in clinical settings to aid health care professionals in evaluating glucose control. -
Page 5: How To Use This Guide
The index is a tool you could use to quickly find terms and items that you are looking for. • FreeStyle Navigator® and FreeStyle® are registered trademarks of the Abbott Group of Companies in various jurisdictions. •... -
Page 6: Table Of Contents
Table of Contents Section 1: Getting Acquainted........... . 1 – 12 n ... - Page 7 Section 10: Respond to Alarms, Errors, and Problems ......89 – 108 n ...
-
Page 9: Getting Acquainted
1 Getting Acquainted... - Page 10 Section 1 – Key Terms Alarms Blood Glucose Mode Continuous Monitoring Mode FreeStyle Navigator Continuous Glucose Monitoring System FreeStyle Test Strips in vitro Interstitial Fluid LeFT/RIGhT Option Buttons Receiver Receiver Display Screen Receiver Test Strip Port...
- Page 11 Your FreeStyle Navigator system continuously reads, displays, and records the glucose levels in the fluids found between the cells under your skin (interstitial fluids). It does this by using a small, thin, plastic sensor inserted just under the skin.
- Page 12 1 Vial of 50 FreeStyle Strips and Strip Insert • 1 Warranty Registration Card • • In addition, the FreeStyle Navigator system can transfer data to a computer wirelessly using Bluetooth® technology. Important Notes: The F reeStyle Navigator® Continuous Glucose Monitoring System is designed as a complete •...
- Page 13 A FreeStyle Navigator Sensor that you insert about 5 mm under your skin. Each inserted sensor is intended to remain in place and provide a continuous glucose reading for up to 5 days. The sensor is contained in the Sensor Delivery Unit.
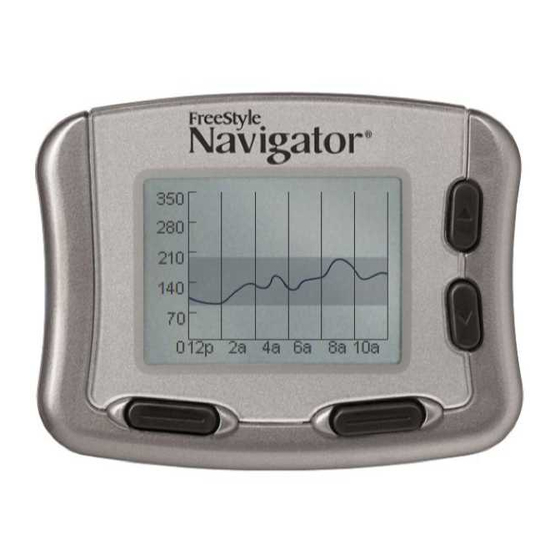
- Page 14 Section 1 Getting Acquainted Key features of the System Alarms Stats 21 day 08:30A Highest CM: 298 mg/dL Lowest CM: 61 mg/dL Ave. CM: 160 mg/dL Std. Dev: 20 mg/dL Above Target: 19% Next Back Statistics Select Event 08:30A Insulin Meals Exercise State of Health...
- Page 15 Section 1 Getting Acquainted Using your system For Daily Activities You will be wearing a sensor and a transmitter at all times while you are using the system. Keep the following in mind as you go about your normal routine. •...
- Page 16 Section 1 Getting Acquainted How do I prepare my system for the first time? When you are setting up your receiver for the first time, perform all of the procedures listed below in the order that they are listed. Check each procedure off when you complete it. Install batteries in the transmitter first and then in the receiver (see Section 2).
-
Page 17: Warnings, Cautions And Important Notes
• The FreeStyle Navigator system includes built-in self-checks to detect conditions that may cause the sensor to not function properly. On rare occasions the system may not be able to detect all such conditions (for example if the adhesive peels up from your skin), and you may get inaccurate results in the Continuous Monitoring mode. - Page 18 • Before adjusting treatment for diabetes management based on the continuous glucose results from your FreeStyle Navigator system, perform a Blood Glucose mode test to confirm the continuous result. • A portion of the membrane polymer will remain in the skin each time the sensor is removed. Although no health effects were observed or reported in clinical studies, the long term effects of the sensor membrane fragments remaining in the skin have not been determined.
- Page 19 HAM radio equipment. The FreeStyle Navigator system is designed to sense and notify you about a lost connection. If your FreeStyle Navigator system loses the radio connection, increase the separation distance between yourself and the transmitter by moving away from the HAM radio.
- Page 20 • Do not use the FreeStyle Navigator system for diagnosing diabetes, testing newborns, or testing arterial or venous blood. Customer Care: 1-866-597-5520...
-
Page 21: Hypoglycemia Unawareness
Section 1 Getting Acquainted What is Hypoglycemia Unawareness? Hypoglycemia unawareness is a condition where you are having hypoglycemia but you do not have any of the usual warning symptoms (such as rapid heartbeat, sweating, shakiness, anxiety, or a tingling sensation in your fingers or toes). Those warning symptoms are either absent or greatly reduced. Instead, the first sign may be confusion or impaired thinking, which makes it even more difficult to know if you are experiencing low blood glucose. -
Page 22: Blood Glucose Mode (Bg))
– Uses a sensor to measure glucose levels. – A transmitter sends the glucose readings to the receiver. – Should only be used with FreeStyle Navigator system Transmitters and FreeStyle Navigator Sensors. Blood Glucose Mode (Glucose BG) -
Page 23: Install Or Replace Transmitter And Receiver Batteries
2 Install or Replace Transmitter and Receiver Batteries... - Page 24 Section 2 – Key Terms Alarm Icon Receiver Transmitter Battery Life Alkaline Batteries 357 hC Silver Oxide Battery Reconnect Customer Care: 1-866-597-5520...
- Page 25 Section 2 Install or Replace Transmitter and Receiver Batteries 2 Install or Replace Transmitter and Receiver Batteries Purpose To ensure that your FreeStyle Navigator system has power to operate properly. Start Do this procedure: • The first time you use your FreeStyle Navigator system. • When the receiver displays the Low Battery message and alarm and the battery icon appears on the screen.
- Page 26 Section 2 Install or Replace Transmitter and Receiver Batteries Install or Replace the Transmitter Battery Turn the circular battery door counterclockwise with either a coin or your fingernail. (Fig. 1) Carefully remove the battery door. Remove the old battery, if any, and discard it properly. Insert a NEW silver oxide 357 HC battery with the plus Fig.
- Page 27 Section 2 Install or Replace Transmitter and Receiver Batteries Match what you see on your Receiver with ONE of the screen shots shown below. If the display is Then • Press the RIGHT Option button to see if the screen turns on.
- Page 28 Section 2 Install or Replace Transmitter and Receiver Batteries Reconnect the Receiver to the Transmitter. Place the receiver within 10 feet of the transmitter. System Menu 08:30A Reconnect Press the RIGHT Option button twice to display the Data Upload Main Menu screen. Status Link Use the UP...
-
Page 29: Set The Time And Date
3 Set the Time and Date... - Page 30 Section 3 – Key Terms LeFT/RIGhT Option Buttons Main Menu Receiver System Menu Transmitter UP/DOwN Arrow Buttons Customer Care: 1-866-597-5520...
- Page 31 Do this procedure: • The first time you use your FreeStyle Navigator system. • When you install new batteries. Materials Your FreeStyle Navigator Receiver. Helpful Information Important: Be sure to set the date and time correctly. The correctness of the line graph and statistical reports depends upon the date and the time being correct.
- Page 32 Section 3 Set the Time and Date Steps Do This Go to the System screen. a. Press the DOWN Arrow button to highlight System. Main 08:30A Glucose b. Press the RIGHT Option button (Select) to go to the Alarms Reports System Menu screen.
- Page 33 Press the LEFT Option button (Main) to return to the Main screen. Check your work. Result: Your FreeStyle Navigator Receiver is operating with the correct time and date. You have done this procedure correctly when: The time is correct.
- Page 34 Customer Care: 1-866-597-5520...
-
Page 35: Perform A Control Solution Test
4 Perform a Control Solution Test... - Page 36 Section 4 – Key Terms Control Solution Test FreeStyle Control Solution FreeStyle Test Strips LeFT/RIGhT Option Buttons Receiver UP/DOwN Arrow Buttons Customer Care: 1-866-597-5520...
- Page 37 Section 4 Perform a Control Solution Test 4 Perform a Control Solution Test Purpose The purpose of the control solution test is to: • Ensure that your receiver and test strips are working properly prior to calibration or blood glucose testing. • Check that you are following the correct testing procedure.
- Page 38 Section 4 Perform a Control Solution Test Steps Do This Verify that your FreeStyle Control Solution is current. Note: FreeStyle Control Solution is good for three months after opening the bottle, or until the expiration date printed on the label, whichever comes first. Count forward three months from the date you open a new bottle of control solution.
- Page 39 Section 4 Perform a Control Solution Test Steps Do This Insert test strip into the receiver. a. Turn the test strip so “FreeStyle” text faces up. b. Grasp the test strip by the end with the two half circles. c. Insert the end with the dark rectangle into the receiver at the lower left corner of the receiver.
-
Page 40: Control Solution
Section 4 Perform a Control Solution Test Steps Do This Apply control solution. Important: Do NOT apply control solution to both edges of the test strip. Notes: • Gently touch ONLY ONE EDGE of the test strip to the control solution next to one of the dark half-circles. • If progress tones are turned on, the receiver will beep to indicate that enough control solution was applied. - Page 41 Section 4 Perform a Control Solution Test Steps Do This Evaluate the test results. Compare the test results displayed on the screen to the range printed on the vial of test strips. If the result Then • Falls WITHIN the Go to Step 8. ➜...
- Page 42 Customer Care: 1-866-597-5520...
-
Page 43: Insert Or Remove Your Sensor
5 Insert or Remove Your Sensor... - Page 44 Section 5 – Key Terms Calibration Sensor Inserter Sensor Release Tabs Reconnect Sensor Insertion Button Sensor Support Mount Sensor Sensor Insertion Site Sharps Container Sensor Delivery Unit Sensor Locking Pin Transmitter Receiver Connection Now that you are ready to insert a sensor, here are a few helpful tips. •...
- Page 45 5 Insert or Remove Your Sensor Purpose To insert, remove, or replace a small, thin, plastic sensor under your skin so that your FreeStyle Navigator system can continuously monitor your glucose level. Start Do this procedure: • The first time you use your FreeStyle Navigator system.
-
Page 46: Insert Your Sensor
Section 5 Insert or Remove Your Sensor Important Things to Know About Getting Reliable Results Caution: Movement of the sensor support mount or excessive perspiration at the sensor insertion site due to activities like vigorous exercise or bumping against objects may lead to poor adhesion of the support mount to the skin and then cause the sensor to dislodge. - Page 47 Section 5 Insert or Remove Your Sensor Steps Do This Remove the sensor. a. Wipe a small amount of isopropyl alcohol around the edges of the sensor support mount. Note: You can use a regular alcohol prep pad from your local drugstore.
-
Page 48: The Transmitter
Section 5 Insert or Remove Your Sensor Steps Do This End sensor session. a. Press the RIGHT Option button twice to get to the Main menu. 08:30A b. Press the UP/DOWN Arrow button to highlight System. c. Press the RIGHT Option button to select System. Did You Remove The Sensor? d. -
Page 49: Prepare The Insertion Site
Section 5 Insert or Remove Your Sensor Steps Do This Prepare the insertion site. a. Wash your hands thoroughly with soap and water. b. Clean the selected insertion site area with soap and water. c. Rinse the area thoroughly and pat dry. d. - Page 50 Section 5 Insert or Remove Your Sensor Steps Do This Attach the sensor delivery unit to your skin. a. Locate the top of the sensor support mount. b. Follow the instructions below as you place the sensor support mount, adhesive-side down, on the insertion site: Top of the Sensor Support Mount...
- Page 51 Section 5 Insert or Remove Your Sensor Steps Do This Remove the locking pin. a. Grasp the top of the locking pin with your thumb and index finger. b. Twist the locking pin a 1/4 turn in either direction until the locking pin clicks.
- Page 52 Section 5 Insert or Remove Your Sensor Steps Do This Check the sensor support mount. a. Confirm the sensor support mount remains tightly adhered to your skin by sliding your finger along the edges of the adhesive pad and examine for any gaps in adhesion.
- Page 53 Section 5 Insert or Remove Your Sensor Steps Do This Discard the sensor inserter safely. We recommend a sharps container or a puncture-proof container with a tight lid. Check your work. Result: An inserted sensor, a removed sensor, or a replaced sensor.
- Page 54 Customer Care: 1-866-597-5520...
-
Page 55: Attach Your Transmitter
6 Attach Your Transmitter... -
Page 56: Sensor Code
Section 6 – Key Terms LeFT/RIGhT Option Buttons Receiver Sensor Code Sensor Support Mount System Transmitter UP/DOwN Arrow Buttons Customer Care: 1-866-597-5520... - Page 57 Start Do this procedure after inserting a new sensor. Materials Your FreeStyle Navigator Transmitter with battery installed. Helpful Information Important: Do NOT remove or replace the transmitter from the sensor support mount while wearing a sensor. If you notice that the transmitter is not properly attached, replace the sensor with a new sensor and then re-attach the transmitter.
- Page 58 Section 6 Attach Your Transmitter Steps Do This Attach the transmitter to the sensor support mount. a. Position the transmitter over the sensor support mount so that the battery side faces the mount. b. Lower the transmitter onto the mount. Note: It helps to position the transmitter’s connector directly over the round part of the “keyhole”...
- Page 59 Section 6 Attach Your Transmitter Steps Do This Apply an over-bandage (Optional). Apply an over-bandage to hold down the transmitter and sensor support mount. Use an over-bandage if you find that the sensor support mount is not adhering well during daily activities.
- Page 60 Section 6 Attach Your Transmitter Steps Do This Check your work. Result: A transmitter ready to send glucose data. You have done this procedure correctly when: The transmitter is securely attached to the sensor support mount. You have applied an over-bandage as necessary to hold down the transmitter and the sensor support mount.
-
Page 61: Calibrate Your System/Test Blood Glucose Manually
7 Calibrate Your System/Test Blood Glucose Manually... - Page 62 Section 7 – Key Terms BG Mode Calibrate Calibration BG Control Solution FreeStyle Test Strips Icon Lancet Lancing Device Lancing Device Cocking handle Lancing Device Depth Indicator window Lancing Device Depth Setting Lancing Device Lancet Cup holder LeFT/RIGhT Option Buttons Receiver Test Strip Port Sharps Container UP/DOwN Arrow Buttons...
- Page 63 Section 7 Calibrate Your System/Test Blood Glucose Manually 7 Calibrate Your System/Test Blood Glucose Manually Purpose To ensure the receiver will calculate your glucose readings accurately. Start Do this procedure: • Each time the receiver prompts you with the message, “Do BG Test. ” You will see a blood drop icon on the screen and you will also hear the system beep (or vibrate).
- Page 64 Section 7 Calibrate Your System/Test Blood Glucose Manually Helpful Information (con’t) MUST successfully complete 4 calibration tests. You will calibrate at approximately 10, 12, 24 and • 72 hours after sensor insertion. If you do not complete calibration tests successfully in the allotted time periods, your glucose readings will NOT be displayed and alarms will be inactive.
- Page 65 Section 7 Calibrate Your System/Test Blood Glucose Manually Helpful Information (con’t) Some common reasons for unsuccessful calibrations • Your BG test result is below 60 mg/dL (3.3 mmol/L) or above 300 mg/dL (16.7 mmol/L). Perform the calibration test when your blood glucose is within the above range. •...
- Page 66 Section 7 Calibrate Your System/Test Blood Glucose Manually Steps Do This Insert a FreeStyle Test Strip into the receiver’s test strip port. a. Insert the end with the dark rectangle. b. Gently push until the test strip stops. Result: The receiver will display the most recently used test strip code number.
- Page 67 Section 7 Calibrate Your System/Test Blood Glucose Manually Steps Do This Select a test site. Caution: If you have hypoglycemia, or hypoglycemia unawareness, then test ONLY on your fingers. Note 1: Vary the sites from test to test to avoid tenderness and to avoid creating calluses.
- Page 68 Section 7 Calibrate Your System/Test Blood Glucose Manually Steps Do This Prepare for lancing. a. Wash your hands and the selected test site with soap and water. Make sure there is no lotion on the test site. b. Thoroughly dry your hands and the test site. c.
- Page 69 Section 7 Calibrate Your System/Test Blood Glucose Manually Steps Do This Prepare for lancing. (con’t) g. Select the lancing device depth setting. If you are lancing Then • A finger. Set the depth setting to its shallowest depth (1). • Your forearm. Start at Level (2) or higher if your experience with setting 2 does not produce a usable sample.
- Page 70 Section 7 Calibrate Your System/Test Blood Glucose Manually Steps Do This Lance the site. To lance your finger (grey cap): a. Lightly touch the lancing device against the side of your fingertip. b. Press the release button. c. Put the lancing device down. d.
- Page 71 Section 7 Calibrate Your System/Test Blood Glucose Manually Steps Do This Test the sample. Do Not: • U se test strips more than once. Discard used test strips. • S crape the blood. • A pply blood to the flat side of the test strip. • A pply blood to the test strip when the test strip is out of the receiver. • A pply blood to both edges of the test strip. • P ut blood or foreign objects into the receiver’s test strip port.
- Page 72 Section 7 Calibrate Your System/Test Blood Glucose Manually Steps Do This Interpret the blood glucose results. Caution: Low or high glucose measurements can indicate a potentially serious medical condition. Then You do NOT have low blood • Lo appears in Repeat the test from Step 3 the display.
- Page 73 Section 7 Calibrate Your System/Test Blood Glucose Manually Steps Do This Remove and discard the test strip Important: Test strips may be used only once. Discard used test strips. Discard the lancet. Note: Use a sealed container such as a sharps container to avoid biohazards.
- Page 74 Customer Care: 1-866-597-5520...
-
Page 75: Set, Review, Or Change The Alarm Settings
8 Set, Review, or Change the Alarm Settings... - Page 76 Section 8 – Key Terms Alarm Menu Alarm Sensitivity Alarm Type Data Loss high Glucose Alarm high Glucose Threshold LeFT/RIGhT Option Buttons Low Glucose Alarm Low Glucose Threshold Main Menu Progress Tones Projected high Alarm Projected Low Alarm Receiver System System Alarms UP/DOwN Arrow Buttons Customer Care: 1-866-597-5520...
- Page 77 Caution: Before adjusting treatment for diabetes management based on the continuous glucose results from your FreeStyle Navigator system, perform a Blood Glucose mode test to confirm the continuous result.
-
Page 78: About Glucose Alarms
Set, Review, or Change the Alarm Settings About Glucose Alarms The FreeStyle Navigator® system is designed to alert you when your glucose levels reach preset low or high values. These values or ‘threshold values’ can be programmed in the receiver for any individual. - Page 79 Section 8 Set, Review, or Change the Alarm Settings About Glucose Alarms (con’t) Follow the guidelines below when selecting your alarm settings for detection of high and low glucose conditions. When the detection rate is maximum, you will get the greatest number of alarms. When the detection rate is minimum, you will get the fewest number of alarms.
- Page 80 Section 8 Set, Review, or Change the Alarm Settings Steps Do This Access the Alarms menu from the Main menu. Note: If you don’t press any buttons within 12 seconds, Main 08:30A the receiver screen will go blank and the last change will Glucose be lost if you haven’t pressed the Select button.
-
Page 81: Mute Alarms
Section 8 Set, Review, or Change the Alarm Settings Steps Do This Set, review, or change the Low Glucose alarm. Caution: The Low Glucose alarm cannot be set below 60 mg/dL (3.3 mmol/L). Therefore, it is not intended to Alarm Settings 08:30A Mute Alarms notify you of severe hypoglycemia. - Page 82 Section 8 Set, Review, or Change the Alarm Settings Steps Do This Set, review, or change the High Glucose alarm. Caution: The High Glucose alarm cannot be set above Alarm Settings 08:30A 300 mg/dL (16.7 mmol/L). Therefore, it is not intended Mute Alarms to notify you of severe hyperglycemia.
- Page 83 Section 8 Set, Review, or Change the Alarm Settings Steps Do This Set, review, or change your Projected Low glucose alarm. a. Select Projected Low from the Alarms menu. • Use the UP/DOWN Arrow buttons to highlight Alarm Settings 08:30A Low Glucose (70) Projected Low. High Glucose (275) • Press the RIGHT Option button to select Projected Low (On) Projected Low.
- Page 84 Section 8 Set, Review, or Change the Alarm Settings Steps Do This Set, review, or change your Projected High glucose alarm. a. Select Projected High from the Alarms menu. • Use the UP/DOWN Arrow buttons to highlight Alarm Settings 08:30A Low Glucose (70) Projected High. High Glucose (275) • Press the RIGHT Option button to select Projected Low (On) Projected High.
- Page 85 Section 8 Set, Review, or Change the Alarm Settings Steps Do This Set, review, or change the Data Loss alarms. Important: If you turn off your Data Loss alarms, you must Alarm Settings 08:30A also turn off your Low Glucose, High Glucose, Projected Low Low Glucose (70) and Projected High alarms.
- Page 86 Section 8 Set, Review, or Change the Alarm Settings Steps Do This Set System Alarms. Important: If you turn off the System Alarms, the receiver will NOT prompt you to do the calibration tests after you Alarm Settings 08:30A High Glucose (275) insert a new sensor.
- Page 87 Section 8 Set, Review, or Change the Alarm Settings Steps Do This Set Progress Tones. a. Select Progress Tones from the Alarms menu. Alarm Settings 08:30A Projected Low (On) Projected High (O ) Data Loss System Alarms Progress Tones Main Select Decide what settings you want: • Turn progress tones on or off.
- Page 88 Section 8 Set, Review, or Change the Alarm Settings Steps Do This Mute all audible alarms for 1 hour. Note 1: You will still get vibration, visual alarms will still be displayed and you will continue to get Low Glucose alarms.
-
Page 89: Daily Use
9 Daily Use... - Page 90 Section 9 – Key Terms BG Mode CM Mode Directional Glucose Trend Arrows Icon Receiver Transmitter Transmitter Receiver Connection Customer Care: 1-866-597-5520...
- Page 91 Section 9 Daily Use 9 Daily Use Purpose To read and understand your display screen. Start Do this procedure: • Anytime you are using your system in the Continuous Monitoring mode. Materials Your receiver. Helpful Information • Your receiver and transmitter must be linked, connected, and calibrated in order to use the system in the Continuous Monitoring mode. • When you sleep, place the receiver on a high headboard or on a nearby dresser rather than clipping it to your bed clothing or taking it to bed. Be aware that if the receiver is set to vibrate and if you place it too far from you, you may not hear it vibrate.
- Page 92 Section 9 Daily Use Steps Do This Decide what to do. If you want to Then go to this Step • Connect your receiver and transmitter. • Reconnect your receiver and transmitter. • Interpret the CM screen. • Interpret icons on the CM screen. • Interpret icons on the Main screen. • Turn the receiver backlight on. Reconnect the receiver to the transmitter. a. Place the receiver within 10 feet of the transmitter. b.
- Page 93 (hypoglycemic) and mg/dL high glucose (hyperglycemic) episodes. Main Caution: Before adjusting treatment for diabetes management based on the continuous glucose results from your FreeStyle Navigator system, perform a Blood Glucose mode test to confirm the continuous result. OVER...
- Page 94 Section 9 Daily Use Steps Do This Interpret the icons. Note: The directional trend arrows are different from the projected glucose alarms (Section 8). For example, you can have a projected low glucose alarm and still have a relatively stable trend arrow. This Icon Means Your glucose is changing gradually, changing at a rate of less...
- Page 95 Section 9 Daily Use Steps Do This Turn the Backlight on. a. In order to turn the backlight on, your receiver has to Press be turned off. If the receiver is on, wait for 12 seconds First to allow the receiver to turn off. Press b.
- Page 96 Customer Care: 1-866-597-5520...
-
Page 97: Respond To Alarms, Errors, And Problems
10 Respond to Alarms, Errors, and Problems... - Page 98 Section 10 – Key Terms Alarms Menu Calibration BG CM Status Calibration high Glucose Alarm Icon Low Glucose Alarm Projected high Alarm Projected Low Alarm Receiver Status Sensor Sensor Support Mount Status Information Transmitter Transmitter Receiver Connection Transmitter Status Customer Care: 1-866-597-5520...
- Page 99 Blood Glucose mode. • Experience problems with your FreeStyle Navigator system. Materials Your FreeStyle Navigator system. Helpful Information Caution: For ALL alarms, if you do not turn on the display of the receiver within the first hour of the notification of an alarm, the receiver will stop beeping (or vibrating). No further alarms will sound (beep or vibrate) until the display has been activated.
- Page 100 Section 10 Respond to Alarms, Errors, and Problems Status Information The receiver can provide you with a number of different types of Status Information. Available Status Information is listed in the following table. To access the Status information, press the RIGHT option button twice to get to the Main menu and use the UP or DOWN arrow button to highlight System.
- Page 101 Section 10 Respond to Alarms, Errors, and Problems Status Information (con’t) Status Information Description CM Status. Stores recent error codes related to the Continuous Monitoring mode (may be useful when calling Customer Care). CM Status 08:30A Note: The CM Status screen shows information about Last Reset: OK calibration and sensor errors.
- Page 102 Section 10 Respond to Alarms, Errors, and Problems...
- Page 103 Section 10 Respond to Alarms, Errors, and Problems...
- Page 104 Section 10 Respond to Alarms, Errors, and Problems...
- Page 105 Section 10 Respond to Alarms, Errors, and Problems...
- Page 106 Section 10 Respond to Alarms, Errors, and Problems...
- Page 107 Section 10 Respond to Alarms, Errors, and Problems...
- Page 108 Section 10 Respond to Alarms, Errors, and Problems...
- Page 109 Section 10 Respond to Alarms, Errors, and Problems...
- Page 110 Section 10 Respond to Alarms, Errors, and Problems...
- Page 111 Section 10 Respond to Alarms, Errors, and Problems Troubleshoot problems The problems you can troubleshoot in this Section are listed below and are arranged in the order of appearance. Receiver • The receiver will not turn on. • The blood glucose test won’t start after you apply a sample. •...
- Page 112 Section 10 Respond to Alarms, Errors, and Problems The receiver will not turn on. a. Was the test strip inserted correctly (the “FreeStyle” side was up as you inserted the end with the dark rectangle)? If YES, go to Step c. If NO, repeat the test with a new strip taking care that the “FreeStyle”...
- Page 113 Section 10 Respond to Alarms, Errors, and Problems Unexpected characters on the receiver display screen, unusual or unexpected receiver screen appearance. Then The batteries are installed correctly. If you are close to a source of electromagnetic interference (see Appendix C for further details), move away from the interfering source and see if the problem goes away.
- Page 114 Section 10 Respond to Alarms, Errors, and Problems There is no glucose value on the screen. Then You are waiting for the first It has been less than You will see an icon on the calibration. 10 hours after the screen.
- Page 115 Section 10 Respond to Alarms, Errors, and Problems Skin irritation at sensor insertion site. a. Ensure that seams, waistbands, or other constrictive clothing or accessories do not cover the site causing friction. b. Inspect the site. If the irritation is Then Around the edges of the adhesive Lift the edges slightly all around the...
- Page 116 Section 10 Respond to Alarms, Errors, and Problems Discomfort when inserting the sensor. a. Rub the insertion site with ice before inserting the sensor. b. If that doesn’t work, call Customer Care. The system does not recognize a new sensor after attaching the transmitter to the sensor support mount.
- Page 117 Section 10 Respond to Alarms, Errors, and Problems You are not sure whether your receiver and transmitter are connected. Then You do not see the icon Your system is connected. on the screen. There is no connection between the receiver You see the icon.
- Page 118 Section 10 Respond to Alarms, Errors, and Problems The system does not prompt you with a message to do BG test for calibration. Then The system did not prompt Follow the troubleshooting ➜ you with a message recognizing guidelines on sensor recognition. a new sensor after you attached the transmitter to the sensor support mount.
-
Page 119: Add Events
11 Add Events... - Page 120 Section 11 – Key Terms events exercise event Generic event Insulin event LeFT/RIGhT Option Buttons Meal event State Of health event UP/DOwN Arrow Buttons Customer Care: 1-866-597-5520...
- Page 121 Section 11 Add Events 11 Add Events Purpose To create a record of events that may affect your glucose levels. Start Do this procedure any time you observe anything that may affect your glucose levels, including your state of health and daily activities such as meals, exercise, and insulin dosages.
- Page 122 Section 11 Add Events Steps Do This Select the type of event you want to record. Use the UP Arrow button or the DOWN Arrow button to highlight the type of event: If the event deals with Then • Meals or snacks. 1.
- Page 123 Section 11 Add Events Steps Do This Record insulin events. a. Use the LEFT Option button (Next) to select which History 08:30A Insulin item to enter or change (Type, Units, SAVE/CANCEL, 04-09-05 08:30 A Date, Time). Type: Rapid Units: 0.25 b.
- Page 124 Section 11 Add Events Steps Do This Record generic events. a. Use the LEFT Option button (Next) to select which item History 08:30A to enter or change (Event, SAVE/CANCEL, Date, Time). Generic 04-09-05 08:30 A b. Use the UP Arrow button or the DOWN Arrow button Event: to change the selected item.
-
Page 125: Review Reports And Edit Events
12 Review Reports and Edit Events... - Page 126 Section 12 – Key Terms event history Reports events exercise event Generic event Glucose Targets Insulin event LeFT/RIGhT Option Buttons Line Graph Main Menu Meal event Multi-Day Statistics Reports Single-Day Statistics State Of health event Statistical Reports UP/DOwN Arrow Buttons Customer Care: 1-866-597-5520...
- Page 127 Section 12 Review Reports and Edit Events 12 Review Reports and Edit Events Purpose • To review your glucose levels. • To help you and your healthcare team detect patterns in your glucose levels relative to your targets. • To review a history of events that are important to your treatment plan. • To edit event history.
- Page 128 Section 12 Review Reports and Edit Events Steps Do This Decide what you want to do. Note: Your reports will be more meaningful if you set glucose targets. Glucose targets give you something to compare your actual glucose levels with. Decide what to do: If you want to Then...
- Page 129 Section 12 Review Reports and Edit Events Steps Do This View a line graph of your glucose level history. a. Select Line Graphs from the Select Report menu. Select Time Period 08:30A i) Use the UP Arrow button or DOWN Arrow 2 Hour button to highlight Line Graph.
- Page 130 Section 12 Review Reports and Edit Events Steps Do This View a statistical summary of your glucose levels. a. Select Statistics from the Select Reports menu. Stats 3 day 08:30A i) Use the UP Arrow button or DOWN Arrow button Highest CM: 298 mg/dL to highlight Statistics.
- Page 131 Section 12 Review Reports and Edit Events Steps Do This Select the desired statistical Note: Statistics include ONLY continuous glucose results. reading. Glucose readings that were taken in the Blood Glucose mode are NOT included in the statistics. a. Use the UP Arrow button or DOWN Arrow button to highlight the statistic you want to review for the selected period.
- Page 132 Section 12 Review Reports and Edit Events Steps Do This Review or change your event history. a. Select Event History from the Select Reports menu. Select Filter 08:30A CM 60 b. Use the UP or DOWN Arrow button to highlight the CM 120 CM 10 event you want to review or edit.
- Page 133 Section 12 Review Reports and Edit Events Steps Do This Interpret your events. a. Interpret the events using the notes about each type of event in the table below: Event Notes • Each recorded measure is displayed on one screen with its (CM 60, CM 120, date and time. and CM 10) • Displays actual measures at the indicated intervals.
- Page 134 Section 12 Review Reports and Edit Events Steps Do This Edit the event. Note: You CANNOT edit your glucose measurements. a. Press the RIGHT Option button (Edit). b. Use the LEFT Option button (Next) to select the item you want to change. c.
-
Page 135: Clean Your System
13 Clean Your System... - Page 136 Section 13 – Key Terms Receiver Transmitter Contact Points Customer Care: 1-866-597-5520...
- Page 137 • Running water. • A clean, soft, lint-free towel for cleaning and drying. For example, a dish towel. • 70% isopropyl alcohol. Helpful Information • Your FreeStyle Navigator system needs minimal maintenance aside from cleaning and battery replacement. • Avoid getting dust, dirt, blood, control solution, water, or any other substance in the receiver’s test strip port. • Keep your receiver in its protective carrying case when you are not using it.
-
Page 138: Clean Your Transmitter
Section 13 Clean Your System Steps Do This Clean your transmitter. a. Wash the transmitter with mild soap and water. b. Rinse the transmitter thoroughly under running water. c. Dry the transmitter thoroughly with a clean, soft, lint- free towel. d. -
Page 139: Link And Unlink Your Transmitter And Receiver
14 Link and Unlink Your Transmitter and Receiver... - Page 140 Section 14 – Key Terms BG Mode CM Mode Link/Unlink Receiver Transmitter Customer Care: 1-866-597-5520...
- Page 141 Section 14 Link and Unlink Your Transmitter and Receiver 14 Link and Unlink Your Transmitter and Receiver Purpose To enable secure communication between your transmitter and your receiver. Start Do this procedure: • When you replace either your transmitter or your receiver. Materials Gather these materials before you begin: • Your receiver.
- Page 142 Section 14 Link and Unlink Your Transmitter and Receiver Steps Do This Decide what you want to do. Then go If you want to to Step • Unlink your receiver from your transmitter. • Link your receiver to your transmitter. • Check your work. Unlink your receiver from your transmitter. a. Press the RIGHT Option button twice to display the Link 08:30A Main menu.
- Page 143 Section 14 Link and Unlink Your Transmitter and Receiver Steps Do This Link your receiver to your transmitter. a. Place the receiver within 10 feet of the transmitter. Link 08:30A b. Press the RIGHT Option button twice to display the Main menu.
- Page 144 Customer Care: 1-866-597-5520...
-
Page 145: Reset User Settings
15 Reset User Settings... - Page 146 Customer Care: 1-866-597-5520...
- Page 147 Do this procedure anytime you feel a need to return your settings to the factory defaults. Materials Your FreeStyle Navigator Receiver. Helpful Information • If you don’t press any button within 12 seconds, the receiver screen will go blank and the last change will be lost if you haven’t pressed the Select button.
- Page 148 Section 15 Reset User Settings Steps Do This Access the Reset User Settings screen. a. Press the UP or DOWN Arrow button to highlight System Menu 08:30A Reset User Settings. Status Link b. Press the RIGHT Option button (Select) to go to the Set Date/Time Reset User Settings Screen.
-
Page 149: Change Country Settings
16 Change Country Settings... - Page 150 Section 16 – Key Terms LeFT/RIGhT Option Buttons Receiver System Menu UP/DOwN Arrow Buttons Customer Care: 1-866-597-5520...
- Page 151 Section 16 Change Country Settings 16 Change Country Settings Purpose To set the date and time formats, the language, and the decimal format. Start Do this procedure when your requirements differ from the country setting currently being used by the system. Materials Gather these materials before you begin: • Your requirements for displaying date, time format and the other items...
- Page 152 Section 16 Change Country Settings Steps Do This Access the Country Settings menu. a. Press the UP or DOWN Arrow button to highlight System Menu 08:30A Country Settings. Data Upload b. Press the RIGHT Option button (Select) to go to the Status Link Country Settings screen.
- Page 153 Section 16 Change Country Settings Steps Do This Change the Date Format. a. Use the UP or DOWN Arrow button to highlight Date Format. Country Settings 08:30A Language (English) b. Press the RIGHT Option button (Select) to go to the Date Format (mm-dd-yy) Time Format...
- Page 154 Section 16 Change Country Settings Steps Do This Change the Decimal Format. a. Use the UP or DOWN Arrow button to highlight Country Settings 08:30A Decimal Format. Language (English) b. Press the RIGHT Option button (Select) to go to the Date Format (mm-dd-yy) Time Format...
-
Page 155: Appendix A: Site Maintenance
17 Appendix A: Site Maintenance... - Page 156 Section 17 – Appendix A Adhesive enhancers Antiseptics Dressings Site Rotation Skin Barriers Customer Care: 1-866-597-5520...
- Page 157 Section 17 Appendix A: Site Maintenance 17 Appendix A: Site Maintenance Introduction Careful site selection, preparation, and maintenance can help to lower the risk of infection and improve sensor adhesion. In addition to site selection, a number of helpful products are available. Site Selection Site rotation helps prevent discomfort, irritation, bruising, skin rashes, and sensitivity to adhesives.
- Page 158 Customer Care: 1-866-597-5520...
-
Page 159: Appendix B: Specifications
18 Appendix B: Specifications... - Page 160 Section 18 – Appendix B Calibration hematocrit Interstitial Fluid Receiver Transmitter Customer Care: 1-866-597-5520...
-
Page 161: System Specifications
Section 18 Appendix B: Specifications 18 Appendix B: Specifications System Specifications Your FreeStyle Navigator system specifications are listed in the following table: 40 º F to 104 º F (4 º C to 40 º C). Operating Temperature Storage Temperature Store the transmitter and receiver between 14º... - Page 162 Section 18 Appendix B: Specifications 18 Appendix B: Specifications (con’t) Receiver Size Height: 2.5 in. (6.3 cm). Width: 3.24 in. (8.2 cm). Depth: 0.88 in. (2.2 cm). Receiver Weight 3.5 oz. (99.2 grams) – including batteries. Receiver Battery Life Up to 60 days. Automatic Shutoff Built-in blood glucose meter: 2 minutes after last user action.
-
Page 163: Performance Characteristics
The study was conducted in 3 centers and included a total of 58 subjects with diabetes. Each subject wore two FreeStyle Navigator Sensors over a 5-day period. The subjects wore one sensor on the back of the upper arm and one on their abdomen. The FreeStyle Navigator system was calibrated with capillary finger- stick measurements using the built-in FreeStyle Blood Glucose Meter at approximately 10, 12, 24 and 72 hours after insertion of the sensor.All measurements were performed by a trained clinic study staff or the subject. - Page 164 FreeStyle Navigator system together (called a ‘data pair’ or ‘matched data points’) determine what zone of the error grid the results fall into. Table 1 also shows that glucose data measured by FreeStyle Navigator system on the arm and on the abdomen have similar distribution on the error grid. This demonstrates that there is no difference in the performance of the system when worn on the abdomen or on the back of the upper arm.
- Page 165 18 Appendix B: Specifications (con’t) Table 2 is a summary of the statistics that describe how well data from the FreeStyle Navigator system correlates to the results from the reference method. Glucose results from the FreeStyle Navigator system and the corresponding results from the YSI (a total 20362 pairs of data points) in the In- Clinic study were used to determine the correlation.
- Page 166 Error grid analysis (like the Clarke Error Grid Analysis and Continuous Glucose-Error Grid Analysis) is one way to evaluate the accuracy of the FreeStyle Navigator system. The accuracy can also be assessed by analyzing the difference in the glucose results from the FreeStyle Navigator system when compared to the results from the YSI.
- Page 167 Erroneous Readings Table 6c groups the difference between glucose results from the FreeStyle Navigator system and the YSI into different blocks (within 20%, within 30% and within 40% from the YSI). It shows there is little change in the difference from YSI over time, thus demonstrating sensor stability.
- Page 168 (con’t) Stability of Sensor Calibration FreeStyle Navigator system typically requires a calibration at 10, 12, 24 and 72 hours after insertion of the sensor. This section presents information about the performance of the system by the 4 calibration periods. The table (Table 6d) breaks each calibration period into smaller slots and summarizes the difference from YSI in each slot.
- Page 169 (con’t) Figure 2. Sample of a Representative ‘Excellent’ Glucose Trace 102 106 110 114 118 122 Sensor Time (hours) FreeStyle Navigator YSI Reference FreeStyle Calibration Night Time (11pm to 6am) Figure 3. Sample of a Representative ‘ A verage’ Glucose Trace...
- Page 170 The performance of low and high glucose alarms was assessed in an in-clinic study using 58 subjects with type 1 diabetes wearing one FreeStyle Navigator sensor on the arm and one sensor on the abdomen. FreeStyle Navigator continuous data were masked from the subjects and investigators and the alarms were not turned on.
- Page 171 See Table 7 below for detection of low glucose. As an example, when the threshold alarm was set at 70 mg/dL (during the day), 56 % of the low glucose events were detected by FreeStyle Navigator. Table 7. Low Glucose Detection...
- Page 172 (con’t) Measuring Glucose in Interstitial Fluid FreeStyle Navigator system measures glucose in the interstitial fluid (ISF) by means of a sensor that is inserted about 5 mm under the skin. Interstitial fluid is the fluid between the body’s cells. Physiologic differences between the interstitial fluid and capillary blood may result in differences in glucose measurements.
-
Page 173: Appendix C: Fcc Compliance Information
19 Appendix C: FCC Compliance Information... - Page 174 Section 18 Appendix B: Specifications Customer Care: 1-866-597-5520...
- Page 175 The FreeStyle Navigator® Transmitter and Receiver communicate using radio frequency waves. The FreeStyle Navigator system has been designed to be reliable and immune to common electromagnetic interference so that it is not influenced by such interference. However, under rare circumstances, if you happen to be in an environment of strong electromagnetic radiation, there may be some interference.
- Page 176 Section 19 Appendix C: Classification/Compliance/Declaration 19 Appendix C: FCC Compliance Information (con’t)
- Page 177 Section 19 Appendix C: Classification/Compliance/Declaration 19 Appendix C: FCC Compliance Information (con’t)
- Page 178 Section 19 Appendix C: Classification/Compliance/Declaration 19 Appendix C: FCC Compliance Information (con’t)
- Page 179 Section 19 Appendix C: Classification/Compliance/Declaration 19 Appendix C: FCC Compliance Information (con’t)
- Page 180 HAM radio equipment. The FreeStyle Navigator system is designed to sense and notify you about a lost connection. If your FreeStyle Navigator system loses the radio connection, increase the separation distance between yourself and the transmitter by moving away from the HAM radio.
-
Page 181: Declaration Of Conformity
• Reorient or locate the receiving antenna. • Increase the separation between the equipment and receiver. • Consult the dealer or an experienced radio/TV technician for help. Caution: Changes or modification to the device not expressly approved by Abbott Diabetes Care Inc. could void the user’s authority to operate this equipment. END OF Section 19 OVER... - Page 182 Customer Care: 1-866-597-5520...
-
Page 183: Glossary
20 Glossary... - Page 184 Section 19 Appendix C: Classification/Compliance/Declaration Customer Care: 1-866-597-5520...
- Page 185 Section 20 Glossary 20 Glossary Adhesive Products that can help the adhesive pad on the sensor support mount stick better to your skin Enhancers Alarms Sounds, vibrations, or text that are used by the receiver to notify you of certain conditions. Alarms Menu A menu you can access from the Main menu.
- Page 186 Alarm working. Data Loss alarms sound when the transmitter-receiver connection is broken or when the sensor has expired. The act of transferring data from your FreeStyle Navigator system to a computer. Data Upload Dressings Products that can be used as over-bandages to cover the transmitter. These can help the sensor support mount adhesive stick to your skin.
- Page 187 Section 20 Glossary 20 Glossary (con’t) Glucose Trend Arrows shown on the receiver that let you know whether your glucose levels are stable, Arrows increasing, or decreasing, and how quickly they are changing. A measure of the amount of red blood cells in your body. Hematocrit High Glucose Notifies you when you go above your high glucose threshold (a number you and your healthcare...
- Page 188 The rectangular window on the center of the receiver that displays glucose levels and other Screen important information. The receiver skin is an optional accessory for use with your FreeStyle Navigator Receiver. Receiver Skin Receiver Status Provides you with information regarding the receiver, including serial number, software version, and remaining battery life.
- Page 189 Section 20 Glossary 20 Glossary (con’t) Reports Information about your glucose levels shown in a way to help you and your healthcare team analyze changes in your glucose levels and your treatment plan (such as changes in insulin doses, carbohydrate intake, etc.) Several types of reports are available. Sensor The part of the system that you insert under your skin.
- Page 190 Information about the system and how it is working, such as sensor time or battery life Information remaining. System A short name for the FreeStyle Navigator Continuous Glucose Monitoring System. System Alarms System messages (For example, low battery life, time for calibration). System Menu A menu available from the Main menu that is used to access status information and other functions.
-
Page 191: Index
21 Index... - Page 192 Customer Care: 1-866-597-5520...
- Page 193 Section 21 Index 21 Index Add events 111 Country Settings 141, 143 Adhesive Daily Use 81 Adhesion To Skin 40, 105 Adhesive Enhancers 147 Data Adhesive Removers 37 Data Loss Alarm 67, 75 Data Upload 5 Alarms Glucose Data And Reports 118 Change The Alarms 67 Mute Alarms 78 Date...
- Page 194 Section 21 Index 21 Index (con’t) Icons 84 Site Select An Insertion Site 38 Insertion Blood Glucose Test Site 57 Sensor Insertion 41 Maintain Your Site 147 Insertion Site 38, 39 Site Rotation 147 Prepare Insertion Site 38, 39 Insulin 112, 113 Specifications 151 Interference 165 Standard Deviation 121...
- Page 196 6,338,790; 6,461,496; 6,484,046; 6,503,381; 6,514,718; 6,560,471; 6,565,509; 6,591,125; 6,592,745; 6,605,200; 6,605,201; 6,616,819; 6,618,934; 6,676,816; 6,749,740; 6,893,545; 6,932,894; 6,942,518; 6,973,706; 6,990,366; 7,003,340; 7,003,341; 7,074,308; 7,090,756; 7,299,082. Abbott Diabetes Care Inc., 1360 South Loop Road, Alameda, CA 94502 ©2008 Abbott ART15589 Rev. A 04/08...
Need help?
Do you have a question about the FreeStyle Navigator and is the answer not in the manual?
Questions and answers