
Subscribe to Our Youtube Channel
Related Manuals for Nexcom PEAK 886VL2


Summary of Contents for Nexcom PEAK 886VL2
- Page 1 NEXCOM International Co., Ltd. Industrial Computing Solutions PICMG Single Board Computer (PICMG 1.3) PEAK 886VL2 User Manual NEXCOM International Co., Ltd. www.nexcom.com Published October 2012...
-
Page 2: Table Of Contents
DVI/ HDMI Port Connector .............16 SATA 2 Connectors ................17 Chapter 2: Jumpers and Connectors SATA 3 Connectors ................17 Before You Begin ..................5 IrDA Pin Header ................18 Copyright © 2012 NEXCOM International Co., Ltd. All Rights Reserved. PEAK 886VL2 User Manual... - Page 3 BIOS Setup Utility ..................24 Main ....................24 Advanced ..................25 Chipset ....................37 Boot ....................39 Security .....................40 Save & Exit ..................40 Appendix A: Watchdog Timer WDT Programming Guide ..............42 Copyright © 2012 NEXCOM International Co., Ltd. All Rights Reserved. PEAK 886VL2 User Manual...
-
Page 4: Preface
No describes how to keep the system CE compliant. part of this manual may be reproduced, copied, translated or transmitted in any form or by any means without the prior written consent from NEXCOM Declaration of Conformity International Co., Ltd. -
Page 5: Rohs Compliance
(Cr6+) < 0.1% or 1,000ppm, Polybrominated biphenyls (PBB) < 0.1% or 1,000ppm, and Polybrominated diphenyl Ethers (PBDE) < 0.1% or 1,000ppm. In order to meet the RoHS compliant directives, NEXCOM has established an engineering and manufacturing task force to implement the introduction of green products. -
Page 6: Warranty And Rma
(manuals, cable, etc.) and any components from the card, such as CPU and RAM. If the components were suspected as part of the problems, ▪ If RMA goods can not be repaired, NEXCOM will return it to the customer please note clearly which components are included. Otherwise, NEXCOM without any charge. - Page 7 ESD workstation. If no such station is available, you can provide some ESD protection by wearing an antistatic wrist strap and attaching it to a metal part of the computer chassis. Copyright © 2012 NEXCOM International Co., Ltd. All Rights Reserved. PEAK 886VL2 User Manual...
-
Page 8: Safety Information
There is a danger of explosion if battery is incorrectly replaced. Replace only with the same or equivalent type recommended by the manufacturer. Discard used batteries according to the manufacturer’s instructions. viii Copyright © 2012 NEXCOM International Co., Ltd. All Rights Reserved. PEAK 886VL2 User Manual... -
Page 9: Safety Precautions
RECOMMENDED BY THE MANUFACTURER. DISCARD USED BATTERIES ACCORDING TO THE MANUFACTURER’S INSTRUCTIONS. 10. All cautions and warnings on the equipment should be noted. Copyright © 2012 NEXCOM International Co., Ltd. All Rights Reserved. PEAK 886VL2 User Manual... -
Page 10: Technical Support And Assistance
Preface Technical Support and Assistance Conventions Used in this Manual 1. For the most updated information of NEXCOM products, visit NEXCOM’s Warning: website at www.nexcom.com. Information about certain situations, which if not observed, can cause personal injury. This will prevent injury to yourself 2. -
Page 11: Global Service Contact Information
Milton Keynes, Buckinghamshire Tel: +33 (0)1 40 90 33 35 MK8 0AB, United Kingdom Fax: +33 (0)1 40 90 31 01 Tel: +44-1908-267121 Fax: +44-1908-262042 http://www.nexcom.eu http://www.nexcom.eu Copyright © 2012 NEXCOM International Co., Ltd. All Rights Reserved. PEAK 886VL2 User Manual... - Page 12 Hall C, Block 17, Tian Xing Cui Lang Building, TEL: +86-755-833 7203 No. 49 Yunnan North Rd., FAX: +86-755-833 7213 Nanjing, 210018, China http://www.nexcom.cn Tel: +86-25-8315-3486 Fax: +86-25-8315-3489 http://www.nexcom.cn Copyright © 2012 NEXCOM International Co., Ltd. All Rights Reserved. PEAK 886VL2 User Manual...
- Page 13 Preface Japan NEXCOM Japan 9F, Tamachi Hara Bldg., 4-11-5, Shiba Minato-ku, Tokyo, 108-0014, Japan Tel: +81-3-5419-7830 Fax: +81-3-5419-7832 http://www.nexcom-jp.com xiii Copyright © 2012 NEXCOM International Co., Ltd. All Rights Reserved. PEAK 886VL2 User Manual...
-
Page 14: Package Contents
Preface Package Contents Before continuing, verify that the PEAK 886VL2 package that you received is complete. Your package should have all the items listed in the following table. Item Part Number Name Description 20P0886VL00X0 ASSY PEAK 886VL2 PICMG 1.3 computing board... -
Page 15: Ordering Information
Preface Ordering Information The following information below provides ordering information for PEAK 886VL2. PEAK 886VL2 (P/N: 10P0886VL00X0) RoHS Compliant PICMG1.3 Single computing board, 3rd generation Intel® Core™ processor family with VGA/HDMI/DVI-D/ 2x Gigabit LAN/ 10x USB / 4x SATA / PCIe x16 / TPM (optional) Copyright ©... -
Page 16: Chapter 1: Product Introduction
▪ Display support for VGA, DVI, HDMI, DisplayPort ▪ Support dual channel DDR3 with non-ECC DIMMs 1333/1600MHz up ▪ Dimension 338.58 x 126.39 mm (W x L) (8 layers single side) to 16GB Copyright © 2012 NEXCOM International Co., Ltd. All Rights Reserved. PEAK 886VL2 User Manual... -
Page 17: Hardware Specifications
▪ Supports VGA and DVI/ HDMI/ DisplayPort interface ▪ Support ATX / AT power supplies Audio Dimensions ▪ HDA interface with pin header (reserved function) ▪ 338mm (W) x 126mm (L) Copyright © 2012 NEXCOM International Co., Ltd. All Rights Reserved. PEAK 886VL2 User Manual... - Page 18 ▪ Storage temperatures: -20°C to 80°C ▪ Relative humidity: 10% to 90% (operating, non-condensing) 5% to 95% (non-operating, non-condensing) Certifications ▪ Meet CE ▪ FCC Class A Copyright © 2012 NEXCOM International Co., Ltd. All Rights Reserved. PEAK 886VL2 User Manual...
-
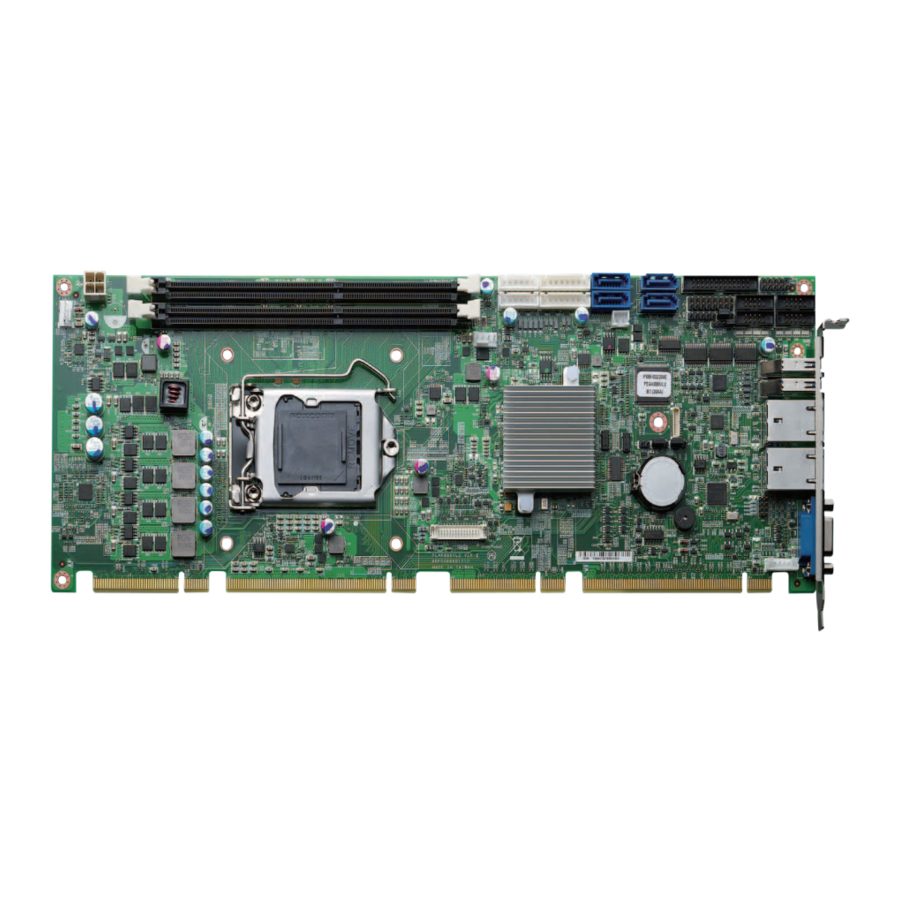
Page 19: Knowing Your Peak 886Vl2
Chapter 1: Product Introduction Knowing Your PEAK 886VL2 USB2.0 x 4 SATA3 x 2 USB3.0 x 4 SATA2(DOM) x 2 ATX-4P ComPort x 4 USB3.0 DVI/DP/HDMI Copyright © 2012 NEXCOM International Co., Ltd. All Rights Reserved. PEAK 886VL2 User Manual... -
Page 20: Chapter 2: Jumpers And Connectors
Static electricity can damage many of the electronic ▪ Use correct screws and do not over tighten screws. components. Humid environments tend to have less static electricity than Copyright © 2012 NEXCOM International Co., Ltd. All Rights Reserved. PEAK 886VL2 User Manual... -
Page 21: Jumper Settings
(on) and open (off). Two-Pin Jumpers: Open (Left) and Short (Right) Three-Pin Jumpers: Pins 1 and 2 are Short Copyright © 2012 NEXCOM International Co., Ltd. All Rights Reserved. PEAK 886VL2 User Manual... -
Page 22: Locations Of The Jumpers And Connectors
Chapter 2: Jumpers and Connectors Locations of the Jumpers and Connectors The figure below shows the location of the jumpers and connectors for PEAK 886VL2. CON1 FAN2 FAN1 CN10 CN11 LAN1 LAN2 CN12 Copyright © 2012 NEXCOM International Co., Ltd. All Rights Reserved. -
Page 23: Jumpers
Settings 1-2 On Normal 1-2 On 2-3 On Clear CMOS 2-3 On 1-2 On: default 1-2 On: default Definition Definition AT_PWRBT# RTCRST# PCH PWRBT# EXTAL PWRBT# Copyright © 2012 NEXCOM International Co., Ltd. All Rights Reserved. PEAK 886VL2 User Manual... -
Page 24: Me Connector
Chapter 2: Jumpers and Connectors ME Connector Connector type: 1x3 3-pin header, 2.54mm pitch Connector location: JP8 Settings 1-2 On Normal 2-3 On Clear CMOS 1-2 On: default Definition SRTCRST# Copyright © 2012 NEXCOM International Co., Ltd. All Rights Reserved. PEAK 886VL2 User Manual... -
Page 25: Connector Pin Definitions
LINK Definition Definition Definition Definition CRT_RED CRT_GREEN LAN1_M0P LAN1_M0N CRT_BLUE LAN1_M1P LAN1_M2P LAN1_M2N LAN1_M1N LAN1_M3P LAN1_M3N LAN1LINK# LAN LED1+ CRT_SDA LAN1_LED_LNK#_ACT LAN LED2+ CRT_HSYNC CRT_VSYNC CRTDDCCLK Copyright © 2012 NEXCOM International Co., Ltd. All Rights Reserved. PEAK 886VL2 User Manual... -
Page 26: Lan2 Port
LINK Definition Definition Definition Definition LAN2_M0P LAN2_M0N VCC(+5V) USBN LAN2_M1P LAN2_M2P USBP LAN2_M2N LAN2_M1N USB3.0_RXN USB3.0_RXP LAN2_M3P LAN2_M3N USB3.0_TXN LAN2LINK# LAN LED1+ USB3.0_TXP LAN2_LED1 LAN LED2+ Copyright © 2012 NEXCOM International Co., Ltd. All Rights Reserved. PEAK 886VL2 User Manual... -
Page 27: Internal Connectors
Connector location: J2 and J4 Connector location: J1 and J3 Definition Definition Definition Definition USBP VCC(+5V) USBN USBN USB3.0_TXP USBP USBN USB3.0_TXN USB3.0_RXP USBP USB3.0_RXN VCC(+5V) Copyright © 2012 NEXCOM International Co., Ltd. All Rights Reserved. PEAK 886VL2 User Manual... -
Page 28: Smart Fan Connectors
Connector type: 1x4 4-pin header, 2.54mm pitch Connector type: 2x2 4-pin header, 4.2mm pitch Connector location: FAN1 and FAN2 Connector location: CON1 Definition Definition Definition Definition +12V S1_FANIO1 S1_FANPWN1 +12V +12V Copyright © 2012 NEXCOM International Co., Ltd. All Rights Reserved. PEAK 886VL2 User Manual... -
Page 29: Keyboard And Mouse Connector
Connector type: 2x5 10-pin header, 2.0mm pitch Connector location: J8 Connector location: COM1 (CN8), COM4 (CN6), COM3 (CN9) Definition Definition Definition Definition VCC(+5V) KDAT DCD# KCLK MDAT DTR# MCLK DSR# RTS# CTS# Copyright © 2012 NEXCOM International Co., Ltd. All Rights Reserved. PEAK 886VL2 User Manual... -
Page 30: Rs232/ Rs422/ Rs485 Serial Port Box Header
Connector type: 2x5 10-pin header, 2.00mm pitch Connector location: COM2(CN5) RS232 RS485 Definition Definition Definition Definition DCD# TX# / RX# TX / RX DTR# DSR# RTS# CTS# RS422 Definition Definition RTS# CTS# Copyright © 2012 NEXCOM International Co., Ltd. All Rights Reserved. PEAK 886VL2 User Manual... -
Page 31: Parallel Port Box Header
Paper empty HDMI_CTRL_CLK Select Auto Feed# DPB2 P Error# Initialize# DPB2 N HDMI_CTRL_DATA Select Input# DPB3 P DPB3 N HDMI_HPD DPB AUX P DPB AUX N DPB_HPD Copyright © 2012 NEXCOM International Co., Ltd. All Rights Reserved. PEAK 886VL2 User Manual... -
Page 32: Sata 2 Connectors
Connector type: Standard Serial ATAII 7P (1.27mm, SATA-M-180) Connector location: CN3 and CN7 Connector location: CN1 and CN4 Definition Definition Definition Definition TXP0 TXP1 TXN0 TXN1 RXN0 RXP0 RXN1 RXP1 Copyright © 2012 NEXCOM International Co., Ltd. All Rights Reserved. PEAK 886VL2 User Manual... -
Page 33: Irda Pin Header
Connector type: 1x5 5-pin header, 2.00mm pitch Connector location: JP3 Connector location: JP5 Definition Definition Definition Definition VCC5 CIR RX VCC5 CON_9 IR RX +12V CON_9 IR TX COM_RI Copyright © 2012 NEXCOM International Co., Ltd. All Rights Reserved. PEAK 886VL2 User Manual... -
Page 34: Sata Dom Power Connector
Definition VCC5 LAN1 ACT LED- LAN2 ACT LED- LAN1 ACT LED+ LAN2 ACT LED+ LAN1 LINK 1G LAN2 LINK 1G LAN1 LINK 100 LAN2 LINK 100 Copyright © 2012 NEXCOM International Co., Ltd. All Rights Reserved. PEAK 886VL2 User Manual... -
Page 35: 2X8 Pin Header
Connector location: JP2 Definition Definition SATA_LED+ POWER_LED+ SATA_LED- POWER_LED- POWER BOTTON- POWER BOTTON+ RESET BOTTON+ RESET BOTTON- SPKR OUT SMB_CLK SMB_DATA SYSTEM TEMP SPKR IN TEMP GND Copyright © 2012 NEXCOM International Co., Ltd. All Rights Reserved. PEAK 886VL2 User Manual... -
Page 36: Chapter 3: Bios Setup
This chapter describes how to use the BIOS setup program for the The settings made in the setup program affect how the computer performs. PEAK 886VL2. The BIOS screens provided in this chapter are for reference only It is important, therefore, first to try to understand all the setup options, and and may change if the BIOS is updated in the future. -
Page 37: Default Configuration
Ctrl Saves and exits the Setup program. TO ENTER SETUP BEFORE BOOT PRESS Press <Enter> to enter the highlighted sub-menu Press the key to enter Setup: Copyright © 2012 NEXCOM International Co., Ltd. All Rights Reserved. PEAK 886VL2 User Manual... - Page 38 When “” appears on the left of a particular field, it indicates that a submenu which contains additional options are available for that field. To display the submenu, move the highlight to that field and press Copyright © 2012 NEXCOM International Co., Ltd. All Rights Reserved. PEAK 886VL2 User Manual...
-
Page 39: Bios Setup Utility
F2: Previous Values F3: Optimized Defaults System Date [Mon 09/24/2012] F4: Save & Exit System Time [01:18:35] ESC: Exit Version 2.14.1219. Copyright (C) 2011 American Megatrends, Inc. Copyright © 2012 NEXCOM International Co., Ltd. All Rights Reserved. PEAK 886VL2 User Manual... -
Page 40: Advanced
+/-: Change Opt. F1: General Help F2: Previous Values F3: Optimized Defaults F4: Save & Exit ESC: Exit Version 2.14.1219. Copyright (C) 2011 American Megatrends, Inc. Copyright © 2012 NEXCOM International Co., Ltd. All Rights Reserved. PEAK 886VL2 User Manual... -
Page 41: Acpi Settings
Select the highest ACPI sleep state the system will enter when the suspend button is pressed. The options are S1 (CPU Stop Clock) and S3 (Suspend to RAM). Copyright © 2012 NEXCOM International Co., Ltd. All Rights Reserved. PEAK 886VL2 User Manual... -
Page 42: Sata Configuration
Enables or disables staggered spin up on devices connected to Serial ATA port 0 to port 3. Version 2.14.1219. Copyright (C) 2011 American Megatrends, Inc. SATA Controller(s) Enables or disables the SATA controller. Copyright © 2012 NEXCOM International Co., Ltd. All Rights Reserved. PEAK 886VL2 User Manual... -
Page 43: Amt Configuration
Intel® AMT Enables or disables Intel® Active Management Technology. BIOS Hotkey Pressed Enables or disables BIOS hotkey press. MEBx Selection Screen Enables or disables MEBx selection screen. Copyright © 2012 NEXCOM International Co., Ltd. All Rights Reserved. PEAK 886VL2 User Manual... -
Page 44: Usb Configuration
Disables support for Legacy when no USB devices are connected. Disable Keeps USB devices available only for EFI applications. USB3.0 Support Enables or disables USB 3.0 controller support. Copyright © 2012 NEXCOM International Co., Ltd. All Rights Reserved. PEAK 886VL2 User Manual... -
Page 45: It8783F Super Io Configuration
Enables or disables the serial port. ITB8783 Super IO Chip Displays the Super I/O chip used on the board. Change Settings Selects an optimal setting for the Super IO device. Copyright © 2012 NEXCOM International Co., Ltd. All Rights Reserved. PEAK 886VL2 User Manual... -
Page 46: Serial Port 2 Configuration
Selects an optimal setting for the Super IO device. Onboard Serial Port 2 Mode Select this to change the serial port mode to RS232, RS422 or RS485. Copyright © 2012 NEXCOM International Co., Ltd. All Rights Reserved. PEAK 886VL2 User Manual... -
Page 47: Serial Port 3 Configuration
Enables or disables the serial port. Change Settings Change Settings Selects an optimal setting for the Super IO device. Selects an optimal setting for the Super IO device. Copyright © 2012 NEXCOM International Co., Ltd. All Rights Reserved. PEAK 886VL2 User Manual... -
Page 48: Parallel Port Configuration
Device Mode Configures the operating mode of the parallel port. The options are Standard Parallel Port Mode, EPP Mode, ECP Mode, EPP Mode & ECP Mode. Copyright © 2012 NEXCOM International Co., Ltd. All Rights Reserved. PEAK 886VL2 User Manual... - Page 49 SYS Temperature Detects and displays the current system temperature. CPU Temperature Detects and displays the current CPU temperature. Fan1 Speed Detects and displays system fan1 speed. Copyright © 2012 NEXCOM International Co., Ltd. All Rights Reserved. PEAK 886VL2 User Manual...
-
Page 50: Cpu Ppm Configuration
Configures the speed of the fan. Enables or disables Intel® SpeedStep. Turbo Mode Enables or disables turbo mode. CPU C3 Report Enables or disables C3 report to the operating system. Copyright © 2012 NEXCOM International Co., Ltd. All Rights Reserved. PEAK 886VL2 User Manual... - Page 51 Chapter 3: BIOS Setup CPU C6 Report Enables or disables C6 report to the operating system. CPU C7 Report Enables or disables C7 report to the operating system. Copyright © 2012 NEXCOM International Co., Ltd. All Rights Reserved. PEAK 886VL2 User Manual...
-
Page 52: Chipset
RTC RAM Lock Enables or disables RTC RAM lock. Restore AC Power Loss Select AC power state when power is re-applied after a power failure. Copyright © 2012 NEXCOM International Co., Ltd. All Rights Reserved. PEAK 886VL2 User Manual... - Page 53 DIMM profile, Custom Profile, XMP Profile 1 and XMP Profile 2. Graphics Configuration Configures the graphic chip settings. NB PCIe Configuration Configures the NB PCI Express settings. Copyright © 2012 NEXCOM International Co., Ltd. All Rights Reserved. PEAK 886VL2 User Manual...
-
Page 54: Boot
Adjust the boot sequence of the system. Boot Option #1 is the first boot device that the system will boot from, next will be #2 and so forth. Copyright © 2012 NEXCOM International Co., Ltd. All Rights Reserved. PEAK 886VL2 User Manual... -
Page 55: Security
To exit the Setup utility and reboot the system without saving the changes, select this field then press <Enter>. You may be prompted to confirm again before exiting. Copyright © 2012 NEXCOM International Co., Ltd. All Rights Reserved. PEAK 886VL2 User Manual... - Page 56 Confirm by selecting Yes. Boot Override To bypass the boot sequence from the Boot Option List and boot from a particular device, select the desired device and press <Enter>. Copyright © 2012 NEXCOM International Co., Ltd. All Rights Reserved. PEAK 886VL2 User Manual...
-
Page 57: Appendix A: Watchdog Timer
Users can select second or minute. Step3. See “TimeCountWDT” procedure #Set Watchdog Timer Time-out Value. Users can set time-out value. Step4: See ExitSetup procedure #Exit Setup Environment Copyright © 2012 NEXCOM International Co., Ltd. All Rights Reserved. PEAK 886VL2 User Manual... - Page 58 WDT_SET); outportb(SUPERIO_PORT+1, 0xC0); # Use the second # Use the minute, change value to 0x40 # Set WDT sec/min outportb(SUPERIO_PORT, WDT_VALUE); outportb(SUPERIO_PORT+1, 0x05); #Set 5 seconds Copyright © 2012 NEXCOM International Co., Ltd. All Rights Reserved. PEAK 886VL2 User Manual...
Need help?
Do you have a question about the PEAK 886VL2 and is the answer not in the manual?
Questions and answers