Singer Sewing Machine Instruction Manual
Hide thumbs
Also See for Sewing Machine:
- Instruction manual (96 pages) ,
- Manual (6 pages) ,
- User manual (1 page)
Table of Contents
Advertisement
Available languages
Available languages
Advertisement
Table of Contents

Related Manuals for Singer Sewing Machine


Summary of Contents for Singer Sewing Machine
- Page 1 Instruction Manual Manuel d'Instruction Âéâëéï Ïäçãéùí...
-
Page 2: Important Safety Instructions
DANGER - To reduce the risk of electric shock: 9. Switch the sewing machine off ("O") when making any 1. An appliance should never be left unattended when plugged in. adjustments in the needle area, such as threading needle, 2. - Page 3 INSTRUCTIONS IMPORTANTES DE SÉCURITÉ 5. Garder les doigts à l'écart de toute partie mobile. Porter une Lors de l'utilisation d'un appareil électrique, il est essentiel de attention particulière dans la zone voisine de l'aiguille de la toujours prendre des précautions pour la sécurité; elles comprennent les suivantes: machine à...
- Page 4 ÓÇÌÁÍÔÉÊÅÓ ÏÄÇÃÉÅÓ ÁÓÖÁËÅÉÁÓ ¼ôáí ÷ñçóéìïðïéåßôå ìéá çëåêôñéêÞ óõóêåõÞ, ðñÝðåé íá áêïëïõèïýíôáé 5. ÖõëÜîôå ôá äÜ÷ôõëá ìáêñéÜ áðü üëá ôá êéíïýìåíá ìÝñç. Éäéáßôåñç ïé âáóéêÝò ïäçãßåò áóöÜëåéáò, óõìðåñéëáìâáíïìÝíùí ôùí áêüëïõèùí: öñïíôßäá ÷ñåéÜæåôáé êïíôÜ óôç âåëüíá ôçò ñáðôïìç÷áíÞò. ÄéáâÜóôå üëåò ôéò ïäçãßåò ðñéí ÷ñçóéìïðïéÞóåôå ôç ñáðôïìç÷áíÞ 6.
- Page 5 Congratulations Félicitations Óõã÷áñçôçñéá Óáí êÜôï÷ïé ôçò íÝáò ñáðôïìç÷áíÞò As the owner of a new Singer sewing Vous voici à présent propriétaire d'une SINGER, åßóôå Ýôïéìïé íá îåêéíÞóåôå ìéá machine, you are about to begin an machine à coudre Singer et en cette åíäéáöÝñïõóá...
-
Page 6: Table Of Contents
List of contents Principal parts of the machine ..........2/4 Zig-zag stitching ...............42 Accessories ................6 Blind hem/ Lingerie stitch ............44 Installing the snap-in sewing table..........8 Sewing on buttons ..............46 Connecting machine to power source ........10 Sew 4-step buttonholes ............48 Changing the bulb ..............12 Zippers and piping ..............50 Two-step presser foot lifter ............14 Mutlti-stitch zig-zag/ Bar tack............52... - Page 7 Table des matières Composants principaux de la machine à coudre ....3/5 Couture au point droit et position d'aiguille.......41 Accessoires ................7 Point zigzag ................43 Installation de la tablette de couture amovible ......9 Ourlet invisible et point de lingerie ...........45 Branchement de la machine à une source d'alimentation ..11 Pose des boutons ..............47 Comment faire des boutonnières (Boutonnières 4 étapes) ..49 Chagement de l'ampoule............13...
- Page 8 Ðéíáêáò ðåñéå÷ïìåíùí Êõñéá ìåñç ìç÷áíÞò ..............3-5 Éóéï ãáæé êáé èåóç âåëïíáò............41 Åîáñôçìáôá ................7 Æéãê-æáãê ãáæé ................43 Åãêáôáóôáóç ôïõ óõñïìåíïõ ðëáôï ñáøéìáôïò......9 Êñõöïâåëïíéá / ãáæé åóùñïõ÷ùí ..........45 Óõíäåóç ôçò ìç÷áíçò óôçí ðñéæá ..........11 Ñáøéìï êïõìðéùí ..............47 Áëëáãç ëáìðáò.................13 Êïõìðïôñõðåò ôåóóáñùí öáóåùí ..........49 Áíõøùôçñáò...
-
Page 9: Principal Parts Of The Machine
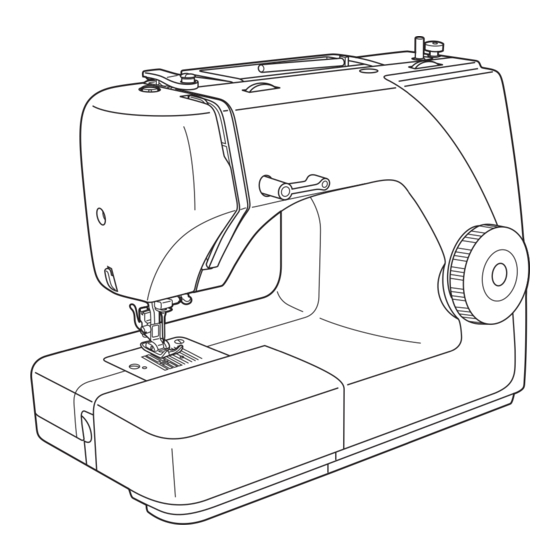
Principal parts of the machine 1. Thread tension dial 2. Presser foot pressure adjustment 3. Thread take-up lever 4. Thread cutter 5. Presser foot 6. Needle plate 7. Removable sewing table/ accessory storage 8. Reverse sewing lever Bobbin stopper 10. Stitch length dial Pattern selector dial Automatic threader (optional) -
Page 10: Composants Principaux De La Machine À Coudre
Composants principaux de la machine à coudre Êõñéá ìåñç ôçò ìç÷áíÞò Molette de commande de tension 1. ÅðéëïãÝáò Ýíôáóçò êëùóôÞò Commande de réglage de pression du pied-presseur 2. Ñýèìéóç ðßåóçò ðïäéïý ðßåóçò Manette de relevage du fil 3. Ðåôåéíüò Coupe-fil 4. -
Page 11: Principal Parts Of The Machine
Principal parts of the machine 13. Horizontal spool pin 14. Bobbin winder 15. Handwheel 16. Power and light switch 17. Main plug socket 18. Bobbin thread guide 19. Upper thread guide 20. Face plate 21. Handle 22. Presser foot lever 23. -
Page 12: Composants Principaux De La Machine À Coudre
Composants principaux de la machine à coudre Êõñéá ìåñç ôçò ìç÷áíÞò Axe horizontal et porte-bobine 13. Ïñéæüíôéïò Üîïíáò êïõâáñßóôñáò Bobineur 14. ¢îïíáò ôõëßãìáôïò ìáóïõñßóôñáò Volant 15. ×åéñïêßíçôç ñüäá Interrupteur d'alimentation et d'éclairage 16. Äéáêüðôçò áíïßãìáôïò êáé ëÜìðáò Prise de branchement du fil d'alimentation 17. -
Page 13: Accessories
Accessories Standard a ccessories (1) a. All purpose foot b. Zipper foot Buttonhole foot 006806008 006905008 006909008 006914008 Button sewing foot L-screwdriver Seam ripper/ brush g. Oil bottle Pack of needles Bobbin (3x) j. Seam guide k. Darning plate l. Spool holder Optional accessories (2) (These 6 accessories are not supplied with this machine;... -
Page 14: Accessoires
ÐñïáéñåôéêÜ åîáñôÞìáôá (2) (Ces 6 accessoires ne sont pas fournis avec la machine. (ÁõôÜ ôá 6 åîáñôÞìáôá äå ÷ïñçãïýíôáé ìå áõôÞ ôç ìç÷áíÞ. cependant, ils sont disponibles chez votre dépositaire Singer) Äéáôßèåíôáé ùóôüóï óáí åéäéêÜ åîáñôÞìáôá áðü ôïí ôïðéêü ðñïìçèåõôÞ óáò). -
Page 15: Installing The Snap-In Sewing Table
Installing the snap-in sewing table Keep the snap-in sewing table horizontal, and push it in the direction of the arrow. (1) The inside of the snap-in sewing table can be utilized as an accessory box. To open, lift up at the point of the arrow. (2) -
Page 16: Installation De La Tablette De Couture Amovible
Installation de la tablette de couture amovible Åãêáôáóôáóç ôïõ óõñïìåíïõ ðëáôï ñáøéìáôïò Maintenir la tablette en position horizontale et la pousser dans la direction de la flèche. (1) ÊñáôÞóôå ôï óõñüìåíï ðëáôü ñáøßìáôïò ïñéæüíôéá, êáé óðñþîôå ôï ðñïò ôçí êáôåýèõíóç ôïõ âÝëïõò (1). L'intérieur de la tablette amovible peut être utilisé... -
Page 17: Connecting Machine To Power Source
Connecting machine to power source Connect the machine to a power source as illustrated. (1) Attention: Unplug power cord when machine is not in use. Foot control The foot control pedal regulates the sewing speed. (2) Attention: Consult a qualified electrician if in doubt as to connect machine to power source. -
Page 18: Branchement De La Machine À Une Source D'alimentation
Branchement de la machine à une source Óõíäåóç ôçò ìç÷áíçò óôçí ðñéæá d'alimentation ÓõíäÝóôå ôç ìç÷áíÞ óôçí ðñßæá üðùò äåß÷íåé ç åéêüíá (1). Brancher la machine tel qu'illustré en (1). Ðñïóï÷Þ: ÁðïóõíäÝóôå ôï êáëþäéï ôñïöïäïóßáò üôáí ç ìç÷áíÞ äåí Attention: ÷ñçóéìïðïéåßôáé. -
Page 19: Changing The Bulb
Changing the bulb Disconnect the machine from the power supply by removing the plug from the main socket! Replace bulb with same type rated 15 watts (220-240V area). - Loosen screw (A) as illustrated. (1) - Remove the face plate (B). - Unscrew the bulb and install a new one (C). -
Page 20: Chagement De L'ampoule
Changement de l'ampoule Áëëáãç ëáìðáò Débrancher la machine de l'alimentation électrique en enlevant ÁðïóõíäÝóôå ôç ìç÷áíÞ áðü ôï ñåýìá áöáéñþíôáò ôï öéò áðü ôçí la prise! ðñßæá. Remplacer cette dernière avec une ampoule de 15 watts (220- ÁíôéêáôáóôÞóôå ôï ëáìðÜêé ìå Ýíá ßäéïõ ôýðïõ 15Watts (220-240V). 240V area) du même type. -
Page 21: Adjusting Presser Foot Pressure
Two-step presser foot lifter When sewing several layers or thick fabrics, the presser foot can be raised to a high rise position for easy positioning of the work. (A) Adjusting presser foot pressure The presser foot pressure of the machine has been pre-set and requires no particular readjustment according to the type of fabric (light-or-heavy weight). -
Page 22: Levier De Levage Du Pied Presseur À Deux Niveaux
Levier de levage du pied presseur à deux Áíõøùôçñáò ðïäéïõ ðéåóçò äõï-âçìáôùí niveaux Lorsque vous cousez plusieurs épaisseurs de tissus épais, le ¼ôáí ñÜâåôå áñêåôÜ åðßðåäá Þ ÷ïíôñÜ õöÜóìáôá, ôï ðïäáñÜêé pied-presseur peut être soulevé sur une position élevée afin de ðßåóçò... -
Page 23: Attaching The Presser Foot Shank
Attaching the presser foot shank Raise the presser bar (a). Attach the presser foot shank (b) as illustrated. (1) Attaching the presser foot Lower the presser foot shank (b) until the cut-out (c) is directly above the pin (d). (2) Raise the lever (e). -
Page 24: Fixation Du Support De Pied Presseur
Fixation du support de pied presseur Ðñïóáñìïãç ôçò õðïäï÷çò ôïõ ðïäéïõ ðéåóçò Soulever la tige du pied-presseur (a) avec le dispositif de levage du pied-presseur puis fixer son support (b) comme illustré en. (1) Áíáóçêþóôå ôï óôÝëå÷ïò ôïõ ðïäéïý ðßåóçò (a). Ðñïóáñìüóôå ôçí... -
Page 25: Winding The Bobbin
Winding the bobbin - Place thread and spool holder onto spool pin (1). - For smaller spools of thread place spool holder with small side next to spool (2). - Wind thread anticlockwise around bobbin winder tension discs (3). - Thread bobbin as illustrated and place on spindle (4). - Push bobbin to right (5). -
Page 26: Remplissage De La Canette
Remplissage de la canette Ìáóïõñéóìá - Placer le fil et le porte-bobine sur l'axe de la bobine. (1) - Ôïðïèåôåßóôå ôçí êëùóôÞ êáé ôï óôïð ôçò êïõâáñßóôñáò ìÝóá óôïí ðåßñï êïõâáñßóôñáò (1). - Si la bobine est plus petite, placer le porte-bobine avec le petit côté... -
Page 27: Inserting The Bobbin
Inserting the bobbin When inserting or removing the bobbin, the needle must be fully raised. - Open the hinged cover (1). - Hold the bobbin case with one hand. Insert the bobbin so that the thread runs in a clockwise direction (arrow) (2). - Pull the thread through the slit and under the finger (3). -
Page 28: Insertion De La Canette
Insertion de la canette Ôïðïèåôçóç ìáóïõñéïõ ¼ôáí ôïðïèåôåßôå Þ áöáéñåßôå ôï ìáóïýñé, ç âåëüíá ðñÝðåé íá Attention: åßíáé ôåëåßùò áíáóçêùìÝíç. Assurez-vous de placer l'interrupteur principal en position ("O") avant d'insérer ou de retirer la canette. - Áíïßîôå ôï êÜëõììá (1). - ÊñáôÞóôå... -
Page 29: Inserting And Changing Needles
Inserting and changing needles Change the needle regularly, especially if it is showing signs of wear and causing problems. For best sewing results always use SINGER Brand Needles. Insert the needle as illustrated as follows: A. Loosen the needle clamp screw and tighten again after inserting the new needle. -
Page 30: Insertion Et Remplacement D'aiguille
Pour öèïñÜò êáé ðñïêáëåß ðñïâëÞìáôá. Ãéá êáëýôåñá áðïôåëÝóìáôá obtenir les meilleurs résultats, toujours utiliser des aiguilles ñáøßìáôïò ðÜíôïôå íá ÷ñçóéìïðïéåßôå âåëüíåò SINGER. fabriquées par Singer. ÔïðïèåôÞóôå ôç âåëüíá óýìöùíá ìå ôéò åéêüíåò ðïõ öáßíïíôáé... -
Page 31: Threading The Upper Thread
Pull about 6-8 inches of thread to the rear beyond the needle eye. Trim thread to length with built in thread cutter. Note: If your sewing machine is equipped with the factory installed optional automatic needle threader, instructions for use can be found on page 26. -
Page 32: Enfilage Supérieur
Enfilage supérieur Ðåñáóìá ôçò ðáíù êëùóôçò Cette opération est simple. Néanmoins, il est important de l'exécuter ÁõôÞ åßíáé ìéá áðëÞ ëåéôïõñãßá áëëÜ åßíáé óçìáíôéêü íá ãßíåé óùóôÜ ãéáôß correctement sous peine de faire éventuellement face à plusieurs åÜí äåí ãßíåé ìðïñåß íá ðñïêáëÝóåé ðïëëÜ ðñïâëÞìáôá êáôÜ ôï ñÜøéìï. problèmes de couture. -
Page 33: Automatic Needle Threader (Optional)
Automatic needle threader (optional) * The automatic needle threader is a factory installed option. If your machine has this option use the following instructions: - Raise the needle to its highest position. - Press lever (A) down as far as it will go. - The threader automatically swings to the threading position (B). -
Page 34: Enfileur Automatique D'option
Enfileur automatique d'option Áõôïìáôïò ðåñáóôçñáò êëùóôçò (ðñïáéñåôéêüò) * L'enfileur automatique est une option installer à l'usine. Si votre machine est équipée de cette option, suivez les * Ï áõôüìáôïò ðåñáóôÞñáò êëùóôÞò ôïðïèåôåßôáé ðñïáéñåôéêÜ instructions ce-dessous: áðü ôï åñãïóôÜóéï. ÅÜí ç ìç÷áíÞ óáò Ý÷åé áõôÞ ôçí ðñïïðôéêÞ áêïëïõèÞóôå... -
Page 35: Thread Tension
Thread tension Upper thread tension Basic thread tension setting: "4" To increase the tension, turn the dial to the next number up. To reduce the tension, turn the dial to the next number down. A. Normal thread tension for straight stitch sewing. B. -
Page 36: Tension Du Fil
Tension du fil Åíôáóç êëùóôçò Tension du fil supérieur ¸íôáóç ôçò ðÜíù êëùóôÞò ÂáóéêÞ ñýèìéóç Ýíôáóçò êëùóôÞò: "4". Réglage de base pour la tension du fil: "4" Ãéá íá áõîÞóåôå ôçí Ýíôáóç, ãõñßóôå ôïí åðéëïãÝá óôïí åðüìåíï Pour augmenter la tension, tourner la molette sur une valeur plus áýîïíôá... -
Page 37: Raising The Bobbin Thread
Raising the bobbin thread Hold the upper thread with the left hand. Turn the handwheel (1) towards you (counterclockwise) lowering, then raising needle. Gently pull on the upper thread to bring the bobbin thread up through the needle plate hole (2). Lay both threads to the back under the presser foot. -
Page 38: Pour Remonter Le Fil De Canette
Pour remonter le fil de canette Áíåâáóìá ôçò êáôù êëùóôçò Tenir le fil supérieur avec la main gauche. Tourner le volant (1) ÊñáôÞóôå ôçí ðÜíù êëùóôÞ ìå ôï áñéóôåñü óáò ÷Ýñé. Ãõñßóôå ôç vers vous (sens anti-horaire) pour abaisser et lever l'aiguille. ÷åéñïêßíçôç... -
Page 39: Reverse Sewing
Reverse sewing To secure the beginning and the end of a seam, press down the reverse sewing lever (A). Sew a few reverse stitches. Release the lever and the machine will sew forwards again. (1) Removing the work Turn the handwheel counterclockwise to bring the thread take up lever to its highest position, raise the presser foot and remove work behind the needle and presser foot. -
Page 40: Couture En Sens Inverse
Couture en sens inverse Ñáöç ðñïò ôá ðéóù Afin de renforcer le début et la fin d'une couture, mettre en Ãéá íá óôåñåþóåôå ôçí áñ÷Þ êáé ôï ôÝëïò ôçò ñáöÞò, ðáôÞóôå position basse la commande d'inversion de couture. ðñïò ôá êÜôù ôï ìï÷ëü ñáöÞò ðñïò ôá ðßóù (A). ÑÜøôå... -
Page 41: Matching Needle/ Fabric/ Thread
2. When sewing with twin needles, the stitch width dial should be set at less than "3". 3. For best sewing results always use genuine SINGER needles. 4. Replace needle often (approximately every other garment ) and/ or at first thread breakage or skipped stitches. -
Page 42: Table De Correspondance De L'aiguille, Du Tissu Et Du Fil
2. Lors d'une couture faite avec une aiguille jumelée, la largeur du point doit être réglée sur une valeur inférieure à "3" au moyen de la molette de commande de largeur de point. 3. Pour de meilleurs résultats, n'utiliser que des aiguilles authentiques Singer. 4. Remplacer l'aiguille souvent (approximativement, pour chaque travail de couture de vêtement) et/ ou en cas de bris ou de points manqués. -
Page 43: Ôáéñéáóìá Âåëïíáò / Õöáóìáôïò / Êëùóôçò
2. ¼ôáí ñÜâåôå ìå ôéò äßäõìåò âåëüíåò, ï åðéëïãÝáò ðëÜôïõò âåëïíéÜò ðñÝðåé íá ôåèåß óå Ýíäåéîç ìéêñüôåñç ôïõ "3". 3. Ãéá êáëýôåñá áðïôåëÝóìáôá ñáøßìáôïò íá ÷ñçóéìïðïéåßôå ðÜíôïôå áõèåíôéêÝò âåëüíåò SINGER. 4. Íá áíôéêáèéóôÜôå ôç âåëüíá óõ÷íÜ (ðåñßðïõ êÜèå êáéíïýñãéï ñïý÷ï) êáé / Þ óôï ðñþôï óðÜóéìï ôçò êëùóôÞò Þ üôáí áñ÷ßóåé íá áöÞíåé âåëïíéÝò. -
Page 45: How To Choose Your Pattern
How to choose your pattern For center needle straight stitch select pattern " " with pattern selector dial. Adjust the stitch length with the stitch length dial. You may choose left needle position, by selecting pattern " ". zigzag stitch , select pattern "... -
Page 46: Comment Choisir Vos Points
Comment choisir vos points Ðùò íá åðéëåãåôå ôï ó÷åäéï óáò Pour les points droits , choisir le type " " avec le sélecteur Ãéá ßóéá âåëïíéÜ åðéëÝîôå ôï ó÷Ýäéï " " ìå ôïí åðéëïãÝá ó÷åäßïõ. règle-point. Ñõèìßóôå ôï ìÞêïò âåëïíéÜò ìå ôïí åðéëïãÝá ìÞêïõò âåëïíéÜò. Régler la longueur du point. -
Page 47: Straight Stitching And Needle Position
Straight stitching and needle position Turn the stitch selection dial so that the pointer is set to the straight stitch position. Choose your needle position, from center needle position or right needle position. Generally speaking, the thicker the fabric, thread and needle, the longer the stitch should be. -
Page 48: Couture Au Point Droit Et Position D'aiguille
Couture au point droit et position d'aiguille Éóéï ãáæé êáé èåóç âåëïíáò Ãõñßóôå ôïí åðéëïãÝá âåëïíéÜò Ýôóé þóôå ç ïèüíç âåëïíéÜò íá Tournez le sélecteur règle-point jusqu'à ce que l'écran montre la äåßîåé ôç èÝóç ôçò åõèåßáò âåëïíéÜò. position du point droit. ÅðéëÝîôå... -
Page 49: Zig-Zag Stitching
Zig-zag stitching Turn the pattern selector dial to " ". (1) Function of stitch length dial while zigzaging The density of zigzag stitches increase as the setting of stitch length dial approaches "0". Neat zigzag stitches are usually achieved at "2.5" or below. Dense zigzag stitches (close together) are referred to as a satin stitch. -
Page 50: Point Zigzag
Point zigzag Æéãê-æáãê ãáæé Régler le sélecteur règle-point à " ". (1) Ãõñßóôå ôïí åðéëïãÝá ó÷åäßïõ óôï " " (1). Fonction de la molette de commande de longueur de point Ëåéôïõñãßá åðéëïãÝá ìÞêïõò âåëïíéÜò åíþ êÜíåôå æéãê-æáãê pour points zigzag Ç... -
Page 51: Blind Hem/ Lingerie Stitch
Blind hem/ Lingerie stitch For hems, curtains, trousers, skirts, etc. Blind hem for stretch fabrics. Blind hem/ lingerie for firm fabrics. Reverse blind hem/ lingerie for firm fabrics. Note: It takes practice to sew blind hems. Always make a sewing test first. -
Page 52: Ourlet Invisible Et Point De Lingerie
Ourlet invisible et point de lingerie Êñõöïâåëïíéá / ãáæé åóùñïõ÷ùí Pour ourlet, rideaux, pantalons, jupes, etc. Ãéá óôñéöþìáôá, êïõñôßíåò, ðáíôåëüíéá, ðïõêÜìéóá, ê.ë.ð. Ourlets invisible pour tissu élastique. ÊñõöïâåëïíéÜ ãéá åëáóôéêÜ õöÜóìáôá. Ourlets invisible / lingerie pour tissu ferme. ÊñõöïâåëïíéÜ / åóþñïõ÷á ãéá óöéêôÜ õöÜóìáôá. En sens inverse o urlets invisible/ lingerie pour tissu ferme. -
Page 53: Sewing On Buttons
Sewing on buttons Install the darning plate. (1) Change presser foot to button sewing foot (2). Position the work under the foot. Place the button in the desired position and lower the foot. Set the pattern selector knob on " "... -
Page 54: Pose Des Boutons
Pose des boutons Ñáøéìï êïõìðéùí Placer la plaquette de reprisage sur la plaque aiguille. (1) ÔïðïèåôÞóôå ôçí ðëÜêá êáñéêþìáôïò (1). Pied pour la pose de boutons. (2) ÁëëÜîôå ôï ðïäáñÜêé ðßåóçò ìå ôï ðïäáñÜêé ðßåóçò ãéá êïõìðéÜ (2). Placer le tissu sous le pied. ÔïðïèåôÞóôå... -
Page 55: Sew 4-Step Buttonholes
Sew 4-step buttonholes Prepare 1. Take off the all purpose foot and attach the buttonhole foot. 2. Measure diameter and thickness of button and add 0.3 cm (1/8") for bar tacks; mark buttonhole size on fabric. 3. Place fabric under the foot, so that marking on the buttonhole foot aligns with starting marking on fabric. -
Page 56: Comment Faire Des Boutonnières (Boutonnières 4 Étapes)
Comment faire des boutonnières Êïõìðïôñõðåò ôåóóáñùí öáóåùí (Boutonnières 4 étapes) Ðñïåôïéìáóßá 1. Áðïìáêñýíåôå ôï ðïäáñÜêé ãåíéêÞò ÷ñÞóçò êáé ôïðïèåôÞóôå Préparation ôï ðïäáñÜêé êïõìðüôñõðáò. 1.Enlevez le pied universel et installez le pied boutonnière. 2. ÌåôñÞóôå ôçí äéÜìåôñï êáé ôçí ðõêíüôçôá ôïõ êïõìðéïý êáé 2.Mesurez le diamètre et l'épaisseur du bouton et ajoutez-y ðñïóèÝóôå... -
Page 57: Zippers And Piping
Zippers and piping Set the machine as illustrated. Dial selector on " ". Change to zipper foot. (1) Set stitch length control between "1" - "4" (according to thickness of fabric). The zipper foot can be attached right or left, depending on which side of the foot you are going to sew. -
Page 58: Fermeture Et Ganse
Fermeture et ganse Öåñìïõáñ êáé óéñéôéá Régler le sélecteur de points à " ". Ñõèìßóôå ôçí ìç÷áíÞ üðùò öáßíåôáé óôçí åéêüíá. Ãõñßóôå ôïí åðéëïãÝá óôçí èÝóç " ". Changer le pied de fermeture. (1) ÁëëÜîôå ôï ðïäáñÜêé öåñìïõÜñ (1). Le pied pour fermeture à glissière peut être fixé soit à droite, Ñõèìßóôå... - Page 59 Multi-stitch zig-zag Sewing on lace and elastic, darning, mending, reinforcing edges. Set the stitch pattern dial to " ". Place patch in position. The stitch length can be shortened to produce very close stitches. (1) When mending tears, it is advisable to use a piece of backing fabric to reinforce.
-
Page 60: Ðïëëáðëåò Ñáöåò Æéãê-Æáãê/ Óôåñåùìá
Point zigzag multipoints Ðïëëáðëåò ñáöåò æéãê-æáãê Pour la couture de dentelle et des élastiques, le reprisage, le Ãéá ñÜøéìï óå äáíôÝëåò êáé ëÜóôé÷á, ìáíôÜñéóìá, ìðÜëùìá, raccommodage, la pose de pièces, le renforcement de bordures. ðïíôáñéóéÝò ãéá ôçí åíßó÷õóç ôùí Üêñùí. ÔïðïèåôÞóôå... -
Page 61: Free Motion Darning, Stippling
Free motion darning, stippling * The darning foot is an optional accessory not included with your machine. (1) Set the machine as illustrated. Install the darning plate. (2) Remove the presser foot clamp. (3) Attach the darning foot to the presser foot holder. The lever (a) should be behind the needle clamp screw (b). -
Page 62: Raccommodage
Raccommodage Ìáíôáñéóìá ìå åëåõèåñåò êéíçóåéò * Le pied de raccommodage est un accessoire d'option dont * Ôï ðïäáñÜêé ìáíôáñßóìáôïò åßíáé ðñïáéñåôéêü åîÜñôçìá ðïõ votre machine n'est pas équipée. (1) äåí ÷ïñçãåßôáé ìå ôç ìç÷áíÞ óáò (1). Régler la machine comme indiqué. Ñõèìßóôå... -
Page 63: Practical Stitches
Practical stitches Set the machine as illustrated. Turn the stitch length dial to suit the fabric and application. Shell stitch (A) For decorative edges. Suitable for edges on sheer, fine and stretch fabrics. The larger stitch should go just over the edge of the fabric to create the shell effect. -
Page 64: Points Utilitaires
Points utilitaires Ðñáêôéêá ãáæéá Utiliser le pied tout usage pour tous ces points. Ñõèìßóôå ôç ìç÷áíÞ üðùò öáßíåôáé óôçí åéêüíá. Voir le schéma pour un exemple de point. Ãõñßóôå ôïí åðéëïãÝá ìÞêïõò âåëïíéÜò ãéá íá ôáéñéÜæåé ìå ôï ýöáóìá êáé ôçí åöáñìïãÞ. Point de coquillage (A) ÏóôñáêïåéäÝò... -
Page 65: Applique And Blindstitch Applique
Applique and blindstitch applique Position applique piece on background fabric. Align needle so that it pierces background fabric along the outside edge if the applique. Lower presser foot. If using a blindhem foot, align the lip of the blindhem foot guide so that it sits directly under the edge of the applique. -
Page 66: Appliqué Et Appliqué Invisible
Appliqué et appliqué invisible Áðëéêå êáé áðëéêå êñõöïâåëïíéáò Placer l'appliqué sur le tissu de fond. ÔïðïèåôÞóôå ôï êïììÜôé áðëéêÝ óôï ðßóù ìÝñïò ôïõ õöÜóìáôïò. Aligner l'aiguille et abaisser-la dans le tissu au bord de l'appliqué. Abaisser le pied presseur. Åõèõãñáììßóôå ôç âåëüíá Ýôóé þóôå íá ôñõðÞóåé ôï ðßóù ìÝñïò ôïõ... -
Page 67: Quilting Functions
Quilting functions Stippling is free motion quilting where you hoop the fabric and guide it by hand, allowing you to stitch in any direction. For template quilting transfer a design from a template (plastic stencil) to your fabric and then stitch following the outline. Do not forget to lower the presser bar if you are sewing without a foot. -
Page 68: Fonctions De Courtepointe
Fonctions de courtepointe Êáðéôïíáñéóìá Pour Piqûre Libre, placer le tissu dans un cerceau et piquer à Óôï êáðéôïíÜñéóìá ìå åëåýèåñåò êéíÞóåéò ðåñíÜôå óôåöÜíé óôï main lever dans la direction que vous désiré. ýöáóìá êáé ïäçãþíôáò ìå ôï ÷Ýñé, ìðïñåßôå íá ñÜøåôå óå ïðïéáäÞðïôå... -
Page 69: Mending
Mending Machine Preparation: - Pattern: Multi - stitch Zigzag - Stitch width: Largest 4.5mm - Stitch length: Fine (0.5 - 1.0) Sewing Instructions: Position a piece of fabric directly beneath the tear in your fabric. Align the center of the foot with the center of the tear. Stitchacross, backstitching at the start and at the end of the seam. -
Page 70: Raccommodage
Raccommodage Ìðáëùìá Préparation de la machine: Ðñïåôïéìáóßá Ìç÷áíÞò: - Point: Multi Zigzag - Ó÷Ýäéï: Ðïëëáðëü æéãê-æáãê ãáæß - Largeur de point: 4.5 - ÐëÜôïò âåëïíéÜò: Ìåãáëýôåñï 4.5mm - Longueur de point: 0.5 - 1.0 - ÌÞêïò âåëïíéÜò: Ëåðôü (0.5 - 1.0) Mode D'emploie: Ïäçãßåò... -
Page 71: Stay-Stitching
Stay-stitching Machine Preparation: - Pattern: Straight Stitch - Stitch Width: Straight - Stitch length: 1.5mm (fine) Sewing Instructions: Stay-stitching is used to reinforce curves such as armholes, seams in stretch fabrics and other areas to prevent stretching. Stay stitch along the edge of the area 1/4 of an inch from the edge of the seam. -
Page 72: Couture De Soutien
Couture de Soutien Éóéá ñáöç Préparation de la Machine: Ðñïåôïéìáóßá Ìç÷áíÞò: - Point: Droit - Ó÷Ýäéï: ºóéï ãáæß - Largeur de Point: Droit - ÐëÜôïò âåëïíéÜò: ºóéï - Longueur de Point: 1.5 mm (Fin) - ÌÞêïò âåëïíéÜò: 1.5mm (ëåðôü) Mode D'emploie : Ïäçãßåò... -
Page 73: Blindstitch Applique
Blindstitch applique Machine Preparation: - Pattern: Blindhem - Stitch Length: 2 - 3 - Foot: Standard Zigzag or optional Blindhem foot Sewing Instructions: Position applique piece on background fabric and secure it in place using fabric glue. Align needle so that it pierces background fabric along the outside edge of the applique. -
Page 74: Appliqué Invisible
Appliqué Invisible Áðëéêå êñõöïâåëïíéáò Préparation de la machine: Ðñïåôïéìáóßá Ìç÷áíÞò: - Point: Invisible - Ó÷Ýäéï: ÊñõöïâåëïíéÜ - Longueur de Point: 2 - 3 pour Invisible - ÌÞêïò âåëïíéÜò: 2 - 3 - Pied: Pied Zigzag ou Pied Invisible facultatif - ÐïäáñÜêé: Êáíïíéêü æéãê-æáãê Þ ðñïáéñåôéêü ðïäáñÜêé êñõöïâåëïíéÜò... -
Page 75: Traditional Pintucks
Traditional pintucks Machine Preparation: - Pattern: Straight - Stitch Width: Straight - Stitch Length: 2 - 3 Sewing Instructions: To mark pintucks in your fabric, either pull a thread to mark the fold or mark with chalk or marking pencil. Fold and press wrong sides together on pulled thread line or marked lines. -
Page 76: Nervure Traditionnele
Nervure Traditionnel Ðáñáäïóéáêåò ðéåôåò Préparation de la machine : Ðñïåôïéìáóßá Ìç÷áíÞò: - Point: Droit - Ó÷Ýäéï: ºóéï - Largeur de Point: Droit - ÐëÜôïò âåëïíéÜò: ºóéï - Longueur de Point: 2 - 3 - ÌÞêïò âåëïíéÜò: 2 - 3 Mode D'emploie : Ïäçãßåò... -
Page 77: Gathering
Gathering Machine Preparation: - Pattern: Straight Stitch - Stitch Width: Straight - Stitch Length: Longest Sewing Instructons: Use this technique for gathering waistbands, sleeve caps etc. At 1/4 of an inch from the edge of the seam, begin by backstitching and then continue to sew the length required. -
Page 78: Froncer
Froncer Óïõñùìá Préparation de la Machine : Ðñïåôïéìáóßá Ìç÷áíÞò: - Point: Droit - Ó÷Ýäéï: ºóéï Ãáæß - Largeur de Point: Droit - ÐëÜôïò âåëïíéÜò: ºóéï - Longueur de Point: Le plus long - ÌÞêïò âåëïíéÜò: Ìáêñýôåñï Mode D'emploie : Ïäçãßåò Ñáøßìáôïò: Utilisez cette technique pour froncer la taille, la tête de manche ×ñçóéìïðïéåßóôå... -
Page 79: Couching
Couching Machine Preparation: - Pattern: Zigzag - Stitch width: Variable (Set according to width of cord) - Stitch length: Variable - Foot: Zigzag or optional Satin foot Sewing Instructions: Couching is simply the technique of zigzagging over a fine cord. Use as a decorative touch on jackets and other sewing projects. -
Page 80: Soutache
Soutache Ñáøéìï ìå ôï ðñïáéñåôéêï ðïäáñáêé ðéåóçò ãéá êïñäïíé Préparation de la Machine: - Point: Zigzag Ðñïåôïéìáóßá Ìç÷áíÞò: - Largeur de Point: Variable (Réglez à la largeur du cordonnet) - Ó÷Ýäéï: Æéãê-Æáãê - Longueur de point: Variable - ÐëÜôïò âåëïíéÜò: Ðïéêßëï (ñõèìßóôå áíÜëïãá ìå ôï ðëÜôïò ôïõ - Pied: Pied zigzag ou pied bourdon facultatif êïñäïíéïý) - ÌÞêïò... -
Page 81: Trim Attachment Stitch Function
Trim attachment stitch function - Set the stitch pattern dial to zigzag. - Set the stitch length to "0". - Sew 6 to 8 stitches to secure the trim in place. - Then set needle to right needle position and then to sew the length of the trim. -
Page 82: Fonctions De Points Pour Attachement De Bordure
Fonctions ee points pour attachement Êïëëçìá äáíôåëáò de bordure - Ñõèìßóôå ôïí åðéëïãÝá ó÷åäßïõ âåëïíéÜò óôï æéãê-æáãê. - Régler le cadran de point au point zigzag. - Ñõèìßóôå ôï ìÞêïò âåëïíéÜò óôï ''0''. - Régler la longueur de point à "0". - ÑÜøôå... -
Page 83: Maintenance
Remove the hook race cover (4) and the hook (5) and clean with a soft cloth. Lubricate at the point (6) (1-2 drops) with sewing machine oil. Turn the handwheel until the hook race (7) is in the left position. Replace the hook (5). Replace the hook race cover and snap back the two hook retaining arms. -
Page 84: Entretien De La Machine
Entretien de la machine Óõíôçñçóç Pour retirer la plaque à aiguillé, mettre l'aiguille en position Ðñïóï÷Þ: haute en tournant le volant. Ouvrir le couvercle d'accés. Avec le ÁðïóõíäÝóôå ôç ìç÷áíÞ áðü ôï ñåýìá, áöáéñþíôáò ôçí tournevis, desserrer les 2 vis (1) et enlever la plaque à aiguille. ðñßæá... -
Page 85: Trouble Shooting Guide
2.Lint or oil have collected on the hook or needle bar. 2.Clean the hook and feed dog as described. 3.Poor quality oil has been used. 3.Only use good quality sewing machine oil. 4.The needle is damaged. 4.Replace the needle. The machine jams Thread is caught in the hook. -
Page 86: Guide De Dépannage
Guide de dépannage Problème Cause Solution Bris du fil 1. La machine n'est pas correctement enfiler. 1. Réenfiler la machine. supérieur 2. La tension du fil est trop élevée. 2. Réduire la tension. (valeur inférieure) 3. Le fil est trop gros pour l'aiguille. 3. -
Page 87: Ïäçãïò Áíôéìåôùðéóçò Ðñïâëçìáôùí
Ïäçãïò áíôéìåôùðéóçò ðñïâëçìáôùí Ðñüâëçìá Áéôßá Äéüñèùóç Ç ðÜíù êëùóôÞ 1. Ç êëùóôÞ äåí Ý÷åé ðåñáóôåß óùóôÜ óôç ìç÷áíÞ 1. ÎáíáðåñÜóôå ôçí êëùóôÞ óôç ìç÷áíÞ óðÜåé 2. Ç Ýíôáóç ôçò êëùóôÞò åßíáé ðïëý óöéêôÞ 2. Ìåéþóôå ôçí Ýíôáóç ôçò êëùóôÞò (÷áìçëüôåñïò áñéèìüò) 3. - Page 88 ÁÖÏÉ Â. ÂÅËËÁÍÇ Á.Å.Â.Å. ÄÕÑÑÁ×ÉÏÕ ÓÅÐÏËÉÁ ÁÈÇÍÁ : 210 5138141, 210 5136851, 210 5139517 ÔÇË CUSTOMER SERVICE DEPARTMENT VELLANIS B. BROS S.A. ,62, DIRRAHIOU STREET, SEPOLIA, 10443 ATHENS TEL: 210 5138141, 210 5136851, 210 5139517 021V880106( ) Dec/05 SINGER 1507(8280C)
Need help?
Do you have a question about the Sewing Machine and is the answer not in the manual?
Questions and answers