Table of Contents
Advertisement
Quick Links
Before commencing assembly please read these instructions thoroughly
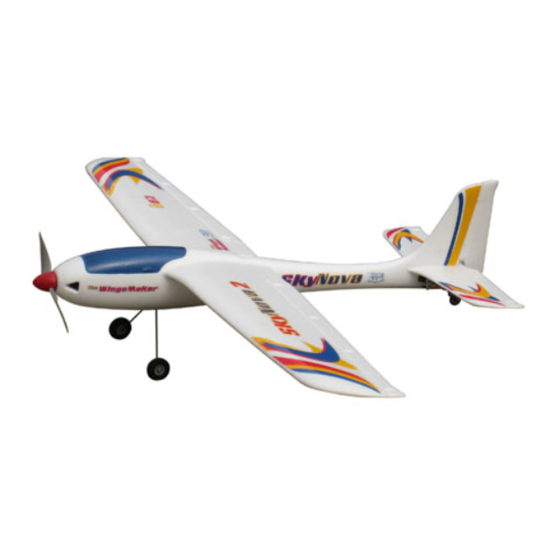
( Polyhedral Wings )
Wing Span: 62.9 in / 1600 mm
Flying Weight: 25.8 oz / 730 g
Fuselage Length: 33.8 in / 858 mm
Warning ! This model is not a toy.
It is designed for maximum performance. Please seek advice if one is not familiar with this kind
of electric powered precision model. Operating this model without prior preparation may cause
injuries. Remember, safety is the most important thing. Always keep this instruction manual at
hand for quick reference.
* Specifications are subject to change without notice.*
THE WINGS MAKER
FACTORY PRE-FABRICATED
ALMOST-READY-TO-FLY (ARF) SERIES
MADE IN CHINA
.
www thewingsmaker com
GM080PO30211403
,
( Aileron Wings )
Specifications
Specifications
48.8 in / 1240 mm
Wing Area: 428 sq in / 27.6 sq dm
338 sq in / 21.8 sq dm
Requires: 3-channel radio w/ 3 mini servos
4-channel radio w/ 5 mini servos
Outrunner Motor KM28251025 w/ Propeller Adaptor
HW2340100 20A Brushless ESC,9x6 Propeller,
3 cells 11.1V 1800 mAh Li-Po battery & charger.
.
I NSTRUCTI ON M ANUAL
(
)
Polyhedral Wings
(
)
Aileron Wings
(
)
Polyhedral Wings
(
)
Aileron Wings
(
Polyhedral Wings
(
Aileron Wings
.
( GM080 )
)
)
Advertisement
Table of Contents

Related Manuals for The Wings Maker SkyNova


Summary of Contents for The Wings Maker SkyNova
- Page 1 Operating this model without prior preparation may cause injuries. Remember, safety is the most important thing. Always keep this instruction manual at hand for quick reference. * Specifications are subject to change without notice.* THE WINGS MAKER FACTORY PRE-FABRICATED ALMOST-READY-TO-FLY (ARF) SERIES MADE IN CHINA...
-
Page 2: Before You Begin
INDEX BEFORE YOU BEGIN PARTS LIST ASSEMBLY P.3-P.24 SAFETY PRECAUTIONS P.16 / P.25 BEFORE YOU BEGIN Read through the manual before you begin, so you will have an overall idea of what to do. Check all parts. If you find any defective or missing parts contact your local dealer. Please DRY FIT and check for defects for all parts that will require CA or Epoxy for final assembly. - Page 3 18. BATTERY COVER -- 1 pc. 6.FUEL TUBE D2xD4x4mm -- 2 pcs CLEVIS PL4112105 --1 pc. FOR SKYNOVA 2 : STRAPER PL4112106 -- 1 pc. 15. 180mm Y-CORD -- 1 pc. PUSHROD Ø1.4x45mm w/ Threads (For Rudder) -- 1 pc.
- Page 4 Decals Cut out decal sheet, peel off backing sheet and apply on fuselage, stabilizer and wings. Decal Polyhedral wings Top View Bottom View Aileron wings Top View Bottom View Stabilizer Bottom View Top View Fuselage Left View Right View GM080PO30211403...
-
Page 5: Stabilizer & Elevator
Stabilizer & Elevator Hinge Setting Hinge Section View Completed Hinge For pre-assembled version, the hinges are factory glued. Bottom View Vertical Fin & Rudder Hinge Setting Hinge Section View Completed Hinge For pre-assembled version, the hinges are factory glued. Right View Decals for Rudder Transparent decals to reinforce stabilizer. -
Page 6: Rudder Pushrod
Rudder Servo & Horn Plastic Bracket Servo wire For pre-assembled version, the horn is factory Horn glued and servo installed. Rudder Pushrod Straper Plastic Stand Fuel Tube d2xD4x4mm Pushrod Ø1.4x45mm Clevis Fuel Tube d2xD4x4mm Horn Elevator Servo & Horn Servo wire Plastic Bracket Horn For pre-assembled version, the horn is factory glued and servo installed. -
Page 7: Elevator Pushrod
Elevator Pushrod Plastic Stand Straper Pushrod Ø1.4x60mm Clevis Fuel Tube d2xD4x4mm Horn Tail Landing Gear PA2x8mm Screw Wheel Ø23mm PA2x8mm Plastic Collar 1.2mm Bottom View Main Landing Gear PA2.3x8mm Screw Plywood 21x26x2.5mm Fuselage PA2.3x8mm Landing Gear Wheel Ø40mm 3.1mm Collar M3x3mm Set Screw Landing Gear... -
Page 8: Motor & Esc
Motor & ESC M3x8mm Socket Head Screw d3xD7mm Washer M3x8mm 2-Pin EZ Connector d3xD7mm Washer EZ Connector Brushless ESC Motor KP0011310 Solder Solder Radio Rudder Servo Elevator Servo Receiver Plug in the Rudder Servo wire to channel 1 Plug in the Elevator Servo wire to channel 2 Plug in the ESC Throttle wire to channel 3 Receiver Tie 130mm GM080PO30211403... - Page 9 Radio Switch on radio The power LED should turn on Install battery Elevator Throttle Elevator Aileron Aileron Mode 1 Mode 2 Battery & Motor Setting Battery Tie 200mm Pull throttle stick all the way back. Mode 1 Mode 2 Battery Mat Plug in battery wait a few seconds for the transmiter and receiver to bind.
- Page 10 Servos Setting Mode 1 Mode 2 Pull back Elevator stick Elevator should move up, plane will pull up when Pull back Elevator stick flying. Mode 1 Mode 2 Push foward Elevator stick Elevator should move down, plane will dive down Push foward Elevator stick when flying.
- Page 11 Propeller Unplug battery Switch off transmiter EZ Connector Puller Install the propeller Propeller Adaptor (d3xD5) HW2340100 PM2x12mm 9x6 Propeller PL6314050 Charge battery M5 Nut Ø36mm Spinner PA1.7x8mm TWM HW3111400 PROPELLER ADAPTOR WRENCH The battery is ready for use when Make sure you have unplugged the battery before all the lights turn from red to green.
- Page 12 C.G. Install battery onto the battery tray. Don`t plug in the battery yet. Put on the battery check C.G. mark underneath wings. Support the model by two fingers on the C.G. mark, move battery position if necessary to balance the model on the C.G.
-
Page 13: Get Ready To Fly
Get Ready to fly Turn on transwitter, throttle stick at low position. Mode 1 Mode 2 Plug in battery. Black Black Plug in with red+ / black- reversed will damage the ESC. Wait a few seconds for the receiver to bind with transmitter. Make sure the propeller is cleared of any object. - Page 14 Flying Try to get an experienced flyer to check through your installation before flying. Ask him/her to do the first flight for you. He/she can trim out the control surfaces for you so the model can fly straight and level with control sticks in neutral positions and throttle stick about half throttle. You will get a much higher successful rate with the help from an experienced flyer.
- Page 15 Flying Now it is time to take off. Don't fly if the wind is more than 5 miles per hour. Wind is good for take off and landing, but if it is too windy, it will be very difficult to control the plane. It is much better to wait for calm weather than crashing your beautiful plane.
- Page 16 Landing Turn the plane against the wind, line up with the runway and throttle back. The plane will be losing air speed and descending gradually. Use the elevator to keep the plane in a level manner. If you allow the plane to nose up, the plane will lose air speed too soon and will lose lift ( stall ) and falls to the ground.
- Page 17 # Check and re-tighten up all factory assembled screws, use thread locker if necessary. Ready for the SkyNova 2 ? Go to next section. GM080PO30211403...
- Page 18 For Step 1 to Step 11, please refer to previous section. Aileron Servo & Horn Hinge Setting Plastic Bracket Servo wire Hinge Section View Completed Horn Hinge Bottom View For pre-assembled version, the hinges and horn are pre-glued, and servo installed. Bottom View Aileron Pushrod Fuel Tube...
- Page 19 Main Wing Nylon Bolt M3x20mm Wing Tube Ø6x715mm Servo wire Insert carben fiber wing tube into right wing, align the anchor holes and apply the nylon bolt. Nylon Bolt M3x20mm Insert the right wing into the Fuselage. Inset the left wing onto the carbon wing tube, press the wings against the fuselage align the anchor holes and apply the nylon bolt.
- Page 20 Radio 180mm Y-Cord Aileron Servo (L) Elevator Servo Aileron Servo (R) Rudder Servo Receiver Plug in the Aileron Servos wire to channel 1 Plug in the Elevator Servo wire to channel 2 Plug in the ESC Throttle wire to channel 3 Plug in the Rudder Servo wire to channel 4 P.19 GM080PO30211403...
- Page 21 Servos Setting ( For WMT6 radio only. Please refer to respective instruction manual if you are using other radio system. ) Please move the servo reverse switch for Aileron, AIL up to the REV position, and check the following. Turn on transmitter, and plug in battery as indicated in Step 19 of previous section. Make sure that the propeller is cleared of any object.
- Page 22 Servos Setting Mode 1 Mode 2 Pull back Elevator stick Elevator should move up, plane will pull up when Pull back Elevator stick flying. Mode 1 Mode 2 Push foward Elevator stick Elevator should move down, plane will dive down Push foward Elevator stick when flying.
- Page 23 C.G. Unplug battery, check C.G. mark underneath wings. Support the model by two fingers on the C.G. mark, move battery position if necessary to balance the model on the C.G. marks. P.22 GM080PO30211403...
- Page 24 Get Ready to fly Turn on transwitter, throttle stick at low position. Mode 1 Mode 2 Plug in battery. Black Black Plug in with red+ / black- reversed will damage the ESC. Wait a few seconds for the receiver to bind with transmitter. Make sure the propeller is cleared of any object.
- Page 25 Flying Try to get an experienced flyer to check through your installation before flying. Ask him/her to do the first flight for you. He/she can trim out the control surfaces for you so the model can fly straight and level with control sticks in neutral positions and throttle stick about half throttle. You will get a much higher successful rate with the help from an experienced flyer.
-
Page 26: Important Safety Precautions
Warning! Important Safety Precautions # First time flyer should never fly by himself / herself. Assistance from experienced flyer is absolutely necessary. # Pre-flight adjustment must be done before flying, it is very dangerous to fly a badly pre-adjusted aircraft. is specially designed to be powered by KM28251025 Outrunner Motor. - Page 27 Pl8210010 Large Clevis Small Clevis Outrunner Motor KM28251025 180mm Y-Cord Code No. Size Package -Kv (rpm/V): 1025 KW0021800 180mm 1 pc -Operating Power: 110W -Operating Voltage: 2-3S Li-Po -Operating Current: 10A -Peak Current: 15A (max. 15 sec.) -Internal Resistance: 50 m ohms -Diameter: 27.6mm -Length: 25mm EZ Connector Puller...
- Page 28 THE WINGS MAKER GM080PO30211403...
Need help?
Do you have a question about the SkyNova and is the answer not in the manual?
Questions and answers