Table of Contents
Advertisement
Quick Links
Advertisement
Table of Contents

Related Manuals for Zebex Z-1060


Summary of Contents for Zebex Z-1060
- Page 2 Copyright © 2004. All rights reserved. No warranty of any kind is made in regard to this material, including, but not limited to, implied warranties of merchantabil- ity or fitness for a particular purpose. Although every effort is made to assure accuracy and completeness, we can not be held liable for any errors contained herein nor incidental or con- sequential damages in connection with furnishing, performance or use of this material.
-
Page 3: Table Of Contents
Table of Contents Unpacking............. 1 Finding Your Way Around ........2 Battery Care ............2 Installing Batteries ........4 Charging Batteries........5 Getting Started ............. 7 Scanning and Storing Data........7 Uploading Data to a PC........10 Uploading Data with WinTaskGen...... 12 Uploading Data with HyperTerminal.... - Page 4 Congratulations on your purchase of the super compact Mini Personal Data Collector (PDC) with LCD display. Along with superior portability and visually safe scanning LEDs, the PDC features a real-time clock, a buzzer, a dual-color status LED, and a UART port for direct con- nection to external equipment.
-
Page 5: Unpacking
Unpacking The PDC package should contain: 1 ea. Mini Personal Data Collector 1 ea. DB-9(F) serial Communication Cable 4 ea. VARTA 1/V40H NiMH rechargeable batteries 1 ea Power Adapter 1 ea. CD-ROM support disk 1 ea. User’s Manual (this book) If any package contents are damaged or missing, please contact your dealer immediately. -
Page 6: Finding Your Way Around
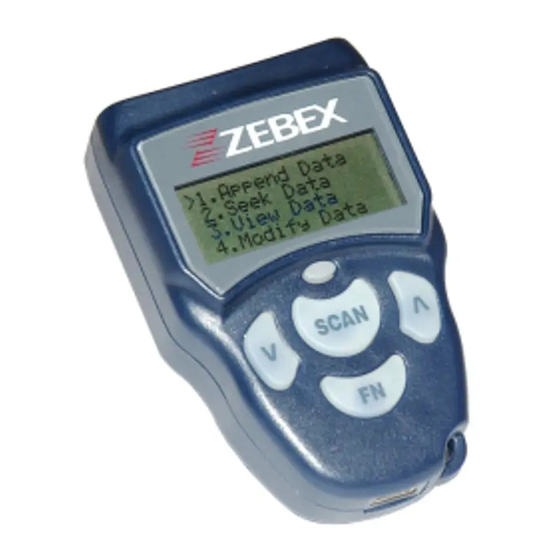
Finding Your Way Around scan window LCD screen LED lamp UP key DOWN key FUNCTION SCAN key RS-232 port Figure 1: The Mini Personal Data Collector Battery Care In the interests of providing the best product perfor- mance possible, the Mini Personal Data Collector comes with high quality, rechargeable Nickel Metal Hydride (NiMH) batteries and a Power Adapter. - Page 7 batteries need to go through three to five charge-dis- charge cycles before they reach peak performance and capacity. The first several times that you use new NiMH batteries you may find that they discharge fairly quickly during use. This is normal until the batteries mature. It is highly recommended that NiMH batteries always be operated until fully discharged before recharging.
-
Page 8: Installing Batteries
Installing Batteries battery cover screw Figure 2: Inserting Batteries Loosen the battery cover screw and remove the cover. Insert four batteries according to the orientation in the picture: two with positive side up on the left, two with negative side up on the right. Replace the cover and tighten the screw. -
Page 9: Charging Batteries
Charging Batteries Warning! Use the Power Adapter with NiMH batteries ONLY! Connecting the Power Adapter with any other type of batteries in the PDC voids the warranty, ruins batteries, can burn up the Mini Personal Data Collector, and could pos- sibly cause harm to persons or property! You may use regular disposable alkaline cells to operate the PDC, but never mix NiMH with alkaline batteries, and... - Page 10 Figure 3: Connecting the Power Adapter It is normal for the Power Adapter and the NiMH battery cells themselves to become warm during charging. Note: If needed when NiMH batteries are low, the PDC may be operated with the Power Adapter con- nected.
-
Page 11: Getting Started
Getting Started The Mini Personal Data Collector comes already pro- grammed with a basic data collection program, FREETASK, that can read and store barcodes, do simple edits, and upload data to a PC through the Communica- tion Cable. Scanning and Storing Data Turn on the Mini Personal Data Collector by press- ing the v and ^ keys together. - Page 12 The bootup (power on) screen appears. Figure 5: Bootup Screen Press the s key to go to the Main Menu. Figure 6: Main Menu With Run Task selected, press the s key. Display shows <Rec>, for record number, and is ready to scan a barcode.
- Page 13 and the LED indicator flashes green. While the s key is still depressed, the display shows the alphanumeric data scanned. When the s key is released, the display reverts to <Rec>, ready for the next scan. If the scan fails, the PDC remains silent, the LED gives a red flash, and the display reverts to <Rec>...
-
Page 14: Uploading Data To A Pc
Uploading Data to a PC The PDC can communicate data to a PC using either WinTaskGen, the supplied software interface, or another RS-232 communications interface, such as HyperTermi- nal, which comes with Windows. Communications settings are: baud rate: 9600 bps data bits: parity: none... - Page 15 To upload data: If not on already, turn on the computer. Connect the PDC with a PC COM port using the supplied Communications Cable. to COM port on PC Figure 7: Communication Cable Turn on the Mini Personal Data Collector by press- ing the v and ^ keys together.
-
Page 16: Uploading Data With Wintaskgen
Run the desired communications software and upload data. See the following two sections for more detailed software instructions. Uploading Data with WinTaskGen WinTaskGen is provided on the CD that came with your PDC. With it you can upload data from the PDC to the computer, edit or create programs (tasks) for use with the PDC, download these tasks to the PDC, adjust the barcode filter for the PDC, setup the computer COM port,... - Page 17 On the WinTaskGen toolbar, press the upload icon. The upload workspace appears. Press the Connect button near the lower left corner. The PDC beeps twice. Press the Upload button. The PDC beeps once, and the data appears in the WinTaskGen work- space.
-
Page 18: Uploading Data With Hyperterminal
Uploading Data with HyperTerminal HyperTerminal is an RS-232 communications program that comes with Windows. This example for uploading data is from Windows XP: Use the supplied cable to connect the PDC to the PC COM port (e.g.: COM 1). In Windows, go to Start > Programs > Accessories > Communications >... -
Page 19: Setup
Setup It is very easy to set the clock and other PDC parameters by connecting the PDC to a PC and running Win- TaskGen > Remote Device Setting. But for those times when a PC connection is not readily available, all param- eters can be set directly, using the PDC keypad. -
Page 20: Lcd Contrast
LCD Contrast From the Setup menu, make sure that LCD Contrast is selected, then press the s key. Contrast may be adjusted from high contrast (1) to very low contrast (30) by pressing the v and ^ keys. Settings “wrap around” if you go lower than 1 or higher than 30. -
Page 21: System Timer
Adjust the setting with the v and ^ keys, then press s to actually set the beep “volume” and return to the Setup Menu. (Or press f to exit with- out changing the setting.) The PDC remembers your settings, and will use them each time the PDC is turned on until they are modified. - Page 22 s repeatedly. The v character, when selected and s pressed, acts as <escape> to the next menu. Press s to delete the target digit. The digit is deleted and its now-blank position is selected. To move the selector one position to the left, press s again.
-
Page 23: Barcode Setup
Barcode Setup Use this parameter to assign which types of barcodes the PDC will read, and which not. From the Setup Menu (page 15), press ^ or v till Barcode Setup is selected, then press the s key. The screen shows a page for (example) EAN/UPC with the designation On or Off below the code type. -
Page 24: Specifications
Specifications OPERATIONAL Scanner Light Source 630nm visible LED Optical System 1024 pixel CMOS sensor Depth of Scan Field 15-40mm Width of Scan Field 44mm (at 28-38mm depth) Minimum Bar Width 6mil @ PCS 90% Print Contrast 45% or more Indicator (LED) two-color (green &... - Page 25 PHYSICAL Length 69.8mm Width 44.4mm Thickness 22.3mm Weight 44.6g (with batteries) Cable Serial cable with mini-USB connector LCD Display FSTN, 96 x 32 dots (16 x 4 characters) POWER Batteries 4 ea. VARTA 1/V40H NiMH rechargeable batteries 4 ea. LR 44 alkaline dry cells Battery Life Up to 1,200 scans (with rechargeable batteries)
-
Page 26: Dimensions
DIMENSIONS Figure 11: PDC Dimensions... - Page 28 Part no.: MUL-53250-01...
Need help?
Do you have a question about the Z-1060 and is the answer not in the manual?
Questions and answers