Table of Contents
Advertisement
Original Instruction Manual
BS12
12" Bandsaw
Version 2.0
February 2012
IMPORTANT
For your safety read
instructions carefully
before assembling or
using this product.
Save this manual for
future reference.
Record Power Ltd
Telephone: 01246 561 520
Unit B, Adelphi Way
Fax: 01246 561 537
Staveley S43 3LS
HEALTH AND SAFETY GUIDELINES
Always follow the instructions provided with the manual. Always wear safety glasses when using
woodworking equipment. Always disconnect the power before adjusting any equipment. Failure to
observe proper safety procedures and guidelines can result in serious injury.
WARNING: Do not allow familiarity (gained from frequent use of your machine and accessories) to
become commonplace. Always remember that a careless fraction of a second is sufficient to inflict
severe injury.
Tel: 01246 561 520 |
www.recordpower.co.uk
Email: sales@recordpower.co.uk
www.recordpower.co.uk
Please register this product by logging in at
www.recordpower.co.uk or calling
Record Power on 01246 561 520
It is important to register your product as soon as possible in order to receive
efficient after sales support and be entitled to the full 5 year guarantee.
Your statutory rights are not affected.
Always wear safety
Always read the instructions
glasses when using
provided before using
woodworking equipment.
woodworking equipment.
Advertisement
Table of Contents

Related Manuals for Record Power BS12


Summary of Contents for Record Power BS12
- Page 1 Please register this product by logging in at www.recordpower.co.uk or calling Record Power on 01246 561 520 It is important to register your product as soon as possible in order to receive efficient after sales support and be entitled to the full 5 year guarantee.
-
Page 2: Table Of Contents
Guide roller (rear) 16. Parts Lists & Diagrams Certificate of Conformity WARNING: This product is heavy and as a precaution it is advised that two people assemble the machine. Original Instruction Manual | BS12 12” Bandsaw | Version 2.0 | February 2012... -
Page 3: Health & Safety Guidance
1. Health & Safety Guidance READ ALL THE INSTRUCTIONS IN THIS MANUAL CAREFULLY BEFORE 15. Maintain Tools With Care. ASSEMBLY, INSTALLATION AND USE OF THIS PRODUCT. KEEP THESE • Follow instructions for lubrication and changing of accessories INSTRUCTIONS IN A SAFE PLACE FOR FUTURE REFERENCE. and consumables. -
Page 4: Additional Health & Safety For 12" Bandsaws
WARNING: Do not allow familiarity (gained from frequent use of your machine) to cause complacency. Always remember that a careless fraction of a second is sufficient to inflict severe injury. Original Instruction Manual | BS12 12” Bandsaw | Version 2.0 | February 2012... -
Page 5: Record Power Guarantee
Guarantee should on such web-sites as that operated by the DTI be made directly to Record Power at the address set out at the foot (http://www.dti.gov.uk) of this Guarantee. The claim itself should be made in a letter setting 1.4 Returning your guarantee card will speed up the claims... -
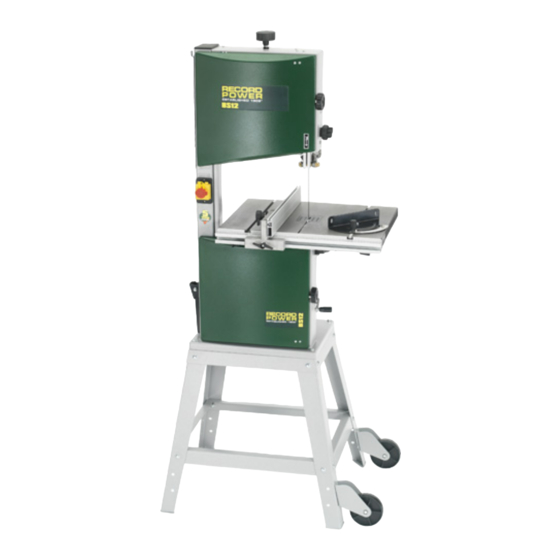
Page 6: Getting To Know Your Bandsaw
Max width blade to rip fence: 185mm Table size: 548 x 400mm Table height (from floor without stand): 478mm Dimensions (with stand): H1680 x W791 x D874mm Original Instruction Manual | BS12 12” Bandsaw | Version 2.0 | February 2012... -
Page 7: Stand & Wheelkit Assembly
6. Stand & Wheelkit Assembly Stand & Wheel Kit Assembly CAUTION! The machine is heavy. Additional help or a suitable lifting device or support will be required for lifting the machine onto the stand. The stand and wheel kit comes as a self assembly unit. Stand A. -
Page 8: Stand Assembly
Once the frame is upright, the whole assembly should fall into place. All fixings should now be fully tightened. Original Instruction Manual | BS12 12” Bandsaw | Version 2.0 | February 2012... - Page 9 6. Stand & Wheelkit Assembly - Cont. Wheelkit Assembly Attach the fixed wheels (G) to the front legs (E) of the stand using the M6x16 hex bolts, Washers, and M6 Nyloc nuts provided. Note: For your safety only use the handle to pull the machine.
- Page 10 Fitting the Wheelkit Handle to the Bandsaw Secure the wheelkit handle in position on the rear of the bandsaw column buy using the two hex nuts and washers. Original Instruction Manual | BS12 12” Bandsaw | Version 2.0 | February 2012...
-
Page 11: Machine Assembly
7. Machine Assembly Unpacking and Components Included The machine is supplied partly assembled. Prior to use, further assembly is required. When unpacking the machine the following components are included for the initial assembly A. M6 Nuts x2 and small crank handle Table Assembly B. - Page 12 Slide the fence rail into the gap left between the table and the star knobs then tighten the star knobs to secure the fence rail. Original Instruction Manual | BS12 12” Bandsaw | Version 2.0 | February 2012...
- Page 13 7. Machine Assembly - Cont. Fitting the Rip Fence Fig. 7.4 Slide the rip fence assembly onto the fence rail. Fence Alignment 1 Fig. 7.5 Adjustment can be made to the fence (Fig. 7.5, A) in relation to being square to the blade. This is done by slackening the four wing nuts on the fence rail (Fig.
-
Page 14: Setting Table Square To Sawblade
(Fig. 8.3, C) to adjust the table angle. Use the angle indicator scale on the trunnion bracket to find the desired angle. Re-tighten the lock handle to secure the table. Original Instruction Manual | BS12 12” Bandsaw | Version 2.0 | February 2012... -
Page 15: Bandsaw Blade Set Up
9. Bandsaw Blade Set Up Tensioning the Blade Fig. 9.1 CAUTION! Before carrying out any adjustments or maintenance ensure that the machine is isolated and disconnected from the electricity supply. The blade tensioning knob (Fig. 9.1, A) should be used to increase or decrease tension. - Page 16 To avoid over-adjusting, make small gradual adjustments on the tracking knob and revolve the bandwheel on a few times to check the alignment of the blade before making further adjustments. Original Instruction Manual | BS12 12” Bandsaw | Version 2.0 | February 2012...
- Page 17 9. Bandsaw Blade Set Up - Cont. Adjusting the Upper Guides Fig. 9.5 CAUTION! Before carrying out any adjustments or maintenance ensure that the machine is isolated and disconnected from the electricity supply. First check that all the roller guides are moving freely. To adjust the upper blade guides, first position the guide assembly relative to the blade by slackening off the grub screws (Fig.
- Page 18 The upper blade guide should provide approximately 5mm clearance above the work piece. After the desired position has been set tighten the rise & fall lock knob. Original Instruction Manual | BS12 12” Bandsaw | Version 2.0 | February 2012...
-
Page 19: Drive Belt Adjustment & Speed Change
Changing the Blade Speed Fig. 10.2 The BS12 has two blade speeds 820 m/min for wood and 380 m/min for some plastics and acrylics. This machine is not suitable for cutting metals. -
Page 20: Connection Of The Electricity Supply
(RCD) with maximum residual current rated at 0.03A, the main connection must have maximum 13A time-lag fuse. Original Instruction Manual | BS12 12” Bandsaw | Version 2.0 | February 2012... - Page 21 11. Connection of the Electricity Supply - Cont. Switch the machine on by pressing the green button in the switch unit. Switch the machine off by pressing either the outer red button or inner red button on the switch unit. Note: Depending on the condition of the electrical mains supply, slight voltage reductions may occur when the machine is switched on (eg momentary...
-
Page 22: Operation & Bandsawing Practice
Before commencing work on an important project, it is advisable to familiarise yourself with the operation of the equipment by practising on low value materials. Original Instruction Manual | BS12 12” Bandsaw | Version 2.0 | February 2012... - Page 23 Remove the faulty component and replace only with genuine Record Power replacement parts. Any electrical components should only be replaced by a suitably qualified person. To replace a broken blade, please refer to the section of this manual entitled “Band saw Blade Set Up”.
- Page 24 Wood -log 3-4 TPI Wood -soft 6 TPI 3-6 TPI 3-4 TPI 3-4 TPI Wood -hard 6 TPI 3-6 TPI 3-4 TPI 3-4 TPI Wood -wet 3-4 TPI Original Instruction Manual | BS12 12” Bandsaw | Version 2.0 | February 2012...
-
Page 25: Blade Selection
12. Operation & Bandsawing Practice - Cont. Blade Selection (TPI) - Cont. Having selected an appropriate blade for the particular thickness and type of material to be sawn, it is essential that the saw blade Blade width: 1/2” Min radius: 2 ”... - Page 26 3/8 x 6 TPI Bandsaw Blade order supplier. 5/8 x 6 TPI Bandsaw Blade BB88CUS Custom width & tooth pattern Original Instruction Manual | BS12 12” Bandsaw | Version 2.0 | February 2012...
- Page 27 12. Operation & Bandsawing Practice - Cont. Custom Jigs & Work Support A bandsaw is one of the most versatile machines in the workshop and with careful lateral thinking many problems encountered on a job can be overcome. By making and using custom jigs repetitive and accurate work can easily be achieved, the following illustrations are some examples of typical jigs and supports used on a bandsaw.
- Page 28 Ex. 5. Jig for accurate repetitive wedges. Ex. 6. By mounting a registration pin on a slide repetitive circles can easily be achieved. Original Instruction Manual | BS12 12” Bandsaw | Version 2.0 | February 2012...
- Page 29 12. Operation & Bandsawing Practice - Cont. Ex. 7. Angle cutting jig for accurate repetitive compound angles. Tel: 01246 561 520 | www.recordpower.co.uk...
-
Page 30: Dust Extraction
Please contact your preferred stockist, call us 0.5 micron filtration; suitable for MDF on 01246 561 520 or visit www.recordpower.co.uk for full details. Original Instruction Manual | BS12 12” Bandsaw | Version 2.0 | February 2012... - Page 31 13. Dust Extraction - Cont. DX1000 RSDE1 RSDE2 DX4000 DX5000 CX2600 CX3000 Bandsaws Circular saws Sanders Intermittent usage Recommended Recommended Recommended Recommended Recommended Bandsaws Circular saws Sanders Heavy usage Recommended Recommended Planer Thicknessers Spindle Moulders Universals Intermittent usage Recommended Recommended Can be used Recommended Recommended...
-
Page 32: Maintenance
• Ensure the blade is fully in place on bandwheel, re-apply tension using the tensioning knob. • Fine adjust the blade tension further if required using the blade tension wheel. Original Instruction Manual | BS12 12” Bandsaw | Version 2.0 | February 2012... - Page 33 14. Maintenance - Cont. 5. If the new blade width is the same as the blade being removed: • Fit the new blade ensuring the blade teeth are pointing downwards and towards you at the position where the blade passes through the table. •...
- Page 34 Individual components can now be changed. Once the new components have been changed & the lower guide assembly & blade guard refitted the blade should be refitted. Original Instruction Manual | BS12 12” Bandsaw | Version 2.0 | February 2012...
- Page 35 14. Maintenance - Cont. The Table Insert Fig. 14.8 The table insert on a bandsaw is a consumable item (Fig. 14.8) and will therefore need replacing periodically. This procedure should be carried out with the bandsaw blade removed. To replace the table insert simply push the old insert out from underneath the table and fit the new one into position.
- Page 36 (this is especially common when cutting a long run of soft wood) if this occurs this resin must be scraped off as performance of the brush will be reduced. Original Instruction Manual | BS12 12” Bandsaw | Version 2.0 | February 2012...
-
Page 37: Troubleshooting
15. Troubleshooting Symptom Possible Causes Solutions Will not cut in a straight line 1. Blade is worn 1. Change blade (see section 12 in the manual) 2. Guide carrier set too high 2. Adjust guide carrier 3. Blade tension not correct 3. -
Page 38: Parts Lists & Diagrams
16. Parts Lists & Diagrams Original Instruction Manual | BS12 12” Bandsaw | Version 2.0 | February 2012... -
Page 39: Tel: 01246 561 520 | Www.recordpower.co.uk
16. Parts Lists & Diagrams - Cont. Tel: 01246 561 520 | www.recordpower.co.uk... - Page 40 Lower wheel shaft SBS12-36 Guide Roller SBS12-76 Motor SBS12-37 Shaft for pilot SBS12-77 Suction connector SBS12-38 Knurled thumb screw SBS12-78 Crank handle SBS12-39 Hexagonal screw SBS12-79 Hexagon nut Original Instruction Manual | BS12 12” Bandsaw | Version 2.0 | February 2012...
- Page 41 16. Parts Lists & Diagrams - Cont. No. Part Number Part Name Quantity No. Part Number Part Name Quantity SBS12-80 Crank SBS12-109 Bolt guide plate SBS12-81 Washer SBS12-110 Washer SBS12-82 Set collar SBS12-111 Knurled nut SBS12-83 Serrated lock washer SBS12-112 Star knob SBS12-84 Hexagon bolt...
- Page 42 TUV Rheinland Product Safety GmbH, at: Am Grauen Stein, D-51105. Cologne, Germany and complies with the relevant essential health and safety requirements. Signed............Dated: 01/02/12 Andrew Greensted Managing Director Original Instruction Manual | BS12 12” Bandsaw | Version 2.0 | February 2012...
- Page 43 Tel: 01246 561 520 | www.recordpower.co.uk...
- Page 44 Visit www.recordpower.co.uk for the full range of Record Power products. Woodworking Blades Machinery Craft Accessories Finishes and Waxes DVDs Accessories Woodworking Machines & Accessories Record Power Limited Telephone: 01246 561 520 Email: sales@recordpower.co.uk Unit B, Adelphi Way www.recordpower.co.uk Facsimile: 01246 561 537 Ireland Industrial Est.
Need help?
Do you have a question about the BS12 and is the answer not in the manual?
Questions and answers