Advertisement
Quick Links
OPERATION AND MAINTENANCE INSTRUCTIONS
OPERATING INSTRUCTIONS:
The following steps and recommendations should be
followed to get the best results from your spray gun:
1. Connect high pressure airless fluid hose to the
gun fluid inlet and tighten securely.
2. With nozzle tip removed, start pump slowly
and direct spray gun into material container and
pull trigger until fluid flows steadily from gun.
3. Release trigger. Install nozzle tip per safety
procedure.
WARNING
!
UNDER NO circumstances should the spray gun be care-
lessly handled nor its spray (even when nozzle is
removed) directed at close proximity to any part of the
human body. If you spray yourself or anyone else at
close range, the stream of material can puncture the
skin and cause great harm (possible amputation).
4. Increase pressure of pump and test spray
pattern for proper atomization.
NOTE
Excessive fluid pressure will distort the spray pattern. A
simple rule to remember is "When the pattern is right,
the pressure is right".
5. Spray gun distance from work surface should
be at a point where maximum fan pattern is
evident. This distance is normally 8 to 14
inches.
6. "Hour-glass" and "tails" on spray patterns
normally indicate too low a fluid pressure for
the nozzle tip orifice size, or the material is
too viscous or thick.
7. Distorted spray patterns may be the result of
excess fluid pressure, plugging of tip, or a
worn tip.
8. Airless spray guns are either ON or OFF. You
cannot "feather" with airless guns as you can
with air atomized equipment.
9. Successive strokes may not require over-lapping
as much as with air atomized spray because
of the heavier pattern edges produced by
airless spraying.
10. Spray strokes with airless spray guns will be
faster because of the higher fluid output.
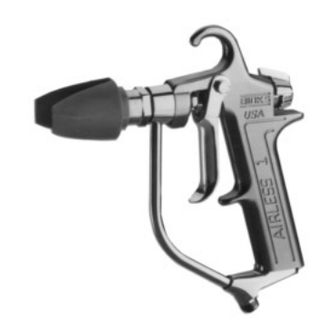
Binks AIRLESS 1
SPRAY GUN
(For Professional Use Only)
Your new Binks Airless 1 spray gun has been thoroughly
tested before leaving the factory. No adjustment is
required prior to spray operations other than installing
the nozzle tip.
Maximum
Fan Width
CORRECT PATTERN
Center Line
of Gun
90º
90º
8"
to
14"
"Hour-
"Tails"
glass"
"Distortion"
INCORRECT PATTERNS
Replaces
Part Sheet
2340R-6
2340R-5
Part
Sheet
Advertisement

Summary of Contents for Binks AIRLESS 1
-
Page 1: Spray Gun
4. Increase pressure of pump and test spray pattern for proper atomization. NOTE Your new Binks Airless 1 spray gun has been thoroughly tested before leaving the factory. No adjustment is Excessive fluid pressure will distort the spray pattern. A required prior to spray operations other than installing simple rule to remember is “When the pattern is right,... -
Page 2: Parts List
Binks AIRLESS 1 SPRAY GUN NOTE Warning information stamped on nut. Nozzle tip not furnished. Please order separately. GLAND Safety Trigger Lock Turn 90º to disengage trigger. The optional Twist-Tip Nozzle Cleaner (Ref. Bulletin A54-45) allows purging of a clogged nozzle without removing the nozzle from the spray gun. - Page 3 BYPASS or triggering spray gun before disassembly of any component parts. • Use Binks NO-WIRE conductive hose in all airless spraying operations. Be sure the gun and hose have continuity. Check REPLACEMENT PARTS continuity weekly with ohmmeter. Overall (end to end) The airless sprayer is designed to use authorized parts only.
- Page 4 Binks AIRLESS 1 SPRAY GUN MAINTENANCE INSTRUCTIONS See High Pressure Warning Statement, page 3. TO REPLACE PACKING (17) CAUTION 1. Remove cartridge assembly following steps 1-4 1. Use care when handling nozzle tips to avoid dropping. under “To Replace Cartridge Assembly.”...


Need help?
Do you have a question about the AIRLESS 1 and is the answer not in the manual?
Questions and answers