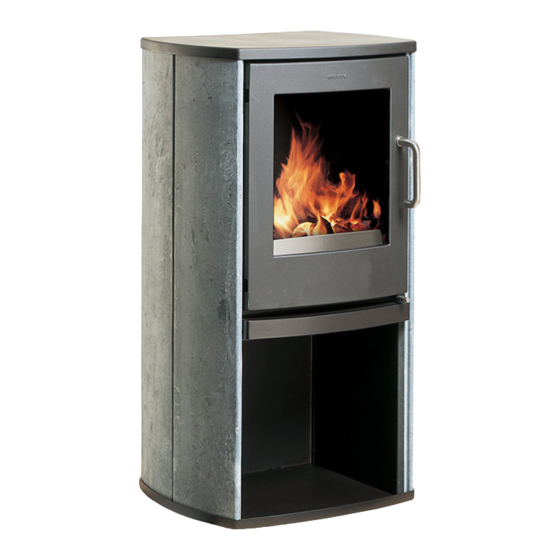
Morso 4600 Series Installation And Operating Instructions Manual
Hide thumbs
Also See for 4600 Series:
- Instruction manual (12 pages) ,
- Assembly and user instructions manual (12 pages)
Table of Contents
Advertisement
Quick Links
Installation and Operating Instructions
Read this entire manual before you install and use your new room heater. If this room
heater is not properly installed, a house fire may result. To reduce the risk of fire, follow
the installation instructions. Failure to follow instructions may result in property damage,
bodily injury, or even death.
Contact local building officials about restrictions and installation inspection-equirements
in your area.
MORSØ JERNSTØBERI A/S . DK-7900 NYKØBING MORS
E-Mail: stoves@morsoe.com · Website: www.morsoe.com
Distributed by: HEARTHLINK INTERNATIONAL
9 Maple St. - Randolph, Vermont - 05060 - USA
4600 Series
For use in North America
Save these instructions
1
Advertisement
Table of Contents

Related Manuals for Morso 4600 Series


Summary of Contents for Morso 4600 Series
-
Page 1: Installation And Operating Instructions
Installation and Operating Instructions 4600 Series For use in North America Read this entire manual before you install and use your new room heater. If this room heater is not properly installed, a house fire may result. To reduce the risk of fire, follow the installation instructions. - Page 2 The Morsø 4600 Series meet the U.S. Environmental Protection Agency’s emission limits for wood heaters sold on or after July 1, 1990 The Morsø 4600 series have been tested by OMNI-Test Laboratories, Inc. The test standards are ANSI/UL-1482 for the United States and ULC S627 for Canada.
-
Page 3: Table Of Contents
CONTENTS: Installation of your Morsø stove Checking loose parts in the stove The chimney / flue system Flue Connection Connection to existing chimney Positioning the stove Operation Before you start firing Lighting and loading intervals Maintenance Exterior maintenance Internal maintenance Cleaning the Stove and the Flue Leaving the stove for extended periods Parts diagram... -
Page 4: Installation Of Your Morsø Stove
1.0 Installation of your Morsø stove Installation of woodburning stoves must be safe and legal. If your Morsø stove is not installed correctly, it may cause a house fire. To reduce the risk of fire, the installation instructions must be followed carefully. Contact the local building officials about restrictions and installation inspection in your area. -
Page 5: The Chimney / Flue System
1.2 The chimney / flue system Note that the flue system must be independently secured and must not rely on the stove for support. The stove must not be connected to a chimney flue serving any other appliance. (Several flues may run up a single chimney stack; use one flueway per appliance). Use a residential type masonry or listed type HT factory-built chimney. -
Page 6: Flue Connection
1.3 Flue Connection The stove is supplied from the factory with a flue collar fitted to the top plate and a round blanking plate blocking off the rear flue exit (behind the rear shield plate). Use a 24 MSG black or blue chimney connector or listed double wall chimney connector. Refer to local codes and the chimney manufacturer’s instructions for precautions required for passing a chimney through a combustible wall or ceiling. -
Page 8: Positioning The Stove
1.5 Positioning the stove Distance to walls and lintel When the stove is positioned near combustible materials, observe all current local and national building regulations with regards to clearances. Whatever regulations apply to your area, do not in any case install the stove within 6 inches of combustible materials around the sides or 16 inches above the top of the stove. - Page 9 CLEARANCES IN ( ) IN MM FOR CANADA FOR NON-COMBUSTIBLE FLOOR PROTECTOR If using rear exit, the floor protection must extend beneath the chimney connector and 2-in beyond each side. Do NOT install in a mobile home Distance to furniture The recommended minimum distance from stove to furniture is 30 inches.
-
Page 10: Operation
2.0 Operation 2.1 Before you start firing For Use with Solid Wood Fuel Only. Do Not Overfire, If Heater or Chimney Connector Glows You Are Overfiring. Inspect and Clean Chimney Frequently. Under Certain Conditions of use creosote buildup may occur rapidly. Because of risk of smoke and flame spillage, operate only with door fully closed. -
Page 11: Lighting And Loading Intervals
The preheated primary air, which is controlled using the right lever, is injected into the flue gasses from above the glass. Secondary Air is delivered to the firebox using the specially designed baffle. The supply of secondary air is fixed open and is not adjustable. For extra safety, your stove has been fitted with a removable handle. -
Page 12: Maintenance
Do not for any reason attempt to increase the firing of your heater by altering the air control adjustment range outlined in these directions. Warning: Fireplace stoves must never be left unattended with doors open. If door are left partly open, gas and flame may be drawn out of the fireplace stove opening, creating risks from both fire and smoke. - Page 13 Reasons for dirty glass · Fuel too wet · Logs too large or not split · Combustion temperatures too low Replace broken glass immediately. Do not operate your stove if the glass in the door is damaged. If you need to replace the glass, it should be replaced with the high temperature ceramic class supplied by Morsø, contact your Morsø...
-
Page 14: Cleaning The Stove And The Flue
6. Finally, give each of the bolts an extra half turn or so. The glass should held tight enought that cleaning will not dislodge it. Do not over-tighten the bolts as this may put excessive pressure on the glass, resulting in cracking - important! To reduce the risk of breaking the glass, avoid striking the glass or slamming the door. - Page 15 A good routine is to clean the flue after each heating season in any case, and inspect prior to the season to ensure that bird’s nests or other blockages have not ocurred during the off season. Ash disposal Empty the ashpan on a daily basis or as needed. Ash allowed to build up towards the underside of the grate will trap heat and could cause premature failure of the grate.
-
Page 16: Leaving The Stove For Extended Periods
If you do experience a chimney fire, act promptly and: Close the air control. Get everyone out of the house. Call the Fire Department. Annual maintenance Before the heating season, perform a thorough cleaning, inspection and repair: Thoroughly clean the chimney and chimney connector. Inspect the chimney for damage and deterioration. -
Page 17: Parts Diagram
3.5 Parts diagram for the Morsø 4600 Series... -
Page 18: Parts List
3.6 Parts list for the Morsø 4600 Series Pos. No. Parts 4600 4600 standless steel Riddling grate 44182800 44182800 Attachment for cover 44256700 44256700 Cover 44261021 44261021 Handle for riddling grate 44262021 44262021 Flue collar 44344121 44344121 Front frame 44450221... - Page 19 Stone right 79095200 79095200 Stone left 79095300 79095300 Air slider washer 791891 791891 Ceramic glass 79463600 79463600 Cover botton 79168300 79168300 Washer 79189600 79189600 Distance tube 545003 545003 Screw 731645 731645 Screw 791835 791835 Box. tertiare air 71463000 71463000 Stone, rear 79095400 79095400 Insulation...
- Page 20 ☎ 72460050. November 1, 2002 morsø jernstøberi 96 69 19 00...
Need help?
Do you have a question about the 4600 Series and is the answer not in the manual?
Questions and answers