Advertisement
Quick Links
.
WARNING:
Improper installation, adjustment,
alteration, service or maintenance
could cause injury or property
damage.
Read the installation, operation and
maintenance instructions thoroughly
before assembling or servicing this
equipment. Failure to follow these
instructions could result in fire or
explosion that could cause property
damage, personal injury or death.
PROP 65 WARNING:
Chemicals known to the state of
California to cause cancer, birth
defects or other reproductive harm
are created by the combustion of
charcoal or charcoal-like briquettes.
!
WARNING
For Outdoor Use Only
(outside any enclosure)
DANGER:
DO NOT use charcoal grill for indoor
cooking or heating. TOXIC fumes can
accumulate and cause asphyxiation.
Do not use in or on boats or
recreational vehicles.
SAVE THESE INSTRUCTIONS FOR
FUTURE REFERENCE. IF YOU ARE
ASSEMBLING THIS UNIT FOR SOMEONE
ELSE, GIVE THIS MANUAL TO HIM OR HER
TO SAVE FOR FUTURE REFERENCE.
FOR CUSTOMER SERVICE, CALL
1-866-869-5300, 8 A.M. - 6 P.M. EST,
MONDAY - FRIDAY.
Customercare@Geoglobalpartners.com
ITEM#:170696
Charcoal Grill
Printed in China
Advertisement

Subscribe to Our Youtube Channel
Related Manuals for Perfect Flame 170696


Summary of Contents for Perfect Flame 170696
-
Page 1: Charcoal Grill
ITEM#:170696 Charcoal Grill WARNING: Improper installation, adjustment, alteration, service or maintenance could cause injury or property damage. Read the installation, operation and maintenance instructions thoroughly before assembling or servicing this equipment. Failure to follow these instructions could result in fire or explosion that could cause property damage, personal injury or death. - Page 2 WARNING Burning charcoal gives off carbon monoxide which has no odor; therefore, burning charcoal in an enclosed environment can cause death or serious injury. NEVER burn charcoal inside homes, vehicles, or tents.
-
Page 3: Table Of Contents
Table of Contents For Your Safety ........... . Illustrated Parts List. -
Page 4: For Your Safety
GGP00101 Owner’s Manual WARNING FOR YOUR SAFETY 1. DO NOT store or use gasoline or any other flammable vapors and liquids within 25 feet (8 m) of this or any other appliance. 2. When cooking with oil/grease, do not allow the oil/grease to exceed 350° F (177°C). Do not store or use extra cooking oil in the vicinity of this or any other appliance. - Page 5 WARNING 1. This grill is for outside use only, and should not be used in a building, garage or any other enclosed area. 2. The use of alcohol, prescription or non-prescription drugs may impair the operator's ability to properly assemble or safely operate the grill. 3.
-
Page 6: Illustrated Parts List
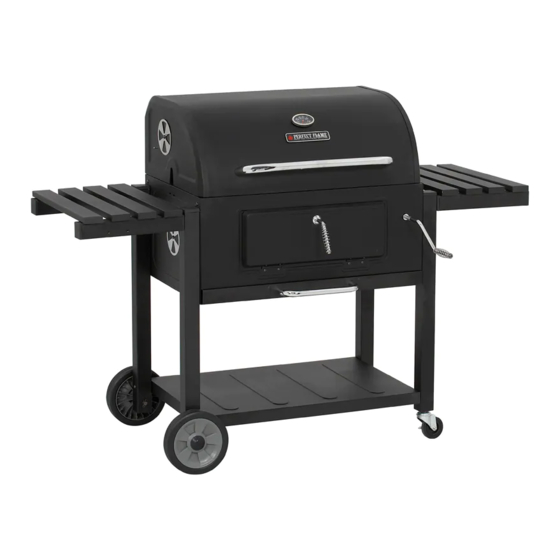
ILLUSTRATED PARTS LIST A. Side Panel………………...2 PCS B. Back Panel………………….1 PC C. Front Panel…………………….1 PC D. Charcoal Door Handle………..1 PC E. Left Leg (Front)………………..1 PC F. Left Leg (Rear)…………………1PC G. Right Leg (Front)……………1 PC H. Right Leg (Rear)………………1 PC I. Base Panel…………………...1 PC J. - Page 7 P. Charcoal Crank.……………..1 PC Q. Crank Axle…...……………1PC R. Damper……………………….4 PCS S. Charcoal Door Washer……..1 PC T. Charcoal Door Latch………1 PC U. Charcoal Tray……………..1 PC V. Hood………….…………...….1 PC W. Ash Pan……….……………1 PC X. Ash Pan Handle…………..1 PC Y. Hood Handle………………...1 PC Z.
- Page 8 EE. Hood Hinge…………….. 2 PCS FF. Hood Hinge Pin…………..2 PCS GG. Bottle opener………..1 PC HARDWARE PACK (parts not drawn to scale) 32 PCS 4 PCS M6 X 10 SCREW (BLACK) M6 X 30 SCREW (BLACK) 4 PCS 4 PCS M6 X 60 SCREW (BLACK) M6 X 40 SCREW (BLACK) 1 PC 2 PCS...
-
Page 9: Assembly Instructions
Assembly Instructions Note: Estimated assembly time is 35-45 minutes. Step 1 Assemble the DAMPER (R) to the SIDE PANEL (A) using Two M6 x 10 Screws (HH) and Two M6 Nuts (NN). Step 2 Attach the CHARCOAL DOOR HANDLE (D) to the FRONT PANEL(C) using the CHARCOAL DOOR LATCH (T) and the CHARCOAL DOOR WASHER (S). - Page 10 Step 3 Assemble both SIDE PANELS (A) to both the FRONT PANEL(C) and the BACK PANEL (B) using EIGHT M6 x 10 Screws (HH). Step 4 Carefully re-orient the Panel Assembly as depicted in the figure below. Using Eight M6 x 10 Screws (HH), attach the RIGHT LEGS [ FRONT (G) AND REAR (H) ] and the LEFT LEGS [ FRONT (E) AND REAR (F) ] to the SIDE PANEL (A) respectively.
- Page 11 Step 5 Using Four M6 x 60 Screws (KK), attach the BASE PANEL (I) to both the RIGHT LEGS [ FRONT (G) AND REAR (H)] and the LEFT LEGS [ FRONT (E) AND REAR (F) ]. Step 6 Attach the CASTER WHEELS (J) to the RIGHT LEGS [ FRONT (G) AND REAR (H) ], and using Two R-PIN SMALL (OO) attach the WHEEL ASSEMBLY(K) to the LEFT LEGS [ FRONT (E) AND REAR (F) ].
- Page 12 Step 7 Place the LIFT ROTATION BAR (N) in both the RIGHT SIDE LIFT (M) and the LEFT SIDE LIFT (L), and secure with Two R-PIN SMALL (OO).
- Page 13 Step 8 Place the THREADED COLLAR (O) in the allotted hole on the FRONT PANEL (C) and secure the Lift Assembly to the FRONT PANEL (C) and THREADED COLLAR (O) using Four M6 x 10 Screws (HH). DETAIL A DETAIL B DETAIL A DETAIL B...
- Page 14 Step 9 Screw the CHARCOAL CRANK HANDLE (P) into the THREADED COLLAR (O). Step 10 Insert the CRANK AXLE (Q) into the slot provided on the LIFT ROTATION BAR (N). Once in place, turn the CHARCOAL CRANK HANDLE (P) so that it is threaded into the CRANK AXLE (Q) and secure this fitting by installing the M6 x 16 Screw (LL) &...
- Page 15 Step 11 Attach the CHARCOAL TRAY (U) to the LEFT SIDE LIFT (L) and RIGHT SIDE LIFT (M) using Four M6 x 10 Screws (HH) and Four NUTS (NN) as shown, and tighten with adjustable wrench. Step 12 Attach the BACK PANEL HINGE (DD) to the BACK PANEL (B) using Four M6 x 30 (II) Screws.
- Page 16 Step 13 Attach the BOTTLE OPENER (GG) to the LEFT SIDE TABLE (AA) using three M6 x10 (TT) Screws. Step 14 Attach the RIGHT SIDE TABLE (Z) to the RIGHT LEGS FRONT (G) AND REAR (H) by first inserting the lower slot over the lower set screw, and then pivot the side table upwards to insert the top slot over the top set screw.
- Page 17 Step 15 Attach the HOOD HINGE (EE) to the HOOD (V) using Four M6 x 40 Screws (JJ) and Four Nuts (NN). Step 16 Using the M6 x 10 Screw (HH) and the NUT (NN), attach the DAMPERS (R) to both sides of the HOOD (V). Using the M6 x 10 Screw (HH) and the WASHER (MM), attach the HOOD HANDLE (Y) to the HOOD (V).
- Page 18 Step 17 Place the HOOD (V) on the Grill Assembly and insert the HOOD HINGE PIN (FF) through the HOOD HINGE (EE) and BACK PANEL HINGE (DD). Use R-PIN LARGE (PP) to secure. Step 18 Insert the WARMING RACK (CC) into the holes provided on the SIDE PANELS (A) and on the left and right sides of the HOOD (V).
- Page 19 Step 20 Attach the ASH PAN HANDLE (X) to the ASH PAN (W) using Two M6 x 10 Screws (HH). Step 21 Slide the Ash Pan Assembly into the Grill Assembly. Fully Assembled...
-
Page 20: Operating Your Grill
OPERATING YOUR GRILL Lighting Your Grill 1. Open the hood as well as the side vent plates. 2. Remove the cooking grates and raise the charcoal pan to its highest setting using the crank. 3. Pour about 4-5 pounds of charcoal briquettes or about 2-3 pounds of natural wood lump charcoal into the pan and make a pile. - Page 21 Seasoning the Grill Before the first time the grill is cooked on, you should season the unit to enhance the cooking and to provide better overall durability. Failure to properly follow these steps may damage the finish and/or add metallic flavors to your foods.
-
Page 22: Warranty Program
WARRANTY PROGRAM Proof of purchase is required to access this warranty program, which is in effect from date of purchase. Inability to provide proof of purchase, or after the warranty has expired, customers will be subject to parts, shipping and handling fees. Full 30-Day Warranty For 30 days from the date of purchase, any missing and damaged parts will be replaced at no charge, with a valid proof of purchase. -
Page 23: Replacement Parts List
REPLACEMENT PARTS LIST Description Part Number Hood G2U001-001S Hood Handle G2E020-045S Damper G2E020-016S Left Side Table G2U001-022S Right Side Table G2U001-018S Wheel Assembly G2U001-028S Ash Pan G2A001-006S Ash Pan Handle G2E020-046S Left Leg (Front) G2U001-024S Left Leg (Rear) G2U001-025S Right Let (Front) G2U001-026S Right Leg (Rear) G2U001-027S...
Need help?
Do you have a question about the 170696 and is the answer not in the manual?
Questions and answers