Table of Contents
Advertisement
Quick Links
Download this manual
See also:
Instruction Manual
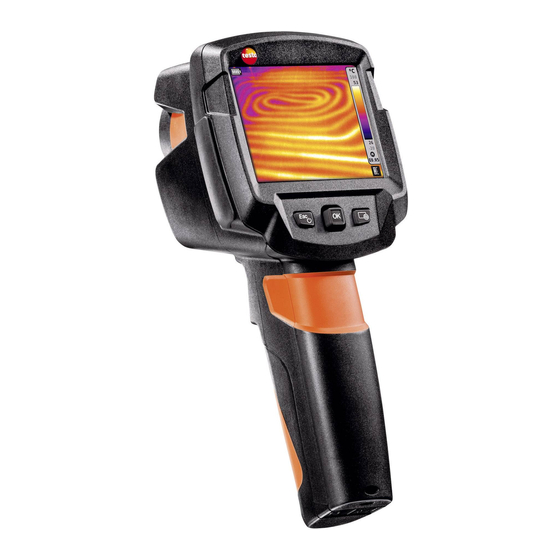
Element
Function
1
Display
Shows infrared and real images, menus and
functions
2
Interface terminal
Includes micro USB interface for power supply
and connection to a computer
- Switch camera on and off
-
3
button
- Cancel action
-
Esc
button
- Open menu, select function, confirm setting
-
4
OK
button
- Navigate in menu, select function, select
-
Joystick
colour palette
5
Quick select button
Opens the function assigned to the quick se-
lect button; the icon for the selected function
is shown at the bottom right of the display
6
Infrared camera lens;
Takes infrared images; protects the lens
protective cap
7
Digital camera (only
Takes real images
testo 870-2)
8
Trigger
Saves the displayed image
9
Battery compartment
Contains the battery
Switching the camera on/off
- Remove the protective cap from the lens (6).
1
- Switching on: press
2
(3).
- Switching off: press and hold down
(3).
To ensure measuring accuracy, the camera performs automatic
zeroing approx. every 60 s. You will hear a "click", and the images
freezes briefly.
Navigating the menu
- Press
1
OK
(4) to open the menu.
- Move the
2
Joystick
(4) up/down to select a function (an orange
box appears around it).
- Press
3
OK
(4) to select the function.
- Move the
(4) right to open the sub-menu (indicated with ►).
3.1
Joystick
Saving an image
- Press the
1
Trigger
(8).
The infrared image is saved automatically.
Only testo 870-2: irrespective of the selected image type, an infra-
red image is always saved with the attached real image.
If a higher resolution is required: In the menu under Configuration,
select the function
SuperResolution
(optional function).
@ More information can be found in the instruction manual.
Displaying and deleting images
- Select the
1
Image gallery
function. For how to do this, see Navi-
gating the menu.
- Displaying an image: move the
2
Joystick
(4) left/right/up/down to
select the image, then press
OK
(4).
- Press
3
(5) to delete the image.
Setting the emission level
testo 870-2: function only available if the
selected.
The emission level describes the capability of a body to emit ther-
mal radiation. For correct measurement results, the emission level
can be set according to the specific material.
- Select the
1
Emission level
iarising yourself with the menu.
- Move the
2
Joystick
then press
OK
(4).
RTC (Reflected Temperature Compensation) is a correction value
for thermal radiation through other objects. If objects with a much
higher/lower temperature are in the proximity of the object to be
measured, the irradiated temperature value must be entered. If this
is not the case, the ambient temperature can be entered.
@ More information can be found in the instruction manual and the
Pocket Guide.
Setting measurements
testo 870-2: function only available if the
selected.
- Open the
1
Measurement
gating the menu.
The sub-menu with the measurements opens:
•
Single point
measurement: the temperature measuring point
in the centre of the image is highlighted with white crosshairs
and the value is displayed. In the case of saved images, the
crosshairs can be moved using the joystick to read off the value
for other measuring points.
•
Coldspot, Hotspot: the lowest or highest temperature measur-
ing point is highlighted with blue or red crosshairs and the value
is displayed.
•
Measurement
range: the temperature range in which measur-
ing values are displayed (for information purposes).
- Move the
2
Joystick
then press
OK
(4).
1
Image type
infrared has been
function. For how to do this, see Famil-
(4) up/down to select the required material,
Image type
infrared has been
sub-menu. For how to do this, see Navi-
(4) up/down to select the required function,
2
Advertisement
Table of Contents

Related Manuals for TESTO 870


Summary of Contents for TESTO 870
- Page 1 Opens the function assigned to the quick se- gating the menu. lect button; the icon for the selected function Only testo 870-2: irrespective of the selected image type, an infra- is shown at the bottom right of the display red image is always saved with the attached real image.
- Page 2 Selecting the image type (infrared image, real image) (only testo 870-2) Assigning the quick select button - Select the Image type function. For how to do this, see Navi- - The quick select button (5) is a additional navigation option, gating the menu.
Need help?
Do you have a question about the 870 and is the answer not in the manual?
Questions and answers