TESTO 890 Instruction Manual And Users Manual
Thermal imager
Hide thumbs
Also See for 890:
- Instruction manual (74 pages) ,
- Quick start manual (2 pages) ,
- Brief instructions (8 pages)
Table of Contents
Advertisement
Quick Links
Download this manual
See also:
Instruction Manual
Advertisement
Table of Contents

Related Manuals for TESTO 890


Summary of Contents for TESTO 890
- Page 1 890 · Thermal imager Instruction manual GlobalTestSupply www. .com Quality Testo Products Online at: sales@GlobalTestSupply.com...
- Page 2 GlobalTestSupply www. .com Quality Testo Products Online at: sales@GlobalTestSupply.com...
-
Page 3: Table Of Contents
Inserting the memory card ................28 5.2.7. Fitting/removing IR protection glass ...............28 5.2.8. Changing the lens..................29 5.2.9. Switching the imager on/off................30 5.2.10. Manually focusing the image................30 5.2.11. Automatically focusing the image..............30 5.2.12. Recording (freezing/saving) an image............31 GlobalTestSupply www. .com Quality Testo Products Online at: sales@GlobalTestSupply.com... - Page 4 6.2.3. Image gallery ....................47 6.2.4. Wizards ......................50 6.2.5. Configuration ....................53 6.2.6. Audio (only testo 890-2)................. 61 6.3. Measuring ..................62 Maintaining the product ............... 64 Tips and assistance ................65 8.1. Questions and answers ..............65 8.2.
-
Page 5: Safety And The Environment
Symbols and writing standards Represen- Explanation tation Note: Basic or further information. 1..Action: more steps, the sequence must be followed. 2..> ... Action: a step or an optional step. GlobalTestSupply www. .com Quality Testo Products Online at: sales@GlobalTestSupply.com... -
Page 6: Ensure Safety
Only use in accordance with the directions in the instruction manual. • Do not short, take apart or modify. • Do not expose to heavy impacts, water, fire or temperatures above 60 °C. GlobalTestSupply www. .com Quality Testo Products Online at: sales@GlobalTestSupply.com... -
Page 7: Protecting The Environment
> At the end of its useful life, send the product to the separate collection for electric and electronic devices (observe local regulations) or return the product to Testo for disposal. GlobalTestSupply www. .com Quality Testo Products Online at: sales@GlobalTestSupply.com... -
Page 8: Specifications
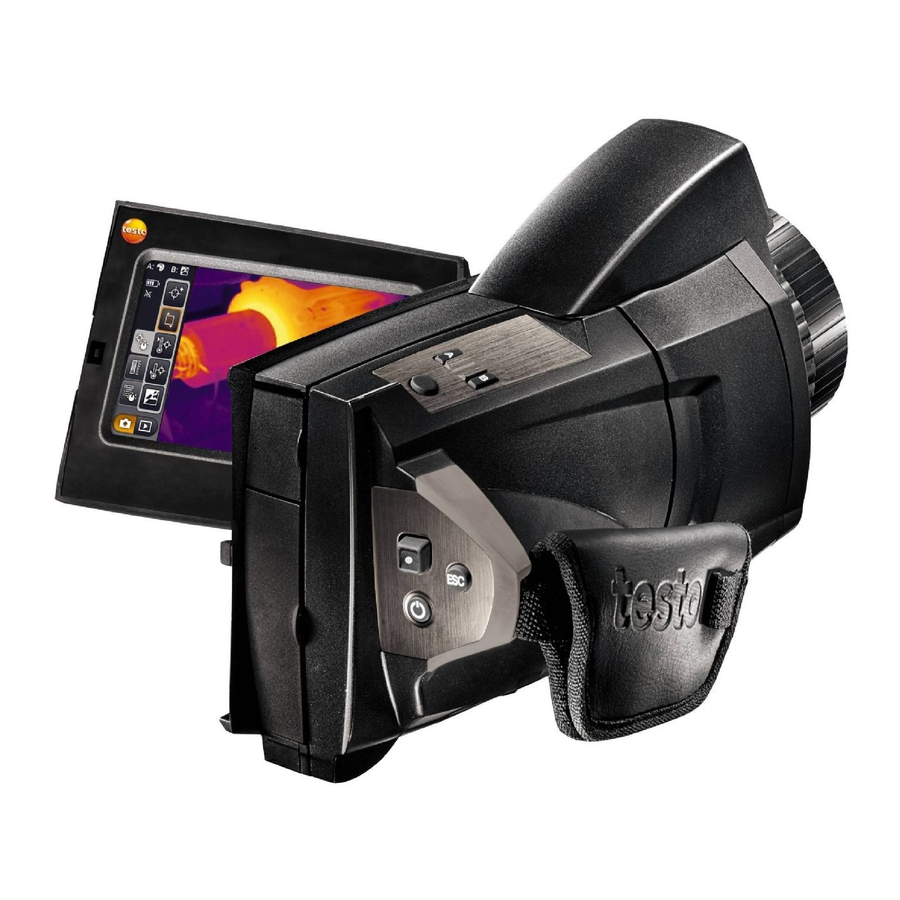
3 Specifications Specifications 3.1. The testo 890 is a handy and robust thermal imager. It enables you to carry out contactless determination and display of the temperature distribution on surfaces. Typical areas of application are: • Building inspection: energetic assessment of buildings, and inspection of heating, ventilation and air conditioning systems. -
Page 9: Technical Data
0.5 m (1.64 ft.) distance Image presentation Feature Values LCD touchscreen, 10.9 cm (4.3") screen Image display diagonal, 480 x 272 pixels Digital zoom 1-3x Display options IR image/real image Video output USB 2.0 GlobalTestSupply www. .com Quality Testo Products Online at: sales@GlobalTestSupply.com... - Page 10 Values Temperature ranges -20 to 100°C (-4 to 212°F) (can be changed) 0 to 350°C (32 to 662°F) Only testo 890-2, optional: 350 to 1200°C (662 to 2192°F) Accuracy ±2°C (±3.6°F) or ±2% of meas. val. (higher value applies) Reproducibility ±1°C (±1.8°F) or ±1% (higher value applies)
- Page 11 Values File format .bmt, possible export to .bmp, .jpg, .png, .csv, .xls Video file format (via .wmv, .mpeg-1 / only testo 890-2: Testo USB) format (full radiometric video) Storage device SD card 2 GB (800 to 1000 images) Power supply...
- Page 12 Changes and modifications to the instrument that have not been expressly approved by testo AG may nullify the user's right to use the instrument. GlobalTestSupply www. .com Quality Testo Products Online at: sales@GlobalTestSupply.com...
- Page 13 Guidelines, warranty Feature Values EU Directive 2004/108/EC Warranty 2 years, warranty conditions: see www.testo.com/warranty GlobalTestSupply www. .com Quality Testo Products Online at: sales@GlobalTestSupply.com...
-
Page 14: Product Description
Do not use desktop tripods: danger of tipping over! 5 Laser (not available in all countries) for marking the measurement object. CAUTION Laser radiation! Class 2 laser > Do not look into the beam. GlobalTestSupply www. .com Quality Testo Products Online at: sales@GlobalTestSupply.com... - Page 15 Off (no battery inserted). • Flashing (mains unit is connected and battery is charging). • On (mains unit is connected and battery is fully charged). Bottom USB port, memory card slot. GlobalTestSupply www. .com Quality Testo Products Online at: sales@GlobalTestSupply.com...
-
Page 16: Display Interface
(with manual scale adjustment). Right: temperature margin of the image displayed, based on the set measurement range, showing the measurement range limits. Automatic or manual scale adjustment activated. Histogram adjustment activated. GlobalTestSupply www. .com Quality Testo Products Online at: sales@GlobalTestSupply.com... - Page 17 4 Menu bar: the menu bar comprises 3 tabs including buttons for selecting functions: Further information is available under Menu bar/tabs, page 32. GlobalTestSupply www. .com Quality Testo Products Online at: sales@GlobalTestSupply.com...
- Page 18 When viewing a saved image in the single image view of the image gallery, the function buttons are permanently assigned the following functions: : display previous image. : display next image. GlobalTestSupply www. .com Quality Testo Products Online at: sales@GlobalTestSupply.com...
-
Page 19: Operating Concept
: Battery operation, capacity 10-25% : Battery operation, capacity 0-10%. (animated): battery is charging. Auto-focus activated or deactivated. Only testo 890-2: radio link to radio probe established. Only testo 890-2: Bluetooth interface activated. Only testo 890-2: headset connected. USB connection established. -
Page 20: Basic Properties
The images are saved according to the following pattern: XXyyyyyy.zzz for all single images (standard), for a package including several single images (recorded with the image stitching wizard). yyyyyy: 6-digit sequential number. zzz: for all images (Testo-specific file extension). GlobalTestSupply www. .com Quality Testo Products Online at: sales@GlobalTestSupply.com... -
Page 21: First Steps
The start screen appears on the display. When you first switch on the imager: the Country settings Set time/date dialogue boxes are opened one after the other to set the instrument language, temperature unit (°C/°F) and time/date. GlobalTestSupply www. .com Quality Testo Products Online at: sales@GlobalTestSupply.com... - Page 22 1. Move [●] up/down to select the required language. An orange box appears around the selected language. 2. Press [●] to activate the selection. The activated language is indicated with a tick. GlobalTestSupply www. .com Quality Testo Products Online at: sales@GlobalTestSupply.com...
- Page 23 16. Move [●] left to select 17. Press [●] to activate the selection and close the input screen. > Hold down to close the imager. GlobalTestSupply www. .com Quality Testo Products Online at: sales@GlobalTestSupply.com...
-
Page 24: Initial Charging Of The Rechargeable Battery
4. Fully charge the battery, then disconnect the instrument from the mains unit. After initial charging of the battery, the imager is ready for use. A desktop charging station (accessory: 0554 8851) can also be used to charge the battery. GlobalTestSupply www. .com Quality Testo Products Online at: sales@GlobalTestSupply.com... -
Page 25: Getting To Know The Product
3. Put your right hand through the hand strap from the right-hand side. 4. Adjust the hand strap by loosening/tightening it to fit your hand and secure the fastening end again. 5. Fold down the top of the hand strap padding. GlobalTestSupply www. .com Quality Testo Products Online at: sales@GlobalTestSupply.com... -
Page 26: Attaching The Lens Cover To The Hand Strap
> Guide the clip on the lens cover (1) through the loop on the handle (2). 5.2.3. Rotating the handle The handle can be rotated up to 180° in 10 positions. 1. Put your right hand through the hand strap. GlobalTestSupply www. .com Quality Testo Products Online at: sales@GlobalTestSupply.com... -
Page 27: Attaching A Shoulder Strap
To protect against damage to lenses not being used, the transparent plastic cap must always be attached to the back of the lens. Make sure that the case zip is properly zipped up. GlobalTestSupply www. .com Quality Testo Products Online at: sales@GlobalTestSupply.com... -
Page 28: Inserting The Memory Card
> Turn the protection glass anti-clockwise and remove it. After fitting or removing the protection glass, activate or deactivate Protection glass option, see Optics, page 57. If this option is set incorrectly, the specified measuring accuracy is not guaranteed. GlobalTestSupply www. .com Quality Testo Products Online at: sales@GlobalTestSupply.com... -
Page 29: Changing The Lens
2. Line up the marks on the lens and the instrument (4) and place the lens in the lens mount. 3. Push the lens into the mount as far as it will go and turn it clockwise until it clicks into place. GlobalTestSupply www. .com Quality Testo Products Online at: sales@GlobalTestSupply.com... -
Page 30: Switching The Imager On/Off
> Activate auto-focus: is displayed. > Touch [Shutter button]. The image is automatically focussed. The area to be focussed must be inside the orange box, which is shown by touching the shutter button. GlobalTestSupply www. .com Quality Testo Products Online at: sales@GlobalTestSupply.com... -
Page 31: Recording (Freezing/Saving) An Image
2. Save image: press [Shutter button] again or touch The IR image is saved and the real image is automatically attached to the IR image. > Do not save image: press [Esc]. GlobalTestSupply www. .com Quality Testo Products Online at: sales@GlobalTestSupply.com... -
Page 32: Using The Product
See also Pixel mark | Hotspot, page 36. Coldspot Display minimum measurement value. See also Pixel mark | Coldspot, page 37. Image type Change display: toggle between IR image and real image. GlobalTestSupply www. .com Quality Testo Products Online at: sales@GlobalTestSupply.com... -
Page 33: Scale And Correction Functions Tab
See also Isotherm, page Only testo 890-2: Humidity Open Humidity input screen. To set the parameters and activate/deactivate the function See also Humidity (only testo 890-2) , page 40. Emissivity Open Emissivity input screen. To set the parameters. See also Emissivity, page 42. -
Page 34: Main Menu Tab
See above. Menu Save Save frozen image. Folder Open Folder input screen. To select where to save images. Only testo 890-2 when connected to Audio a headset: open Audio input screen, see see Audio (only testo 890-2), page 61. GlobalTestSupply www. - Page 35 : zoom in, see above. : zoom out, see above. : display buttons for moving the zoomed image. To move, touch the buttons shown in the image. : close sub-level zoom. GlobalTestSupply www. .com Quality Testo Products Online at: sales@GlobalTestSupply.com...
-
Page 36: Menu Functions
Measurement range. Measurement range Pixel mark | Hotspot Hotspot mark (crosshairs with maximum measurement value displayed) can be shown. Task Actions/description Show/hide hotspot mark. > > Measurement Pixel mark | Hotspot. GlobalTestSupply www. .com Quality Testo Products Online at: sales@GlobalTestSupply.com... - Page 37 > Double-touch the crosshairs and Hide crosshairs. touch Hide in the context menu. Joystick operation: 1. Select crosshairs and press joystick twice. 2. In the context menu, activate Hide. GlobalTestSupply www. .com Quality Testo Products Online at: sales@GlobalTestSupply.com...
- Page 38 (alarm colour). To set the alarm colours, see Colour selection, page 47. Task Actions/description Open Alarm input screen. > > Measurement | Alarm. GlobalTestSupply www. .com Quality Testo Products Online at: sales@GlobalTestSupply.com...
- Page 39 > Measurement Isotherm. Activate/deactivate > Active. isotherm display. > To deactivate, touch the button again. Set lower and upper > isotherm limit. Link setting for > upper/lower limits. Apply entries. > GlobalTestSupply www. .com Quality Testo Products Online at: sales@GlobalTestSupply.com...
- Page 40 (Ambient temp.) and ambient humidity (Humidity): Set up radio link to the > optional radio humidity probe. Further information is available under Radio (only testo 890-2), page 56. Apply entries. > GlobalTestSupply www. .com Quality Testo Products Online at: sales@GlobalTestSupply.com...
- Page 41 If the imager is connected to an optional radio humidity probe (only testo 890-2), the ambient temperature and humidity are transferred automatically. For connection to a radio humidity probe, Further information is available under Radio (only testo 890-2), page 56.. Task Actions/description...
- Page 42 (accessory, 0554 0051), which must be applied to the object to be measured. The following table gives typical emissivities of important materials. These values can be used as a guide for user-defined settings. GlobalTestSupply www. .com Quality Testo Products Online at: sales@GlobalTestSupply.com...
- Page 43 0.97 Porcelain (20°C) 0.92 Black paint, matt (80°C) 0.97 Steel, heat-treated surface (200°C) 0.52 Steel, oxidized (200°C) 0.79 Clay, burnt (70°C) 0.91 Transformer paint (70°C) 0.94 Brick, mortar, plaster (20°C) 0.93 GlobalTestSupply www. .com Quality Testo Products Online at: sales@GlobalTestSupply.com...
- Page 44 > Highlight the material to be used by Select material. touching on it. Manually set the > emissivity (only when User defined is selected) and reflected temperature (RTC). Apply entries. > GlobalTestSupply www. .com Quality Testo Products Online at: sales@GlobalTestSupply.com...
- Page 45 > Measurement Scale manual. Activate/deactivate > Active. manual scale adjustment. > To deactivate, touch the button again. Set scale limits. > Link setting for > upper/lower limits. Apply entries. > GlobalTestSupply www. .com Quality Testo Products Online at: sales@GlobalTestSupply.com...
-
Page 46: Display Options
It is therefore difficult to draw conclusions about temperatures from colours. Task Actions/description Activate/deactivate > Display options Histogram adjustment. Histogram adjustment. GlobalTestSupply www. .com Quality Testo Products Online at: sales@GlobalTestSupply.com... -
Page 47: Image Gallery
The saved image can be viewed and analysed in the image gallery. Folders can be created for saving new images to. Only testo 890-2: it is possible to listen to and also subsequently record or edit a voice commentary. Images with a voice... - Page 48 The single image view must be opened: see above. Task Actions/description Open main menu to > activate functions. > or [B]. Display next or previous image. Back to overview page: > Image gallery. > [Esc]. Close image gallery: GlobalTestSupply www. .com Quality Testo Products Online at: sales@GlobalTestSupply.com...
- Page 49 > > Confirm deletion: Record/edit voice > commentary (only testo 890-2). Further Information: See Audio (only testo 890-2), page 61.. Open sub-level zoom with > : menu, see above. additional functions. > : to zoom in on the image (digital zoom, 5 increments).
-
Page 50: Wizards
When recording single images, please note: > Rotate the imager with your wrist. Do not move it horizontally. Ideally, use a tripod. Task Actions/description Call up function. > Wizards Image stitching. GlobalTestSupply www. .com Quality Testo Products Online at: sales@GlobalTestSupply.com... - Page 51 When carrying out alignment to determine where the next single image must be joined, the single image overview helps, see below. To record the single images in another order, see single image overview (below). GlobalTestSupply www. .com Quality Testo Products Online at: sales@GlobalTestSupply.com...
- Page 52 > Close single image overview: Save panoramic image. > Select where to save > image. Folder input screen is opened. Close image stitching wizard. 2. Acknowledge confirmation prompt. GlobalTestSupply www. .com Quality Testo Products Online at: sales@GlobalTestSupply.com...
-
Page 53: Configuration
6 Using the product Site recognition (only testo 890-2) With the PC software, markers can be set to clearly indicate a measuring site. By setting a marker with the built-in digital imager, the images, which are then saved, are automatically allocated to the relevant site (allocation is saved with this image). - Page 54 IRSoft PC software. Please observe the installation requirements and steps on the website or in the email sent to you. GlobalTestSupply www. .com Quality Testo Products Online at: sales@GlobalTestSupply.com...
- Page 55 (SR) is displayed additionally behind Save Image? box. Bluetooth (only testo 890-2) This function is not available in all countries. Via the Bluetooth radio interface, a link to a Bluetooth headset can be established for voice recording. Task...
- Page 56 6 Using the product Radio (only testo 890-2) This function is not available in all countries. A radio humidity probe can be logged onto the instrument. Every radio probe has a probe identification number (RFID). This is made up of the three-digit RFID number on the probe and the position of the switch in the battery compartment of the radio probe or L).
- Page 57 Ensure the correct setting to prevent corruption of the measurement results. Task Actions/description Open Optics input > Configuration screen. Optics. GlobalTestSupply www. .com Quality Testo Products Online at: sales@GlobalTestSupply.com...
- Page 58 Set the brightness of the > (low) or (medium) backlight: (high). Activate/deactivate Active. automatic switch-off function LCD off Imager off and set the switch-off time. > To deactivate, touch the button again. Apply entries. > GlobalTestSupply www. .com Quality Testo Products Online at: sales@GlobalTestSupply.com...
- Page 59 > Back up all saved images before performing a reset to prevent possible overwriting. Task Actions/description Execute function. Configuration Reset counter. 2. Confirm reset: GlobalTestSupply www. .com Quality Testo Products Online at: sales@GlobalTestSupply.com...
- Page 60 Factory settings The instrument settings can be reset to the factory settings. Please note: time/date, country settings and counter are not reset. Task Actions/description Execute function. Configuration Factory settings. 2. Confirm reset: GlobalTestSupply www. .com Quality Testo Products Online at: sales@GlobalTestSupply.com...
-
Page 61: Audio (Only Testo 890-2)
6 Using the product 6.2.6. Audio (only testo 890-2) This function is only available with the view of a frozen or saved image. For these images, voice commentary can be recorded and edited. Next to the bar display (top), two times are displayed (format mm:ss): •... -
Page 62: Measuring
Images that are not in focus cannot be corrected retroactively! To obtain precise measurement values, the emissivity and reflected temperature must be set correctly, see Emissivity, page 42. Subsequent adjustment is possible via the PC software, if required. GlobalTestSupply www. .com Quality Testo Products Online at: sales@GlobalTestSupply.com... - Page 63 (see Scale manual, page 45), or must be subsequently adjusted to uniform values using the PC software. GlobalTestSupply www. .com Quality Testo Products Online at: sales@GlobalTestSupply.com...
-
Page 64: Maintaining The Product
> Large dust particles can be removed with a clean optical cleaning brush (available in specialized photography shops). > Use a lens cleaning cloth for slight contamination. Do not use rubbing alcohol! GlobalTestSupply www. .com Quality Testo Products Online at: sales@GlobalTestSupply.com... -
Page 65: Tips And Assistance
> Check parameter settings for plausibility. If we were unable to answer your question, please contact your local dealer or Testo´s Customer Service. Refer to the back of this document or website www.testo.com/service-contact for contact details GlobalTestSupply www. -
Page 66: Accessories And Spare Parts
Recommendation: Avery Zweckform L4776 For further accessories and spare parts, please refer to the product catalogues and brochures or look up under www.testo.com GlobalTestSupply www. .com Quality Testo Products Online at: sales@GlobalTestSupply.com... - Page 67 GlobalTestSupply www. .com Quality Testo Products Online at: sales@GlobalTestSupply.com...
- Page 68 GlobalTestSupply www. .com Quality Testo Products Online at: sales@GlobalTestSupply.com 0970 8900 en 01 V01.00 en-GB...
Need help?
Do you have a question about the 890 and is the answer not in the manual?
Questions and answers